Pages

Friday, December 18, 2015

It's the MOST Wonderful Time!

Hi all! Are you in count-down to Christmas mode yet? I kind of am. I have blocked off the next few days for baking and have presents almost wrapped and ready. Yipppeeee! I hope you feel the joy in your neck of the woods! 

To get ready for the big day, I did have to make a few gift card holders and so, I decided to turn to one holder that I first created more than a decade ago. It's an idea that's been around the block more than a few times. But, because it is so easy to create, it is a stand by for me! 

So, here's what I am making today thanks to a kraft envelope, Power Poppy's Poinsettia stamp set, some ribbon, some gold embossing powder and my Copic markers.....

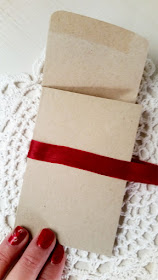
And, here's how to create this easy, peasy, lemon squeezy giftcard holder! First you start by folding an A2 sized envelope in half. Then, along the fold on the envelope's flap, cut down the middle. This is the foundation for your holder.


From here, I added a panel with a sentiment on one side to hide the sealed half flap. On the other side I stamped the poinsettia image in Love Note Memento Ink and blended the ink by running a blender pen over the stamped lines. I rounded the corner of the left side of the flap and as you can see, this half of your envelope creates the perfect pocket for your gift card!


 To seal it all up, I used a line of glue runner and attached some hug snug seam binding ribbon to the front. Once my front panel is on, I will use this ribbon and tie it in a bow to present to the giftcard's recipient.

I stamped the poinsettia image using Espresso Truffle Memento ink and then reached for these Copic markers. R30, R32, R35, R39, R24, R27, G20, G40, G48, Y21, Y26, Y28, and then E40 and E42 to accent around my image. You can see, I also added some white paint pen accents as well. The sentiment was heat embossed with gold detail powder. Ta da!!!!


And that, my friends is it! I could enter this one into the Power Poppy Power & Spark Rewind challenge for creating a gift from the heart! Not sure what I mean? Well click on over HERE and see all the official details!

And, while you're hopping, be sure to check in with my beloved Bloomie sistahs and see what they whipped up... just for you!

Allison Cope
Christine Okken
Cindy Lawrence
Julie Koerber >>> you are here!
Kathy Jones
Katie Sims
Leslie Miller
Stacy Morgan
Tosha Leyendekker


Hope you have a wonderful end to your week! Enjoy this season and all it has to offer! I will see you back here soon!

~Julie


Pin It

Friday, December 4, 2015

Peachy Keen!

Helllllloooooo Stamping Friends! It's the first Friday of the month and.... what does that mean? It means Power Poppy has another way for you to add a little design power and creative spark to your card making and paper crafting projects! It is time for another...... 


HOW TO PLAY: Call this challenge Power & Spark Rewind! Why? Because all you need to do is look at this list below and pick one of your favorite challenges of 2015, rewind, and give it another go! Just that simple! To make it easy for you, here's a listing of our 2015 challenges! Click on the links if you want a sample idea or more info!

 2015 CHALLENGES


Want a peek at the THE OFFICIAL RULES? Just click on over to THIS challenge post!

On to my creation! I decided to rewind back not too terribly long ago and partake in the challenge I ushered in for October -- the Bits & Pieces challenge! I had this image below all cut out but not colored and thought -- why not now?


After printing the digital stamp Ranunculus, I used the Spellbinders Labels Eight to cut it out and -- just like the challenge -- cut out only a portion of it! From there, I colored it up using Copic Markers and I used YR00, YR01, YR04, YR07 and YR09, G20, G40, G43, shading with BG0000. Afterward, I decided that my image needed a little "something." So, I cued up Kathy Racoosin's tutorial HERE on adding dimension and used one of my Tim Holtz stencils and a Copic Marker YR00 to add a little bit of dimension behind my image. I had never done that before and so, this was a fun little experiment! :-)

The rest is just matting it all up! I used my Swiss Dots embossing folder on a piece of white card stock and then cut out the piece using one of my new double stitched rectangle dies for a little extra bit of pop. I also took a craft knife and cut along one side of my floral so that I could create a slit and stick the sentiment flag through it. Easy peasy, lemon squeezy!

Here's a close up for you! As you can see, I did add a little splash of sequins!


And that, my friends, is it! A peachy keen creation that's ready to send off to a friend! Speaking of friends, the Bloom Brigade is on stand by to share some of their recent creations. As always, hop by, say hi, and get a little creative inspiration while you're there!


Allison Cope
Christine Okken
Julie Koerber >>> you are here!
Kathy Jones
Katie Sims
Leslie Miller
Stacy Morgan


Thanks for spending a bit of your day with me! I'll see you back here real soon! 


~Julie


Pin It