Pages

Friday, December 18, 2015

It's the MOST Wonderful Time!

Hi all! Are you in count-down to Christmas mode yet? I kind of am. I have blocked off the next few days for baking and have presents almost wrapped and ready. Yipppeeee! I hope you feel the joy in your neck of the woods! 

To get ready for the big day, I did have to make a few gift card holders and so, I decided to turn to one holder that I first created more than a decade ago. It's an idea that's been around the block more than a few times. But, because it is so easy to create, it is a stand by for me! 

So, here's what I am making today thanks to a kraft envelope, Power Poppy's Poinsettia stamp set, some ribbon, some gold embossing powder and my Copic markers.....

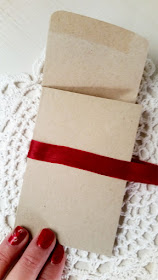
And, here's how to create this easy, peasy, lemon squeezy giftcard holder! First you start by folding an A2 sized envelope in half. Then, along the fold on the envelope's flap, cut down the middle. This is the foundation for your holder.


From here, I added a panel with a sentiment on one side to hide the sealed half flap. On the other side I stamped the poinsettia image in Love Note Memento Ink and blended the ink by running a blender pen over the stamped lines. I rounded the corner of the left side of the flap and as you can see, this half of your envelope creates the perfect pocket for your gift card!


 To seal it all up, I used a line of glue runner and attached some hug snug seam binding ribbon to the front. Once my front panel is on, I will use this ribbon and tie it in a bow to present to the giftcard's recipient.

I stamped the poinsettia image using Espresso Truffle Memento ink and then reached for these Copic markers. R30, R32, R35, R39, R24, R27, G20, G40, G48, Y21, Y26, Y28, and then E40 and E42 to accent around my image. You can see, I also added some white paint pen accents as well. The sentiment was heat embossed with gold detail powder. Ta da!!!!


And that, my friends is it! I could enter this one into the Power Poppy Power & Spark Rewind challenge for creating a gift from the heart! Not sure what I mean? Well click on over HERE and see all the official details!

And, while you're hopping, be sure to check in with my beloved Bloomie sistahs and see what they whipped up... just for you!

Allison Cope
Christine Okken
Cindy Lawrence
Julie Koerber >>> you are here!
Kathy Jones
Katie Sims
Leslie Miller
Stacy Morgan
Tosha Leyendekker


Hope you have a wonderful end to your week! Enjoy this season and all it has to offer! I will see you back here soon!

~Julie


Pin It

Friday, December 4, 2015

Peachy Keen!

Helllllloooooo Stamping Friends! It's the first Friday of the month and.... what does that mean? It means Power Poppy has another way for you to add a little design power and creative spark to your card making and paper crafting projects! It is time for another...... 


HOW TO PLAY: Call this challenge Power & Spark Rewind! Why? Because all you need to do is look at this list below and pick one of your favorite challenges of 2015, rewind, and give it another go! Just that simple! To make it easy for you, here's a listing of our 2015 challenges! Click on the links if you want a sample idea or more info!

 2015 CHALLENGES


Want a peek at the THE OFFICIAL RULES? Just click on over to THIS challenge post!

On to my creation! I decided to rewind back not too terribly long ago and partake in the challenge I ushered in for October -- the Bits & Pieces challenge! I had this image below all cut out but not colored and thought -- why not now?


After printing the digital stamp Ranunculus, I used the Spellbinders Labels Eight to cut it out and -- just like the challenge -- cut out only a portion of it! From there, I colored it up using Copic Markers and I used YR00, YR01, YR04, YR07 and YR09, G20, G40, G43, shading with BG0000. Afterward, I decided that my image needed a little "something." So, I cued up Kathy Racoosin's tutorial HERE on adding dimension and used one of my Tim Holtz stencils and a Copic Marker YR00 to add a little bit of dimension behind my image. I had never done that before and so, this was a fun little experiment! :-)

The rest is just matting it all up! I used my Swiss Dots embossing folder on a piece of white card stock and then cut out the piece using one of my new double stitched rectangle dies for a little extra bit of pop. I also took a craft knife and cut along one side of my floral so that I could create a slit and stick the sentiment flag through it. Easy peasy, lemon squeezy!

Here's a close up for you! As you can see, I did add a little splash of sequins!


And that, my friends, is it! A peachy keen creation that's ready to send off to a friend! Speaking of friends, the Bloom Brigade is on stand by to share some of their recent creations. As always, hop by, say hi, and get a little creative inspiration while you're there!


Allison Cope
Christine Okken
Julie Koerber >>> you are here!
Kathy Jones
Katie Sims
Leslie Miller
Stacy Morgan


Thanks for spending a bit of your day with me! I'll see you back here real soon! 


~Julie


Pin It

Friday, November 27, 2015

Black Friday at Power Poppy!

Hello all! For those of you in the good ole U.S of A., I hope you had a blessed and special (and tasty) Thanksgiving Day! We had a quiet day with just our kids and my mom. The turkey was just right and the company was even better! 
As we kick off the holiday season, Power Poppy wants to help you ring in the CHEER! And that's why Marcella is hosting not a one day, not a two day but a three day extravaganza with 20% off all clear and digital stamps plus a super special on a darling little scarf-bedecked snow dude! 

This little guy with a sweet little bird on his twiggy arm is ready for a long winter's day.  He's ready to... "just chill!" In addition to this fun snowman, you also get the sentiment "Let's Chill" plus a fun little snowflake background too! You can find it all HERE!  So, get on over to Power Poppy to get this three piece digital stamp sets for just a BUCK! Now through Monday, it is just $1!!!

Now to create, I just simply printed the snowman and sentiment on white card stock and then changed the color of the snowflakes so that they would be a fun blue backdrop to my card. After I printed and trimmed down the white snowflake panel, I spritzed on some light blue ink that was dilluted in a mister. Oh, yes, before I forget!! If you need any help changing colors or need help with digital stamps in general, I did a tutorial back when Power Poppy launched its digital line and you can find that tutorial HERE! 

After I was done printing the snow guy, I added just a bit of color with BG0000, BG000,, BG11, BG13, R35, R32, C00, C01, and C03. Add a little sparkle with glitter glue and mat it all up with a button and a bow and... ta da!!! Fini!

Here's a close up!


Thanks for stopping by today! Be sure to stop by the Power Poppy blog HERE for all the details on this weekend's sale and also to see what some of the other Bloomies did this week creatively!
See you back here soon!
~Julie


Pin It

Friday, November 20, 2015

And ..... A Partridge In A Pear Tree!!!!

Hello all and happy Friday! I am going to be super short and sweet today -- our house got a bit of a bug all of a sudden and we have a very sad case of the sickies. We're a sorry lot!

I did want to share however a brand new creation using one of Power Poppy's brand new digital stamps, Partridge In A Pear Tree! It's a beauty, see?


And, here's my creation! 


And here's a close up, so you can see this darling birdie!


I knew I wanted a simple design since I printed this beauty a little larger than how it comes. I colored it all up with Copic markers and I hate to laugh about this but I kind of  "made up" the colors of this partridge! I googled and man, these birds come in all kinds of shades! Just click on the link and you'll see what I mean.

After coloring, I found some green polka dot decorative paper, some Hug Snug ribbon in white and a fun little gem and I felt that this was really all I needed for this one. The sentiment is from the stamp set called Spice It Up.  I thought something small on a tag might be a perfect little addition!

And that, my friends, is it! A few of my fellow Bloomies whipped up some creativity this week as well! Hop on over to their "places" to take a gander! And, while you're at it -- tell the ever-so-talented Tosha Leyendekker -- HAPPY BIRTHDAY! I am blessed to share this special day with her! Never met anyone before she came along that was born on the same day! ;-)

Christine Okken
Cindy Lawrence
Julie Koerber
Leslie Miller
Tosha Leyendekker

Thanks for stopping by!

~Julie


Pin It

Friday, November 13, 2015

Looking a Bit Like Christmas!

Hello folks! Hope your week is ending on a high note! I don't know about you but my Christmas card stack is, well, a little on the low side. After taking a peek, I decided that I have some creating to do! And so, when I got a little bit of time this week to escape into my stamp room, I chose one of my favorite new stamps from Power Poppy!


I just love all of the elements in the set Cozy Cupfuls! I had colored up the pair of adorable birds and then, who could resist the stack of packages with whimsical charm? So, this image had to be next on my list! I stamped my image with Tuxedo Black Memento Ink and then... grabbed my Copic markers! I used a mix of greens G40, G43, G46, YG03, YG06, YG13, R24, R27, R29, R01, BG0000, Y26, Y28, Y11, and E40. 

From there, I matted it up, added a splash of sequins and bit of doily and some ribbon. I stamped the sentiment from the set Wreaths Plain and Fancy  and I punched it out with a 1-1/4" circle and then matted it up on a 1-3/8" circle punched piece of glitter paper. 

I had the half doily on my desk that was leftover from last week's post HERE. So, I thought, why not flip it and make it the top of my creation instead of the bottom? And, so that's what I did! Afterwards I used by double stitched rectangle die and matted it all up with a snippet of seam binding ribbon. I really love the crisp look of the colors on this one!

Here's a close up.....


And that, my friends, is it! One more Christmas card to add to the short stack! And, I was excited that I could also incorporate a few embellishments to play along in Kathy Jones Power & Spark Challenge this month. Have you heard about it?


All you need to do is pick an embellishment, or two, or three, and use them to deck out your creation! Just that simple! You can read all about the challenge HERE!

I know some of my fellow Bloomies have been busy this week in their stamp rooms. Why not stop by, say "hi" and see what they've bee up to?

Christine Okken
Cindy Lawrence
Julie Koerber >>> you are here!
Katie Sims
Leslie Miller

Thanks so much for spending a bit of your day here! Hope you come back again real soon! ;-)

~Julie

Pin It

Friday, November 6, 2015

Embellish It!

Hello all and happy Friday! With a a brand new month comes a brand new way to design with a creative spark! And, that's why today, I'm helping my fellow Bloomies to unveil the next Power Poppy Power and Spark Challenge! So, without further ado.......


This month's challenge is hosted by our Blossoming Aussie Kathy Jones! She dares all of us to dig deep into that embellishment drawer to see just what fun we can pull out and use on a card or creation!

HOW TO PLAY: In the words of Kathy Jones, think "Buttons, Pearls, Rhinestones, Sequins, Ribbon, Brads, Eyelets, Flowers, Micro Beads... use them simply or in interesting ways! Don't have any? Make your own! Wrong colour? Use your markers to colour them up to match your project. Most importantly, have fun and play along!"

For all of THE OFFICIAL RULES all you need to do is click on over to THIS challenge link! The winner will be announced the first Friday in December and gets their pick of a digital or clear stamp set! 

I decided to get in on the action today. So, on to my creation!


I have to say that this image was one that I colored months ago and then never put into a card. I used Copic markers after printing off the digital stamp from the set Geraniums! I used these  markers to color this beauty up! R81, R83, R85, G40, G43, G46, G20, YG63, E84, and BG0000. After I was done coloring, I did add some white paint pen to the centers of my flowers!

From there -- time to EMBELLISH! I added not only a half doily but a fun baby blue button as well! Dress it all up with some decorative papers from my scrap bin and this card is good to go!

Here's a close up! 


Now........ drum roll please! It's time to let our Bloom Brigade take center stage! It's always too fun to see what they've created during the week! So, be sure to hop on over and say "hey!" to get that dose of weekend inspiration! 


Thanks so much for checking in this Friday and paying me a little visit! I hope you have a wonderfully creative weekend ahead! 

~Julie


Pin It

Friday, October 30, 2015

Quick and Easy Christmas!

Hello all and happy Friday! Well, I don't know about you, but I am sure excited for this weekend. There's pumpkin carvin', apple cider drinkin', trick or treatin' fun to be had in the family! We have a ton of kids in our neighborhood, so we always stock up on the candy and usually run out by 8PM. It's crazy! I love this time of year, nothing like the crisp fall air paired with darling kiddos smiling and just looking for goodies! It's priceless. So, HAPPY HALLOWEEN to you all!

I'm going to switch gears from one holiday.... to another! I recently stumbled upon a tutorial on the web that I actually *thunk* smacked my head and said, after 15 years of stamping, why didn't I think of that!?!???!?

Let's take a peek at my card first and then I'll share how it's done! Here's the card, and I mean to tell you, this technique is so easy that you could mass produce this idea and make dozens of cards in an hour --- easy!


And, here's how it's done! I used the poinsettia stamp from the Power Poppy set Merry Littles and paired it up with Love Letter Memento Ink.

Now to the fun part. When you add your stamp to the acrylic block, don't put it face up. Put it face down! Just like this. The image you would normally stamp is what is attached to your block.


Now, why do this? Because, inking the wrong side of the stamp will give you a shadow of your main image! I inked with Love Letter Memento ink, stamped, and then huffed on the stamp and stamped again to get a second generation color on my panel. I did this all over the card and then did a second generation stamp for my little sentiment tag there. The sentiment is from Power Poppy's new stamp set called Wreaths Plain and Fancy! That little sentie was the perfect size!

After I was done stamping the shadows, I went back over each one by stamping with the right side of the stamp this time using Versafine Black Onyx ink for a crisp, black effect. Afterward, I added a little glitz to the center of all my flowers thanks to some glitter glue! See?


Mat it up on some sparkly paper and then again on some red decorative paper. Add a little red metallic cording and... ta da! Done! So easy peasy lemon squeezy it is NOT even funny! That's all there is to it!

And now it's time to shine the spotlight on the ever-so-fabulous crew of Power Poppy Bloomies! Make sure you stop by their "places" to give them a shout!


Christine Okken
Cindy Lawrence
Julie Koerber >>> you are here!
Katie Sims
Leslie Miller
Stacy Morgan
Tosha Leyendekker


Before I go -- one last reminder! Power Poppy's fun-filled Power and Spark Challenge called Bits & Pieces ends tomorrow at 8PM EST! So, grab whatever bit or piece of a stamped image you'd like to play up on a card and get those last minute entries in! Winner gets a stamp set of choice and that, sweet stamping friends!

Thanks for stopping by and spending a little of your day with me! Hope you have a wonderful weekend and I will see you back here real soon!

~Julie


Pin It

Friday, October 23, 2015

A little bit of holiday flair!

Hello all and Happy Friday! With all the festive fanfare with Power Poppy's  Happiest Holiday release last week, I decided to stay on a holiday kick in my craft room! So, let's get to my creation!


With all the focus on polymer this past week, I decided to mix things up and print off one of Power Poppy's newest digital stamp sets -- Glittering Glass Santa! After printing it off, I did pick up my Copic Markers and used these markers: B0000, B000, B00, B01, R24, R27, R29, G40, G43, G46, YG13, YG06, and G20. I did add a little bit of sparkle thanks to a bit of glitter glue!

Here's a close up! As you can see, I did add a little bit of white paint pen to make the little glass ornaments look as if they are shiny.....


And, here's a peek at the inside! I actually used the sentiment and stitched heart from the Bough Wow Wow stamp set!


While I wanted to add another card to my Christmas card pile, I also wanted to take part in one of the Splitcoaststampers' Hope You Can Cling To  Challenges! I decided to give HYCCT1507 a try. The challenge? T.R.A.S.H. Cancer! You have to use each letter of the word TRASH as an element. To break it down for you-- I have a Tree branch for T. Rhinestone for R. Antique ornament for A. Sparkle for S. And, Holiday creation for H! There you have it! If you want to read up on the challenge you can click HERE. You can click HERE for the entire SCS Hope You Can Cling to Challenge Forum or HERE for the HYCCT1507 Gallery!

If you are on the hunt for additional challenges, don't forget about Power Poppy's  Bits & Pieces Power and Spark Challenge. You only have 8 days to get in on the action for your chance to win some Power Poppy stamps! Read all about it HERE!

And that, my friends, is it! Now it's time to take a trip through Bloom Brigade land to check out what some of the Bloomies whipped up for your viewing pleasure this week!

Julie Koerber >>> you are here!


Thanks so much for stopping by and sharing a little time this Friday! Hope you have the bestest of the best weekends ahead! 

~Julie


Pin It

Sunday, October 18, 2015

Cozy Cupfuls!

Hi all -- it's a happy day here on the ole blog! Why? Because today is the official release of Power Poppy's  Happiest Holiday 2015 Collection! After seeing sneaky peeks from the Bloom Brigade all week, the day has officially come when YOU can get your mitts on these beautiful holiday stamp sets right HERE! And just like every other Power Poppy Hop day -- the Bloomies are here in full force to show off some of their favorite creations using these new stamp sets!

On to my creation!

When I saw Marcella's illustrations for this new stamp set called Cozy Cupfuls, I was instantly charmed by it. Not only is this darling cardinal couple as sweet as can be, there are two other vignettes that are perfect for the holidays -- a woodsy stack of packages and a darling mini tree planted in a Christmas tea cup. You will love this set, I am sure of it!

So, to create my card, I stamped in black and then grabbed my Copics to color. I knew that I wanted this to be a male/female pair because that is just too cute, right? And so I had to google what a female cardinal actually looked like! I was clueless, but found THIS super helpful! Gotta love "the Googles!" ;-) Add some fun Christmas inspired decorative paper, a stitched border die, some Stampin' Up Candy Dots, some May Arts ruffle trim and... ta da! I should mention that the sentiment is actually from another one of the sets in the collection called Wreaths Plain and Fancy. 

Here's a close up for you! 


And that, my friends, is it! Now you'll have to hop through to see the rest of the Bloom Brigade Parade that's being ushered along today! And, don't forget to check out these beauties in the Power Poppy Shop HERE! 

Allison Cope
Christine Okken
Cindy Lawrence
Julie Koerber >>> you are here!
Kathy Jones
Katie Sims
Leslie Miller
Stacy Morgan
Tosha Leyendekker


Thanks for hanging out with me this week! Hope you had as much fun as I did and..... I'll see you all back here soon!

~Julie


Pin It

Friday, October 16, 2015

Sneaks Day 4: Olive & Oak Extended!

Hello all and happy Friday! I hope you are having a wonderful week and are looking forward to a restful weekend ahead! It's been so nice in my neck of the woods and for once, it seems like we are truly experiencing... FALL! In seasons' past, we've had early snow and that just makes the leaves fall instead of change colors. This year is different and we are being surrounded by shades of rust and gold! So, we feel blessed this year!

And, speaking of blessings, today with the fourth day of the Power Poppy sneak peeks, we have a set that once was just a digital stamp set and now it's getting a new life in polymer!


This set -- Olive & Oak Expanded -- is full of rich, natural beauty! After releasing this image above in digital form, Marcella had so many requests for it to be in polymer, she thought, why make folks wait until next year? This set offers clusters of greenery and sentiments that work not just for fall but Thanksgiving as well! The Bible verse in this set is one of my all time favorites so I had to use it on my creation for today.

On to my card!


I kept the design rather simple, letting the mix of patterns work their magic. I let the sentiment be the focal point and then adorned the die cut and sponged panel with the cluster of leaves and acorns in this set. I colored the image up with Copics and used E23, E25, E27, E33, E55, E81, Y17, Y21, Y32, YR27, E08, and E97. After I was done coloring, I did accent the clusters with a bit of white gel pen. Fussy cut around your colored image, pop it up and.... voila! See?


And that, my friends, is it! You'll have to stop by to see my fellow bloomie Christine Okken to get a glimpse of what she whipped up with this set and then, hop on over to Marcella's place on the Power Poppy Blog to see not only the inspiration behind this set but some of her favorite creations using it!

Tomorrow brings the final sneaky peek and then -- we let loose and have a Bloom Brigade Parade on Sunday with all of the stamp sets available in the Power Poppy Shop! Can't wait!!!

See you back here soon!

~Julie


Pin It

Wednesday, October 14, 2015

Sneaky Peeks Day 2: Spice It Up!

Hello all and welcome to day 2 of the Power Poppy Happiest of Holidays Collection Sneaky Peaks! Today's set is one that, if you look at it long enough, you'll be smelling the scents of citrus and clove. I remember as a teen going over to a friend's house and learning how to make these sweet smelling goodies! So, without further ado, take a gander at......

This set called Spice It Up features clove-speckled orange pomanders, star anise and cinnamon, mistletoe, berries, and pinecones -- as Marcella said after she drew this one -- it's beginning to smell like Christmas!

On to my creation! When I looked at this cluster, I knew that I wanted to shake it up a bit and show folks how you don't need to make these festive globes oranges, you can make them look like glittered ornaments too! See?


After stamping my image, I grabbed just about every Copic marker in the BG color family that I own to color up each ornament just a wee bit differently. After I got the ornaments colored, I knew I wanted to keep it pretty monochromatic. I added the berries for just a pop of color and I am glad I did. The ribbon, I wanted to look like silver, so I colored them all up with a Sakura Stardust Gel Pel. I also used the pen to add dots of glitter to the cloves, opting instead for the glittered look! See?


From here, the rest is just matting it all up! I used a few Spellbinders Labels dies, some sheer ribbon, a bit of bling and I used a Stampin' Up snowflake embossing folder to add a little texture that I later sanded down to reveal the paper's white core. And that, my friends, is it!

Now it's time to take a trip through the rest of Power Poppy Land to see how the Bloom Brigade used this sweet-smelling and spicy set!

Allison Cope
Christine Okken
Cindy Lawrence
Julie Koerber >>> you are here!
Kathy Jones
Leslie Miller
Tosha Leyendekker
Power Poppy Blog>>> see more of the inspiration behind this set from Marcella!


Thank you so much for stopping by! Tomorrow's set is has a air of festivity that just loves to "hang out!" Yes, that's your clue. See you back here soon!

~Julie


Pin It

Tuesday, October 13, 2015

Sneaky Peeks Day 1:Botaical Tree

Hello all! I sure hope you are in the holiday spirit because this week, Power Poppy is unveiling it's newest additions to the Happiest of Holidays Collection! I can't tell you too much because we obviously want you to SEE the collection, but this series of stamp sets is creative, out-of-the box, beautiful -- oh my -- all of the above!

Today's sneak peek is no exception. Wait until you feast your eyes on this set!


This brand new stamp set called Botanical Tree offers a stylized tree made up of meandering holiday botanicals --- from Poinsettias and Christmas Roses to Mistletoe, Lilies, Rosehips, and bits of berry clusters! Whether colored in or stamped in a single ink and embossed, this image is big on impact! While I grabbed my Copic Markers to color this intricate design, I can't wait to stamp and emboss in gold for a card with a bit of Christmas bling!
 
On to my creation!

Because of the detail in this image, I knew I wanted a white background to truly make all the colors in this image POP! After stamping, I colored with Copics and literally grabbed every green marker I had and colored with gradations mixing up the tone of green with each varying plant. I didn't want one green to be more prominent than the next. I did the same with the reds varying from light, almost pink to deep reds. 

Here's a close up. You *might* be able to see that I added a bit of sparkle thanks to a Sakura Stardust Gel Pen to the stamens of those fun pinkish flowers.....


From there, its simply fussy cutting my image, matting it up, adding a crystal button with some gold cording, some fun sheer ribbon and an embossed background! And that, my friends, is it!

I am so excited to share the rest of the holiday collection with all of you! Hope you stop back and see what I've been up to! For now, make sure you hop on over and see the rest of the Bloom Brigade and what they whipped up with this breathtaking illustration!


Cindy Lawrence
Julie Koerber >>> you are here!
Kathy Jones
Leslie Miller
Stacy Morgan
Tosha Leyendekker
Power Poppy Blog -- read all that inspired marcella's latest set!


Tomorrow's set is on the "spicy" side! So, be sure to tune in and see! Have a fabulous day!

~Julie


Pin It

Friday, October 9, 2015

Color YOUR World!


Wouldn't it be nice to take a little respite, a little break from the day-to-day grind to do something that adds joy and color to your life? Well, me and my peeps over at Power Poppy dedicated at least ONE DAY to coloring our worlds and we're joining the ever-talented Kathy Racoosin over at The Daily Marker in her challenge to color up something every day -- YES -- every day for 30 days! She's even sharing prizes for those who participate (Pssst, Power Poppy is giving a way a stamp set of choice for one lucky colorista!)! It may be the 9th and we may be joining the party fashionably late, but you can join in at any time at all!

And so, here's a creation from one of my recent colorfests!


I have to admit that when I colored up this little pumpkin, I wasn't even anywhere near my craft room. When fall hits, there's nothing better than grabbing my markers, a stamped image and a clipboard and then nestling into the couch to color and watch some TV. I am strange. I can't watch TV without "doing something!" So, I color or knit almost 90% of the time! And this was one image from Power Poppy's stamp set called So Grateful that I got lost in!

I forgot to write down which markers I used to color up this image so I am going to "attempt" to remember them all! I know I used warm neutrals for the chair -- W00, W01, W03 and W05. I used my favorite greens for the leaves and grass -- G20, G40, G43, G47. I used the rustic yellows for the black eyed susans -- Y21, Y23, Y32 and Y35. The purple tones for the Dahlias were V01, V04, V06 and just a smidge of V09. The berries were a mix of R24 and R27.

When I was done coloring, I grabbed some scraps from my decorative paper scrap bin and went to town adding a glitzy button and some twine! the border is a Spellbinders die called Scalloped Borders Two!

I wanted to add a little "sumpin' sumpin" to the inside and so I used Potters Clay Memento Ink and stamped the larger Dahlia from the set as well as one of the sentiments.

See?


And that my friends is it! So, after you color up something fun, make sure you link your creation RIGHT HERE on the linky for a chance at some prizes! Keep in mind Kathy is urging us all to share our colorific skills -- not necessarily a finished card! Just show off what you colored! You can check HERE for all the details!

So, with all of that fun swirling in your heads, why not hop, skip and jump your way through our link list to see what my fellow Bloomies created during one of their own personal coloring sessions!


Julie Koerber >>> you are here!
Katie Sims


Want to combine this challenge with another? YOU CAN! There is so much going on at Power Poppy you have a plethora of ways to double, triple even quadruple your chances of winning some Power Poppy stamps! You have until Saturday night to play along in the World Cardmaking Day Sketch Challenge! You can nip and snip and play along in the Power and Spark Bits & Pieces Challenge! Or, you can hop on over to Splitcoaststampers and play along in their month long Hope You Can Cling To event. 

So there you have it peeps, a handful of reasons to take time to create a little happy and color up some fun!

~Julie

Pin It