Tuesday, October 13, 2009

A Season That Sparkles.... day 1!

It's beginning to look a lot like Christmas over at Flourishes! In the debut sneak peek for Flourishes' October release, you'll see they combined the beautiful imagery of the Nutcracker Suite with the age old story of the Little Drummer Boy. This combination of two Christmas Classics is sure to bring that touch of whimsy to your Christmas cards and creations!

Introducing....


This set is drawn by Lauren Pope and will add a rich and regal touch to your Christmas cards! And.. as a bonus, a background stamp will be unveiled with this set on Friday called Musical Score. It's a timeless classic featuring the words of "Angels We Have Heard On High." Now, don't forget to march on over to visit these fine designers!

Leslie Miller
Christine Okken
Latisha Yoast
Laura Fredrickson
Stacy Morgan
Cindy Lawrence
Jan Marie Caruso

Now, to my creation! I had so much fun whipping this up. My son actually collects nutcrackers so I raided his stash to serve as my inspiration!

I stamped my nutcracker using Memento Tuxedo Black ink on Flourishes Classic White cardstock. I then masked my image and sponged a mix of Antique Linen and Tea Dye distress inks all over. I took off the mask and then used Copic markers to color up my nutcracker! I used these collections: Warm Neutrals for the boots, the lightest peach marker from the pastels set,
the Poppy collection for the red tones, Spring Green for the lighter green shades along with Y28, G17, and G28 to finish off the detail! I also used the Copic Spica gold pen to add some razzle dazzle to the crown and drum. I added some red rhinestones to give some sparkle to my drummer. Add some fun ribbon and a little pizazz with the help of a silver Finishing Touches Stunning Slide. Then, it's time to mat it all up! I used June Bug Basic Grey for the polka dot and the other paper was one I had in my decorative paper drawer. It was a distressed ivory that I then stamped the new Musical Score background on using Vivid Red ink! I love, love, love this background -- so classic! The sentiment is also from the Muscial Score set! Yes -- there are sentiments included with this background!

Do you want to win this set and the Musical Score background? All you need to do is leave a comment HERE over at the Flourishes Newsletter on the Christmas Drummer post and you'll be in the running!

MORE FUN AT FLOURISHES...

  • It is Tuesday afterall, and that means another Timeless Tuesday challenge! Today our Friends of Flourishes team used this set and background for a super duper fun sketch that you can try and play along with! There is even a $10 Gift Certificate on the line! Click HERE to check out the challenge!

  • Since we are talking about challenges, did you see our A Season That Sparkles Challenge? If you play, you will have a chance at winning all SIX of our new releases for October. That's one valuable prize - you could even call it an early Christmas present! Click HERE for the details.

  • One last fun fact to throw your way.... Mark your calendars for our RELEASE PARTY coming up this Friday! It's our power hour of fun with games, goodies, and prizes up for grabs! We'll host it in the Flourishes Forum over on Splitcoast HERE from 9 to 10 PM Central Standard Time. As the party wraps, all of our sets that we peek this week will be put in store for your shopping pleasure!

It's going to be a fun week at Flourishes! Tomorrow's release is one that might have you singing a little bit of the 12 days of Christmas! You'll see why when you come back tomorrow!

Monday, October 12, 2009

A card for a friend...

I have this sweet lady who is a friend that has mentored me on all things knitting. We chat via email and she always has a colorful story to share. Well, sadly, it's been awhile since her last email and I'm kind of starting to worry. She's an older lady and is not in the best of health. I had some time today and dug through some of my "cheer me up" images. It's one of the first stamps I ever bought--- about 10 years ago! I'm hoping this little card brings a smile to her face!

The image is called Bending Chicken from Inky Antics. I stamped him with Memento Ink on Flourishes Classic White and colored him up with Copic Markers (the Daffodil collection and the Flesh Tones 2 collection to color my "ground -- both from Flourishes. The beak was colored with the Tiger Lily Collection). Before I assembled my card, I stamped my chicked a second time and colored just the head so that it could pop up on my card.

The inside is the fun part! I just thought this little saying was too cute! Both the saying and the little chick are from Inky Antics too..

Well, my friends, I hope you had a fabulous weekend! I hope my Canadian friends had a fabulous Thanksgiving! I'll be back tomorrow with day one of a handful of sneak peeks from Flourishes! It's the company's biggest release EVER and they have a ton of fun surprises! So.... be sure to check back!

See you then!

Friday, October 9, 2009

A Season that Sparkles!

In a matter of days, the package over at Flourishes will be unwrapped unveiling a bunch of new surprises just in time for your Christmas cardmaking marathons! And, to get ready, Flourishes is ushering in a one of a kind challenge that could land YOU with their whole October release. It just so happens to include six... yes six..new stamp sets!

So, here's the challenge! Glitzy packages, the new fallen snow, a Christmas ornament shimmering from the lights on the tree - all of these things equal magic during the holiday season! Capture that sparkle on a card and share your creativity for our A Season That Sparkles Challenge! Once you make your card, you just need to use Mr. Linky and add your name to the list on THIS post! This contest will close Friday, Oct. 16th at 4PM CST. Winner gets our entire release for October!

So... now to my sparkly creation!

For my card, I wanted it to look like one of those holiday flags -- so I clipped the bottom of a strip to create that "V". I used gold detail embossing powder to stamp the Christmas Wreath from the Seasonal Wreaths set and then colored up the glass balls with the bright collection of Copic Spica pens. I love the micro sparkle from these pens! I will say, it's really hard to capture this on camera! You might just need to trust me. Here's a close up......

The rest was matting up my image. I used some deep red Bazzill card stock and a really old piece of Christmas decorative paper from Penny Black that has sat in my dp drawer forever. I guess it was waiting for just the right moment! I also added some small self stick gold pearls at the top and .... voila!

Want to see the glitzy creations from the rest of the Flourishes DT? Hop on over and see....

Christine Okken
Latisha Yoast
Laura Fredrickson
Leslie Miller
Stacy Morgan
Cindy Lawrence

Hope you make time to play! Once you see the new sets, you might not be able to resist! :-) Thanks for stopping by. Hope you have a fabulous weekend! :-)

Thursday, October 8, 2009

Stamp Simply.... Getting 'Krafty!"

Hi all and TGIF!!!! Hope you had a fabu week! Time for another one of Sharon Johnson's fun weekend challenges and this one has us all getting krafty! You know the latest trend these days-- where kraft is the new white? :-) The second part of the challenge is to use a pop of black too. You can check out all the Official deets HERE...

And now, for my creation!


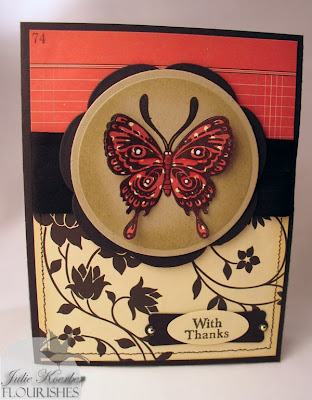
I actually picked all the elements of my card before I even knew what stamp I would use! I loved this Jenni Bowlin paper and was amazed it's been sitting for... well... quite a while! This one is uber simple! I layered up my paper and added some stitching around the bottom. Add some lush silk ribbon, a fun sentiment matted up with the help of some SU punches and some gold self stick pearls and you are almost done! The focal image is the butterfly from the Butterfly Moments set from Flourishes. I stamped it twice - once on my kraft circle (cut from Nesties) and then a second time on some coordinating cardstock from that same paper pack. I cut out the butterfly and paper pieced it on my circle. You might also notice I colored some of the butterfly's spots with a white gel pen. Add some sponging with the help of some Antique Linen Distress Inks and mat it again on a shape cut from the Blossom Nestie die.

And that... my friends is it!

Can't wait to see how the rest of the Stamp Simply team got krafty!

Amy, October Guest Designer
Janine
AJ
Tammy
Deb
Barbara
Jenny
Barb

Have a fabulous weekend everyone and I'll see y'all back here soon!


Tuesday, October 6, 2009

Shopping with my Gal Pals!

I have some more of the after party going on here from World Cardmaking Day! This creation was from the Girls Just Wanna Have Fun Challenge from Stamping Bella over on SCS! It was hysterical - you were supposed to show something that you and your gal pals like to do together AND since the song Girls Just Wanna Have Fun is from those wild 80s years, you had to make sure the colors had an 80s flair. What's more 1980s than pink and green???

So... here we go!

I actually had this image from my pal Jackie who sent me some fun images a while back! I colored her up with Copic Markers (B26,B29,E26,E29,RV00,RV02, RV14,YG00) and after I was done, I masked the edge of my image and then sponged on some Ballet Pink Memento Ink around her to make her even more "pink!" I love this paper it's from Making Memories. Team that up with some fun flowers, some bling and... that's pretty girly!

Sorry to make this so short and sweet... I have a kiddo that needs homework help! :-)

Hope you're all having a fabulous week so far! I'll be back soon with some more fun!

Monday, October 5, 2009

Did you have a happy WCMD??

Gosh the paper was flying this weekend for World Cardmaking Day and what fun it was!!! Did you do a challenge or two or start on your holiday cards for this year??

It's so nice that we get a little reminder on when it's time to really start your Christmas or Holiday cards!! Trust me... I need it!


One of the challenges on SCS was from Unity and it was to make a quote a focal point of your card. I dug through my sticker/rub ons drawer and found a fun and perky rub on that just "needed" to be used! I have no idea what company even made this one! Sorry!

This card really isn't my "style" but I had a blast making it! I rubbed the rub on to a strip of Flourishes Classic White card stock and then, with some lime green thread, let my sewing maching do the driving to produce this fun and squiggly line around my quote. Add some bling to the rub on flower. Mat it onto a sparkly piece of cardstock (Pebbles). Mat that onto an uber large silk flower and then mat this onto your card front. I had a piece of pink cardstock (Radiant pack from Crafty Secrets) that I also edged with lime green thread as well to try to tie it all together!

And that.. my friends.. is it! Hope you had a fabulous weekend and a great start to your week!

I have more fun to share so, I'll see you all back here soon!

Friday, October 2, 2009

Stamps for Sale!!!!

Remember that huge clean up I did in my stamp room? Well, I have TONS of stamps that now need new homes! I have single stamps, background stamps, border stamps, alphabet stamps, plenty of sentiments, plus clear and rubber sets..... all offered at BARGAIN BASEMENT prices!!! Seriously - well below wholesale - many of them are like new! Simply click HERE to see, or click on the Stamps For Sale icon on my sidebar. If you are interested, all you need to do is email me at juliekoerber@bresnan.net and we'll work out the details!

Thanks for looking!


Just the right 'Finishing Touches'!

TGIF! With Friday comes another Flourishes Focus! This one is being hosted by the uber talented Laura Fredrickson and the topic... is Finishing Touches! You'll have to check out her tutorial over on the Flourishes Newsletter!

Just in case you aren't aware, Finishing Touches are those fun pieces of "jewelry" for your card creations. If you've never checked out the line of embellishments that Flourishes carries.. OH MY.. you really should! You can click HERE to see what I mean!

For my card, I used two of these embellisments! After stamping my lilies onto some Flourishes Classic Ivory card stock using Memento Rich Cocoa ink, I colored them up with the Fields and Tiger Lily Copic Collections.

I stamped the stems using Memento Bamboo Leaves and New Sprout. Then cut my lilies out and popped them up with some foam tape. The paper was some that I found in my decorative paper scrap bin. I cannot remember what it is! I used a EK Success Border punch and then slipped some of that luscious Olive Silk Ribbon through one of the Finishing Touches Ribbon Slides. To add my hanging tag, I used a jump ring and attached it right to my slide. The message is from the Strawberries set and was cut out to fit my mini message tag with the help of a 3/4" circle punch.

And that, my friends, is all she wrote! Hope you hop on over to the rest of the DT to see what they cooked up!

Christine Okken
Faith Hofrichter
Latisha Yoast
Laura Fredrickson
Leslie Miller
Stacy Morgan
Cindy Lawrence

Just a quick note... did you know that tomorrow is World Cardmaking Day???? Well, Flourishes is cooking up some fun! They've teamed up with Splitcoast Stampers for a fun challenge and there are some great prizes on the line! So.... stay tuned! More on that to come!

Thursday, October 1, 2009

Do you know your ABCs and 1-2-3s?

ABC.... easy as 1-2-3. I've got that little ditty in my head now! And, lucky for you -- there's a reason for it! :-) That's the topic for today's Stamp Simply challenge! All you need to do is make letters or numbers a focal point in your card!

You can see Sharon Johnson's lovely card and read up on the challenge HERE for ssnotime107!

For my creation, I played it really, really simple. I had an old Hero Arts set that featured the letter "A" and I loved it because it had the word appreciation. I thought it made up a cute Thank You card.

This card couldn't be any easier. I stamped the large "A" onto some Basic Grey Urban Prairie paper, cut it out and then used the flourish and appreciate in the set to stamp on a white strip. I used Pear Tart Memento Ink and Vivid Aqua. Mat it up on a strip of blue from the Lime Rickey Basic Grey pad and you're done with the strip! The card was created my layering and paper piercing other pieces from the Lime Rickey pad. Add a prima flower and a sparkly button and... done! I think I am going to give this to my son for showing him I appreciate some of the help he's been giving me around the house. I know it has a flower on it but maybe he'll over look that!! :-)

You can check out the rest of the Stamp Simply Team by clicking on their links!

Amy, October Guest Designer (Amy’s upload will be early Friday morning)
Janine
Jennifer
AJ
Tammy
Deb
Barbara
Jenny

Thanks for stopping by! Hope you make time for play time and join us!


IO DT Challenge.... Gratitude!

It's challenge time again for Impression Obsession and this one is all about being thankful! With Thanksgiving and Christmas on their way, it gives us time to reflect and make up some cards that are perfect to slip into the mail for family and friends.

For my creation, I just made a card that I could send as a thank you. I just love the sentiment I used. IO has the BEST sentiments! You can find the one I used HERE.

This card was easy peasy to make. I grabbed gold detail embossing powder and embossed the Victorian Rose all over a speckled piece of ivory paper. Afterward, I colored the rose and leaves with a light wash from my watercolor pencils. Then, I took some Tattered Rose distress ink (Adirondack) and sponged it all over my image (even the colored pieces). I edged with a goldleaf pen, embossed my sentiment, matted it up, added some gold self stick pearls. You can see too that I added some gold thread just by wrapping it around my rose piece before attaching it to my ivory card base. Like I said -- easy peasy! This card is actually something I would have done years ago. I hardly ever heat emboss anymore! And, that is what got me started in stamping! I was fascinated with heat embossing! Funny--huh?

Well my friends, that's it! If you'd like to participate in the challenge... it's open to all! Just click HERE for a peek at the rules and what you might get a chance to have your art featured on the IO blog! :-)

You'll also have to hop on over to the rest of the DT to see what kind of gratitude they exuded with this challenge!

Dina... she has blog candy! Check it out HERE!
Daniela
Laura
Jeanne
Shirley
Jenny

Tuesday, September 29, 2009

Answering a couple questions.....

Hey all! I got a few email questions since my last post so... I thought I'd take some time to answer them here!

Q. What is that "contraption" in the corner of some of your photos?

A. This is my makeshift light kit..... total cost was between $40 and $50 but you could get away with a lot less.
The light is one of those clip on lights that you can find in the hardware store - ($5) I put a natural light bulb in and then covered it with a light diffuser screen that you can find at a camera shop ($15-25). I bought mine on line at B & H Photo. It is like THIS one. They come in smaller sizes - all you need to do is get one larger than the light source you are using.
The stand was one I found on ebay and I paid no more than $20 for. I just searched "light stand" and found it. It can reach to a 7 foot height. From here, you clip your light onto your stand and you can see I use a fancy schmancy clip to attach my diffuser. I raided my husband's desk drawer at work! ;-)
When I said you could get away a lot cheaper - you really don't need the light stand since the light is a clip on light. Attach the light to a chair back and-- you could be good to go! I just like the fact that I can adjust my light to height. I don't do that often, but it's nice to have.

Q. What kind of camera do you use?
A. I use a Cannon Powershot G6. I bought it for work about 5 years ago. I love it, but if you have a macro button, that's really all you need now a days to get great pictures of your cards/creations. Cameras are so much more sophisticated now that you can pick a similar camera for a LOT cheaper. I think now they are up to the G10!

Q. How do you store your border punches?
A. Honestly, that is becoming a problem!! ;-) I have them in one of the plastic drawers in one of the rolling carts and I won't be able to fit one more punch inside. I love the new EK Success punches that lock down to a slim size -- those rock! Anywhoo, no real great ideas on that front! LOL!

Q. What does the sign on your window ledge say?
A. Well - it says 'Everyone is gifted, some just open the package sooner.' It made me laugh and realize that hey.. we all have our moments. So, if some day I finish a card and accidentally smudge ink all over it - I'm only human, maybe I'll get to open "the package" some other
day! :-)


And, to answer my friend Cheryl who said - if you are anything like me, you won't want to create for a while for fear of messing it up! Well, I am happy to report I have 8 new cards to show! hehehe! I just need to get my camera out so I can show you all!
Happy Tuesday! See you back here soon!

Sunday, September 27, 2009

My wild hair is.... OVER!

Ok, I got a lot of funny flack for showing pics of my stamp room this week. BUT, guess what? I found some deals and figured out some storage solutions that I am soooo jazzed about! I thought I would share because who knows -- maybe it would be useful for other stampers in blog land! :-)

My first find is what I consider a BIG FIND! I was flipping through one of my craft magazines -- Crafts 'N Things I think-- and I saw an ad for a company called Unikeep. They advertised some fun little two and three ring binders that were perfect for craft storage. They were trying to showcase this for photo storage but I thought -- OH MY GOSH-- I have been really looking for a system for my cling stamps. So, I logged onto their website and found THESE! And, they were on sale! Only $1.07 per binder! They measure roughly 5 by 9". I thought it was a perfect size! After shipping (super duper fast shipping I might add) I got 20 cases for less than $30!

I bought the white folders but they come in clear and black too. It has a clear wrap overlay so that you can customize your binders -- I decided to make mine for my Impression Obsession stamps and organize them according to categories. See?

This is what they look like open. It's basically a two ring binder that is about 1-1/4" thick. Here's an inside look...

As luck would have it I had some large EZ Mount sheets that you can stick cling stamps to. I wasn't aware of this but you can't or shouldn't stick cling stamps to acetate for storage. It creates a reaction that will ruin your cling. Anywho - I cut some of my larger sheets to fit inside. Then, the fun began as I started to put my stamps inside. Look how many stamps you can fit in these babies! I have the sheets full on both the front and back of my EZ Mount storage sheets. Each binder can fit between 30 - 50 cling stamps.

As I was trying to figure out where to put my new binders, I realized, they fit perfectly into one side of my craft desk. WOW! Can you see me jumping up and down??? Sorry, I am easily excitable! That bottom clear box is a container I put all my acryllic blocks in.

The next big find was these photo storage boxes - just $2 a piece at Hobby Lobby this week! This was my storage solution for my Flourishes clear sets!
I have been buying some of Flourishes Clear Storage Boxes a bit at a time to put all of my clear sets in. You can see those boxes HERE. They fit two 4 by 6 sets in each one! I organized the sets according to category and when all was said and done I was able to fit more than 70... yes MORE than 70 sets into five photo boxes -- with plenty of room to spare! Each box will fit up to 30 clear sets if you use the clear boxes. If you keep your clear sets in a plastic sleeve - you could probably fit upwards of 100 in each photo box.
I had some old baskets from my son's room that he wasn't using and put all my BasicGrey pads in one....
And ribbon spools in the other!

The loose ribbon went into some fun jars. I grouped the ribbon according to color and I used some baby clothes pins to secure the ends. The jars were on sale at Hobby Lobby for $2 each.

And... here's a peek at my stamp closet so you can see how it all fits together!

I use small hooks I got at Lowe's for my Nesties and an old cafe curtain rod for my larger punches...

Here's a shot of the room from one side....

And a wider shot of my closet. The plastic rolling storage carts house my papers. I have solids and dp organized now by color. Easy breezy to find what you need! The smaller storage drawers are for emellies.
Here's the room from one side so you can see the closet and how big of a part this is to my room.

The fun thing? Close the door and... bam... out of sight!
I know some of you have seen my room before but, with these new storage systems, I had to share. I had been struggling for a long time to find something that would make it easy. And, I am thinking this is going to be easy!
Hope you all are having a fabulous weekend! Take care and I'll see you back here soon! :-)

Friday, September 25, 2009

Twice As Nice Friday!

Hi all! T.G.I.F.! I can't tell you how much I need a weekend! We've been so busy here at the Koerber house that I just want to sit on my tuchas! ;-)

Well, I've got two little challenges for you this Friday! First things first, the ever-so-talented Leslie Miller is hosting the Flourishes Focus today over on the Flourishes Newsletter. Her showcase? To show just how versatile one stamp set can be if you just look at it with a different set of eyes. She challenged the rest of the DT to do the same!

You'll have to check out what the DT did for this fun challenge! I am sure you'll get tons of inspiration just by seeing their take on one set/two looks! Click on:

Christine
Cindy
Faith
Latisha
Laura
Stacy

and don't forget to check out Leslie's tutorial on the Flourishes Newsletter.

For my card, I picked up the new Seasonal Wreaths set from Flourishes and decided to turn sunflowers -- into daisies!
I wasn't quite sure how my "daisies" would look when I got them all colored up, but I have to say, I like them! It's a soft and sweet look that will be perfect for spring cards.
I stamped my wreath onto Flourishes Classic White cardstock using Memento London Fog. I used Copics to color them and picked up the Buttercup and Spring Greens Copic Collections to color them up. I also used the Copic Pastel Collection to add some shading to my petals with the pale blue. After I was done, I used some soft blue ink (Memento Summer Sky) to sponge around my wreath while my circle Nestie die was still on my paper. After that, I grabbed some fun paper (scraps from my patterned paper drawer) added some gingham ribbon, and my Bow Easy to create my bow, and I was almost done! I did some paper piercing and added a button and.... Voila!

Here's a close up of the wreath....

My next card is to show another way to use the Seasonal Wreaths set. And, this time, I used this week's Stamp Simply challenge (ssnotime106) as my inspiration! This week, Sharon challenged us all to use the rich colors of autumn for our creation! I realize I didn't have a ton of leaves in this wreath, but the leaves I did have, I made sure to color up with an autumn feel -- as if they were just starting to change for fall. The second part of the challenge was to make the project even more rich in color by adding sponging to create a little extra depth of color.

So.... here's my card!
I used the same layout as my daisy card but swapped the colors for rich fall tones. I used the Evergreen, Daffodill and Skin Tones 2 collections to color up my sunflowers. And, while my Nestie die was still on, I sponged on some Antique Linen and Tea Dye Distress Inks on my circle. The paper is Scenic Route and Prima and the ribbon is some of the beautiful Silk May Arts ribbon in an olive green. Add some paper piercing and a button and.... done!
Here's a close up.....

Want to see what the rest of the Stamp Simply team cooked up? Just click on their links to see their fine work!

Charlene, September Guest Designer
Janine
Jennifer
AJ

Tammy - is taking the night off.
Deb
Barbara
Jenny


Thanks for stopping by! Hope you make time for some creative fun this weekend.... see y'all back here soon! :-)