Showing posts with label Copic Markers. Show all posts

Thursday, July 25, 2013

It's SIX for SIX!


BirthdayCelebration-5 

Today the entire Flourishes Design Team is jumping on the birthday band wagon and helping Flourishes light the candles and roll the music to celebrate SIX fun-filled, creative years!  Today's challenge is all about the right recipe for your cards. So, all you need to do is check out our recipe card below and make sure you use all six. We're calling this challenge -- The SIX for SIX -- six items for six years! So, without further ado -- the recipe!
  7-26Graphic 

HOW TO PLAY: Like we said, simply use the six items as your recipe for your card or creation. Make sure to use the sketch and be inspired by the colors in the inspiration photo and then, use the other four items as well when you create. This Birthday Celebration Challenge is just that simple! When you are done with your card, don't forget to link up your creation HERE using the Inlinkz widget! For Birthday Celebration Challenge #5, enter as many times as you like. If you upload to Splitcoaststampers, use the keyword FLLCBC5. You have until 11:59 PM CST on July 31st to enter! Winners will be announced Saturday, August 3rd and winners will receive a goody bag from Flourishes valued at $30!

On to my creation!

So, you can see I followed the sketch pretty much to a tee. I had this Dahlia image stamped and ready on my desk and it was even partially colored -- BINGO! Since it was colored in peachy tones, perfect! But, if you look at the stamp, there is another little vase included in this image. I didn't want that one because it wouldn't fit with my sketch -- so thanks to my handy dandy detail scissors -- I cut that part of the image off! I stamped with Memento Tuxedo Black and then picked up my Copics (see below for the color collections that I used). So, with the sketch and color inspiration done --- I added bling in the form of some gold cording and a little rhinestone bling... See? The gold cording also counts as twine -- so cross off 3 and 4 on the "recipe!"


Now... you have to squint to see #5... but it's there if you look at the main photo for the card. On the tan little flag, I used a fancy fan embossing folder and then sanded down the embossed ridges for a little texture. And... for #6?  My favorite Flourishes stamp (for the time being) HAS to be Dahlias! Oh my, they are beauties!!!! 


And, to give the inside a little something, I stamped the other Dahlia image from the set using peach ink and then grabbed one of the sentiments from the set for the center.. Add a little paper piercing and... voila! Done!

And that, my friends is it! I should mention that there is a whole bunch of fun scheduled for Flourishes 6th Birthday — if you want a peek at all the challenges, just click HERE to see! Now just as I said, all of our fine and fabulous Flourishes designers are playing along in this one, so be sure to hop on over and see what these ladies have in store!

Thanks for stopping by! We can't wait to see what fun you whip up for this challenge! Remember, you only have until July 31st to play in any and all of our birthday challenges! Be sure to stop by tomorrow. To win tomorrow's goody bag, all you need to do is stop by and leave a comment sending Flourishes some birthday wishes! One lucky person will walk away with a goody bag valued at $30! See you back here then!

~Julie

SUPPLIES:


Pin It

Thursday, May 23, 2013

What a Catch!

Hi all and Happy Friday!! This week is shaping up to be a nice one. After days and days of rain last week, we're seeing sun which makes me happy, happy, happy indeed!

Today all the gals with the Flourishes Design Team are showing off two sets that are aimed at giving a little love to the guys in your life and as you make the rounds, you'll see either the What a Catch set or the A Guiding Light set! Both are fabulously masculine and make wonderful cards!

On to my creation! I have to admit, I made this card a wee bit back and thought it would be fun to share now. Call it an old to me, new to you card!


Because I had some of this wood grain paper, I knew these scraps would be PERFECT for an outdoorsy creation. While this is older paper, THIS paper pack over at Flourishes has something similar and would be perfect as well! It's a nice mix of masculine and feminine prints! Moving on! I stamped my fish image on white card stock using Tuxedo Black Memento Ink and then cut it out using a circle die cut -- Spellbinders Classic Circles LG. While the die was still on, I sponged on some Antique Linen Distress ink around the top and side portion of my die cut. Then, the fun began with Copic markers! I used the Water, Lenten Rose, Emerald Coast and Evergreen Collections. Add some brads, a die cut mat done using Spellbinders Labels Three, some Natural Jute, and of course, a fly -- for those fly fishermen and... ta da! Done! 

Here's a close up of the fly... love this as an accent! 

Need some more inspiration? You can check out THIS card I made with the set last year. Or, better yet, visit the Flourishes Gallery HERE and see the other creations for this set from the ever-so-talented team of Flourishes designers!


Amanda Havon
Christine Okken 
Cindy Lawrence
Danielle Kennedy
Heather Jensen
Julie Koerber  -- you are here!
Maki Jones
Silke Ledlow
Stacy Morgan

And... before you go, you should click on over to today's post on the Flourishes blog and read up on one very talented Flourishes designer! Last week, Christine kicked off what she's calling her Designer Focus -- a chance for YOU to get to know US better! This week I had the pleasure of telling you all a little bit about her and if you head on over, you can see how YOU can win some goodies if you play along in a fun-filled Christine inspired challenge. Just click HERE and be prepared to get those fingers inky!

Have a fabulous weekend everyone and I'll see you back here soon!
~Julie


Pin It

Friday, October 21, 2011

Merry Kissmass!


Hi all and, more importantly, T.G.I.F! Today, all the Flourishes gals are showing off more of their release week "fashions" from Flourishes brand new October release. I cannot tell you how much fun I have had getting in the Christmas spirit a little bit early! And, as you'll see with my creation today -- I had another excuse to pull out the Kisses! I know what you are thinking... I might just need to buy a case of Hershey's Kisses for all these sweet projects. And, you know what? You might be right! ;-)

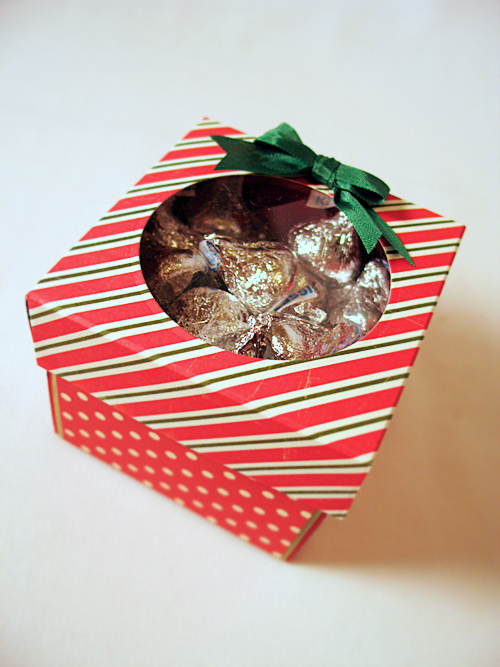
On to my creation! This "sweet" window box!
I used a mix of papers from my scrap box, and some of Flourishes' Clear Card Stock to create my little acetate window... see?
So, how did I make the box? Pretty easy peasy actually! I took a piece of red card stock that measured 8 by 8" and using my Scor-Pal Mini, I scored 2.5" all the way around. This will create the bottom of the box. I did cut the flaps so that I could fold the flaps on the inside for the box construction. For the lid, I took a piece of paper that measured 5.25 by 5.25" and I scored 1" all the way around, snipping to create flaps and securing with a bit of glue runner. Before I assembled however, I did center a circle die on the center of the scored area, ran it through my Grand Calibur, and then added the clear card stock, adhering to the inside of my box top with glue dots.

Inside is a little trifold card! The top has the Mistletoe sprig from the Meet Me Under the Mistletoe set that was stamped on Flourishes Classic White and cut out using the Spellbinders Blossom Die. I colored this up with Copics and you can see the collections I used below!
This is the bottom of my card, I actually used the mistletoe border from this set to create a kind of frame. I colored it up and added some glitz to the berries with the help of some glitter glue!
Add in some little tasty kisses and you've got one sweet little gift to give to someone you love! I will say, the middle panel is blank for a reason -- I plan to print off a photo of my family and put that in the center.  I can see this going into a basket of goodies that our family will shower on someone!

You'll want to check out the other fabulous creations the Flourishes DT whipped up using these brand spanking new sets! And don't forget, today marks the end to Flourishes New Release Bundle -- 10% off all four new sets when you purchase as a bundle!


Thanks for stopping by! Hope to see you all back here soon! It's supposed to feel like fall here in my neck of the woods. I might have to find some colorful leaves to play in! ;-) Take care!


SUPPLIES I USED..............

Wednesday, August 31, 2011

Happy Birthday To You!

Hello all! Hope your week is beautiful in your neck of the woods! Today, I have some really fun things to share! First of all, it's a festive Impression Obsession challenge and the goal is to shine the light on a very special operation -- Operation Write Home! That's right, it's OWH's birthday this month and to celebrate, the IO DT is helping bring attention to this great cause with a birthday challenge of our own! Grab your Impression Obsession stamps to create a b-day card and YOU could win $25 to the IO store! What fun! You can read up on this challenge HERE!

On to my creation!
I used one of my all time FAVORITE stamps -- Climbing Rose-- This is just such a lovely image and your card doesn't need a ton of "extras" to make it SING! I stamped with Memento Tuxedo Black, colored with Copic markers (R81, R83, R85, G40, G82, G85, BG000 and BG0000). And, after it was all done and matted, I added the sentiment at the top and if you can see below, some bling on the little heart tag thanks to a mini rhinestone.

I have to say that to create my long and lean birthday card was inspired by this sketch....

It's just one of 10 new sketches just released by CardMaps that you can find HERE! I loved the clean simplicity of this sketch and using the image I did, I thought this sketch was perfect!

Before I go.... Want to read more about Operation Write Home's Birthday Bash? Just click HERE! Think about it. We all make cards because we enjoy the crafty process. Imagine your card traveling to our troops so that they can send some of your handmade love HOME! Not to mention, in just three short months, OWH spends more than $13,000 in shipping. If you can't donate a card, why not donate a few bucks to help them ship the creations? It's such a fabulous cause.

Be sure to stop by some of my fellow IO DT members to see what kind of birthday creation they whipped up to help OWH celebrate!


  • Daniela Dobson
  • Dina Kowal
  • Jeanne Streiff
  • Jenny Gropp
  • Laura Fulcher


  • Thanks so much for stopping by! Hope to see you all back here real soon! :-)
    ~Julie

    Thursday, January 6, 2011

    Love is All You Need!

    Hi all and welcome to the very first Impression Obsession Challenge for the new year! This one is especially fun because the Design Team is showing off some of the new images that will soon be released by Impression Obsession during Winter CHA! Woo hoo! Today's challenge is about love, hearts, and valentines! You can read up on the challenge HERE. Remember, there's a $25 gift certificate to the IO Store on the line! :-)


    So, here's a peek at my creation...
    The paper cone and flowers are from a new clear stamps set called Lighthearted Lines  and the sentiment is called A Loving Note. Again, both will be available soon!

    Creating the card was rather simple... stamp, cut out the cone and the flowers, color with Copic markers (RV32, RV34, RV02,RV00, YG00, YG03, YG63). Frame it thanks to Petite Oval and Petite Scalloped Oval Spellbinders Nestabilities dies. (On the scallops, I embossed and then sanded the edges to reveal the paper's core. On the oval, I left the die on, and sponged on some Angel Pink Memento Ink). I also used some foam tape to pop up some of the flowers as well. Add some stitching, linen ribbon, a pearl and a punched oval for the sentiment and... done!

    Here's a close up!


    Want to see what the rest of the IO Design Team crafted with a little love in mind? Hop on over and see....

    Daniela Dobson
    Deborah March
    Dina Kowal
    Jeanne Streiff
    Jenny Gropp
    Kathy Menzies
    Kelli Richardson
    Laura Fulcher
    Shirley Ross


    Thanks so much for stopping by!

    Monday, November 23, 2009

    You Warm My Heart....

    Hi all! Happy Monday! Hope you had a fabulous weekend. I actually got a little time to just stamp for no reason! I think that's the best when you can walk in to your craft space and not have any real motive - just pick up a stamp and go with it! ;-) I got my hands on this fun Snowman Marshmallow Mug recently and had been itching to ink it up!


    Isn't that stamp the cutest thing? I inked it up twice - once in a light blue Memento ink and the second time in a Tuxedo Black Memento Ink. I colored it with Copics and only used a few colors - RV00 for the rosy cheeks, BG0000 to edge my snow guy, and then some blues - BG10, B21 and B24. The cocoa was colored by E31 and E25. The marshmallows were just given a bit of color with the help of YR0000. Now you might wonder why I inked and stamped twice? Well, the snowman is actually paper pieced. I wanted him to stand out but I wanted my cup (in blue) to be real soft looking. I also paper pieced the snow man's hat by stamping just the hat portion onto some blue decorative paper (Stampin Up). The marshmallows and cocoa were also paper pieced. You can also see, I used the same light blue to sponge some color around my mug. After I was done assembling, I added some Crystal and Diamond Stickles to my snowflakes and marshmallows.

    See?

    The rest is just matting it up! I added a strip of decorative paper edged with a Martha Stewart Snowflake Border Punch and added a bit of silver stitching. Using Adirondack Stonewashed ink, I added the You Warm My Heart sentiment!

    Well my friends, that's it for today! Hope you have a great start to your week and I'll see you back here soon! Hope my American friends are getting excited for turkey day! I love this day -- full of wonderful family times!

    Wednesday, October 28, 2009

    Just sitting here dreamin'........

    Don't you find that there are times when you just have to dream of the ocean. And, since I live in Montana -- the ocean seems worlds away. So, what do I do to combat that? Well, I "stamp" the ocean instead!

    I dug deep and picked a stamp that is long gone when it comes to images. It's a retired PSX stamp called Portland Head. Here's a little history for you. Henry Wadsworth Longfellow often visited this area and wrote a poem about this very lighthouse....

    The rocky ledge runs far out into the sea
    And on its outer point, some miles away,
    The lighthouse lifts its massive masonry,
    A pillar of fire by night, of cloud by day.

    - Henry Wadsworth Longfellow, "The Lighthouse"


    Enough dreaming.... here's my card! I made it pretty simple because my image is so pretty. I colored it up with Copic markers using Flourishes Copic Collections - I used the Water, Poppy, Spring Greens and Flesh Tones 2 collections. I added some Snow Green from the Pastels Collection to the clouds and while my Nesties Labels 1 die was still on my shape, I sponged some baby blue and Antique Linen inks around the upper edges for my sky. Add a sentiment, on a punched oval, some rustic cord and you're almost done! The papers are from Prima and Crate Paper (blue). I also paper pierced the edge of the blue for a little extra pop.

    Voila! Now if only I could zap myself to the coast to smell that ocean air in real life. Oh well.... I can dream! :-)

    Thanks for stopping by! I'll see you back here soon!


    Wednesday, July 1, 2009

    Copic coloring continues....again!

    Hi all! Just an FYI... I'm hosting the DT Copic Week over on the Flourishes Newsletter. You can click HERE to check it out! I thought I'd share one of my favorite color schemes with one of my favorite stamps of all times-- the Sweet Peas set with two Copic Collections that were pretty much made for it! Here's a peek at my card....

    Here's a peek at the Copic Collections I picked up for this card...

    Supplies:

    Sweet Peas, Hollyhock and Spring Greens Copic Collections, Flourishes Classic White paper, Spellbinders Ribbon Slides for my message, a sentiment from the Sweet Violets set, pink rhinestones and... done!

    If you want the step by step tutorial, you'll have to check it out over on the Flourishes Newsletter. It was really fun to put together and like you've been hearing all week - using these collections makes Copic coloring a breeze!

    Some other members of the DT pulled out their favorite Copic Collections to give you a little more of a show and tell! Be sure to stop by and see what
    Leslie and Stacy cooked up!

    Thanks for stopping by! Tommorrow we'll kick the lid off our sneek peek challenge to get ready for next Friday's Flourishes release! This challenge is the one that could land you will all three of our new stamp sets! Be sure to check it out!

    Tuesday, June 30, 2009

    Copics Continued!

    Hi all! Hope your week is going well! We are closing in on the end of the week here and I don't know where the time went! Hubby has Friday off so we might just hit the mountains! I can smell the fresh air now!

    Copic week part two continues over at Flourishes. Last week, the owners shared some tips and valuable coloring tips. This week, it's the DT's turn! You'll have to check out the fabulous tutorial Cindy Lawrence put together over on the Flourishes Newsletter!

    Remember this project I shared a little less than two weeks ago?


    Well, I thought I'd revisit it and share some tips on how I colored it and some other fun things about adding some additional color with Copics!

    First, these were the collections that I used....

    Like I've said in the past, Flourishes makes it SO easy. They've grouped the colors so that you don't have to guess what colors will blend nicely. I colored these lemons in - I kid you not - 5 minutes!

    Want to see?


    I started stamping my lemons from the Life, Love and Lemons set with Palette Noir and then coloring the base of the lemon and leaves with the lightest marker in both collections - Y00 and YG91.
    Then, I added some shading with the second lightest colors - Y02, YG93.

    Then, I added the second darkest shades in both of the collections - YG95 and Y06. Keep in mind - normally I would be blending as I go because it is best to blend while the paper is still wet from the marker's ink. But, for tutorial purposes, I wanted you to "see" how the color is layered on the paper.

    And lastly, I added a bit of the darkest shades in both collections - Y08 and YG99.
    When you are done adding your shading, then it is time to go back over your work with the lightest shade in both collections to blend!

    See?

    I didn't want to just leave the lemon with a white background. I wanted to add some depth thanks to the BG11 marker in the Water Collection. Here's a peek at those shades...
    I love the lightest blue shade to add some depth to my images. Here is what it looked like before I blended...
    And, here is what it looked like when I took my Copic Blender and, using circular motions, fuzzied the lines of the blue to make it look more natural..
    You can't really tell because it is so subtle, but I edged my paper in this BG11 and then went over the edges with my blender pen. It just added a soft bit of color that I love.
    And that, my friends is it! I hope seeing the process makes it easier to see just how easy it is to get the vibrancy that only Copics can deliver!

    Be sure to check out Cindy's tutorial over at the Flourishes Newsletter. Latisha and Stacy also have samples to show as well. So, be sure to hop on over there too!