Tuesday, April 29, 2014

How Beautiful A Day....


Hello all and welcome to day three of Power Poppy's Instant Garden release -- a release that's all digital -- meaning you can download, print and use to create -- right away! Isn't that the most fun ever? Today's dose of flower power is about the fanciful, fluffy and irresistible Peonies! You can get this beauty RIGHT HERE, RIGHT NOW! :-)

On to my creation!


I printed my image off on white card stock and then, grabbed my Copic Markers and used G40, G43, G20, G46, R81, R83, R85, R0000, RV01, and used BV000 and BV0000 to shade around my flower. I used the Spellbinders Blossom die and while my die was still on the paper, I sponged on some Ranger Spun Sugar Distress Ink. The decorative paper is from BasicGrey and Ruby Rock-It. I got the white ribbon from Michael's and added a little rhinestone button. The panel on the front of my card was matted and run through my Grand Calibur with a Stampin' Up embossing folder -- just for a wee bit of texture. 

Here's a close up.... 

And here's a peek at the sentiment that goes with this set that I printed off on some BasicGrey paper. Isn't that a beautiful sentie? I love how fresh and pretty this one is!


And that, my friends is it! One more fun note, during the month of May, the Bloom Brigade will not only be sharing ideas on how to use these digital beauties, but we'll also give those who purchase them extra ways to win some Power Poppy goodies! The fun will happen each Friday in May! Can't wait!

I should point out -- Marcella Hawley shared some fun tidbits today over on the Power Poppy blog. I happen to know that peonies are one of Marcella's faves when it comes to flowers  -- so hop on my the Power Poppy Blog and see some of her fabulous inspiration for this digi set! 

Want to see what fanciful beauty the Bloom Brigade whipped up using this new digi? Hop on over and see...


Coming up tomorrow, one last addition to our Power Poppy Instant Garden! This one will have you tip toeing through all kinds of creativity! 

See you back here tomorrow!
~Julie


Pin It

Monday, April 28, 2014

Time to Remember....


Hello all and welcome to day two of the Power Poppy Release! Today's dose of flower power is all about strength, faith and remembrance -- that's what the Gladioli flower stands for! I absolutely love the range of colors this flower comes in and, if I must say, Marcella drew it up in such a beautiful way. Don't you think?  I should mention, if you like what you see when you make the rounds to the blogs of the Bloom Brigade, you can get this beautiful image RIGHT HERE, RIGHT NOW! How? It's a digital release, meaning instant gratification for YOU! Just purchase, download to your computer, print, color and make into a beautiful card or creation! 

On to my creation! I have to say that for my card, I was definitely influenced by THIS card created by my fellow "Bloomer" Christine Okken. I loved the sketch she used from Deconstructing Jen and so... I followed her link and tried THIS sketch too! 


I used scraps from my pattern paper bin, so I wish I could tell you what these papers are -- I need to do a better job of keeping track! After printing my image, I used an oval and scalloped oval die from Spellbinders -- Classic Oval LG and Scalloped Classic Oval LG. While my oval die was still on my white paper, I did use the die as a guide for some paper piercing. I then colored my image up with my Copic markers. I used R30, R32, R34, R14, R0000, G20, G40, G43, G46, BG0000, BG000, and BG10. The centers of the flowers were just a touch of YG21 and then some glitter glue. 

I wanted the inside of my card to be special too so I printed off the sentiment on some decorative paper and before I printed, I also added some of the gladioli and took down the opacity so that it was about 35% of the image and would show up a bit as a decorative accent around my sentiment. I did this in Photoshop Elements. I added some paper piercing and... ta da... the inside of my card! 

And that, my friends is it! I forgot to mention -- the ribbon is Melon Hug Snug and the little splash of bling is from Queen & Co. Just that simple! :-) Again, if you want to have some fun coloring up this beauty of an image, you can do it  RIGHT HERE, RIGHT NOW -- with this oh-so-special digi release! :-)

One more fun note, during the month of May, the Bloom Brigade will not only be sharing ideas on how to use these digital beauties, but we'll also give those who purchase them extra ways to win some Power Poppy goodies! The fun will happen each Friday in May!

Well, I've done enough chatting -- time to head on over and see what kind of Gladioli goodness the rest of the Bloom Brigade crafted!

Allison Cope
Christine Okken
Cindy Lawrence
Dawn Burnworth
Julie Koerber -- you are here!
Kathy Jones
Leslie Miller
Tosha Leyendekker
Coming up tomorrow, another flower takes center stage and this one has a flair of fullness and romance. It's a breath of spring that you can add to a card any time of the year! You'll have to come on back and see what Power Poppy has in store!

See you then!
~Julie


Pin It

A little PageMaps Fun!


Hello everyone! It's been a while since I've done a PageMaps Monday to kick off some creativity in your week and -- well -- my feet are back under me now and I am going to start this back up again. How does it work? Easy! I just head on over to the PageMaps.com site, click on CardMaps and then -- have at it! There are HUNDREDS of sketches there to inspire!

So, I picked one from the April CardMaps selection this time and here's a peek at the sketch!


And here's a peek at my card! I have been playing around lately with using decorative papers as a base for my main image. I thought if I stamped this beautiful floral from Power Poppy's Azalea set on pink decorative paper, I could accent with some splashes of white. Originally, I was going to have it all shades of white. Well, after I pulled down the Prismacolor Pencils, I couldn't just stop with white! I added a splash of rose and lime too. And, why stop there? Grab the Molotow White Paint Pen and dot on some accents too! Underneath my image I used R81, R83 and RV00 Copic Markers to add some shading. The sentiment is also from the set and I just added it thanks to a 1-1/4" circle punch and some foam tape. I also accented the word "Always" thanks to the R81 marker. Add some bling and a fun Spellbinders border die called A2 Scalloped Borders Two.  The paper is Alphabet Junction by Carta Bella.

And that, my friends, is it! Want a source of inspiration when you hit your craft room? Grab a cuppa joe and head on over to PageMaps! Within minutes, you'll have sketch ideas and your brain will be swirling with ways to bring them to life! Have a fabulous Monday!

~Julie


Pin It

Sunday, April 27, 2014

Pick some Gerbera Daisies!


Hi all! It's time for the first day of the Power Poppy release and guess what? If you like the image today, you can get it immediately! How is that? Well, Marcella decided to illustrate a completely digital release -- meaning all you have to do is purchase the image and it is ready for download in minutes! Simply print, color and fashion into a whole lot of homemade gorgeousness! This image featuring a trio of beautiful Gerbera Daisies even comes with a beautiful and heartfelt sentiment perfect for those one-of-a-kind friends! And, like I said, you can get it RIGHT NOW --- RIGHT HERE! ;-)

On to my creation! I decided to take a trip back to some of the older Scor-Pal card tutorials on their site and had fun with THIS one called Cami Tri-Fold. I didn't follow the directions exactly -- but followed the basic idea. 

Here's a peek at my finished card!

I started with a 12" by 12" piece of C'oredinations Card Stock that I cut to measure 12" by 5-1/2" and scored twice - once at 4-1/4" and once at 8-1/2".  Once I folded the three sections, I ended up with one portion that was only 3-1/2" wide. And, just like the tutorial, It made a great spot for a window!

So, I took my Long Rectangle Spellbinders Die (retired), and set it where I wanted it on the front my card. 


I wanted a mat on the front of my card, so I took some My Mind's Eye Collectibles Paper and created a 4" by 5-1/4" mat. You can see it above on the back side through my window. I thought setting the die back down in this hole would help me easily cut that window out of my mat. Like I'm showing below...


I made a second mat and again cut out the window. Before I attached it, I did add some paper piercing for a little extra pop....


Now, I am ready for the inside. I created a blue polka dot mat and then, matted up my main image with a dark blue polka dot and set it in the inner portion of my inside fold so that it would peek out through the window in just the right way. After printing my daisies, I colored them up with Copic markers and used G20, G40, G43, G46, Y21, Y23, Y35, Y38, BG0000, BG000, BG10, and BG11. I also accented the centers of my daisies with a Molotow White Paint Pen.  Here's a close up!


And here's what the entire center panel looks like..

You might wonder about the buttons. Well, those were strategically placed so that the front window panel could be secured underneath the scalloped circle. I used a really large glue dot to make sure they stayed put! ;-)

And, here's a peek at the center panel. I printed off the sentiment onto some yellow decorative paper and matted it on the inside. I haven't decided if I am done with this card yet. I might add a white panel to the right so that I have more space to write. Not sure! I am going to set this one aside and keep it for just the right occasion!

And here's one last look at the finished and folded card!

Want to try this project yourself? Just follow the link to the Scor-Pal tutorial and remember, you can get this image RIGHT HERE as we speak -- what fun! I should mention, this digi will only be available for a limited time. And, if you purchase it, you should know that Power Poppy will have a month of fun designed around all of these new images with challenges designed to help you win more Power Poppy goodness! 

Want to see what kind of creativity is popping up with the rest of the Bloom Brigade? You'll have to stop on over and see.....

Allison Cope
Christine Okken
Cindy Lawrence
Danielle Kennedy
Dawn Burnworth
Julie Koerber
Kathy Jones
Katie Sims
Leslie Miller
Stacy Morgan
Tosha Leyendekker

Like I mentioned yesterday, this release is all about the April Showers that are sure to bring up May Flowers and tomorrow is no exception! Get ready for a blossom that stands for faith and strength of character -- it's also drop dead gorgeous! See you back here tomorrow!

~Julie

Pin It

Saturday, April 26, 2014

Get ready for some FLOWER POWER!

Hello gang! It's almost time! It's almost time! Tomorrow kicks off day one of Power Poppy's new release! This one, is a wee bit special because with it comes a bit of instant gratification. I won't say much more because I don't want to ruin the surprise. I will share a peek though! Want to see? 

You know that saying April showers bring May flowers? Well that is what this release is all about -- FLOWER POWER! Get ready for four days of intense fun with eye-popping, jaw-dropping, color infused fun! I can almost guarantee, one of your favorite flowers will be in this upcoming release! And, if you decide to buy up any of the new release, you should know there is a whole MONTH of fun planned around the images! You'll have to wait to see what we have in store for that. So, be sure to come on back tomorrow to see what I and the rest of the Bloom Brigade has in store! 

~Julie

Pin It

Friday, April 25, 2014

Springtime Love!

Hi everyone and happy Friday! Hope your week is ending on a high note! Today I'm sharing an O2M, N2U card -- that means old to me, new to you card! ;-)

I made this card about a month ago and never blogged it! I picked up the Bo Bunny Pin Cushion paper pack and couldn't help but be inspired by it's down home, country feel! I love those shades of green grass and coral!


I started by stamping the rose and wood hyacinth image from Power Poppy's Springtime Love set on some white card stock and trying to imitate the orange and green tones in my image. I used G20, G40, G43, G46, R30, R32, and R34 with BV00, BV02 and BV0000. I did use the Spellbinders Labels Fourteen. While the die was still on, I sponged on some Ranger Peach Bellini ink to cast a soft glow. I stamped the "LOVE" sentiment and punched out with a small Stampin' Up scalloped circle punch and then matted it on a 1" circle punch, popped it up with foam tape and... ta da!  I added some May Arts lace trim, a few buttons and that, my friends, is pretty much it!

Enjoy the rest of your week and mark your calendar! Starting this Sunday - April 27th - the Power Poppy Design Team will be back with an EXCITING new release. This one is all about instant gratification, so you'll have to stop by and see what we have in store!!!

See you then!
~Julie


Pin It

Friday, April 18, 2014

A Little Friday Creativity.....

Hi all! Hope life is fabulous in your neck of the woods. I stole away some time today for a wee bit of creativity. After surfing some of the new creations over on Splitcoast, I had to see what some of the challenges were this week! ;-) I am loving trying to do one each week!

I only had about a half hour today and so.... with an oh-so cute sketch courtesy of Ally -- Sketch Challenge Hostess with the Mostess over on Splitcoaststampers -- I decided to whip this little creation out for SC484!

Here's a peek at the sketch...

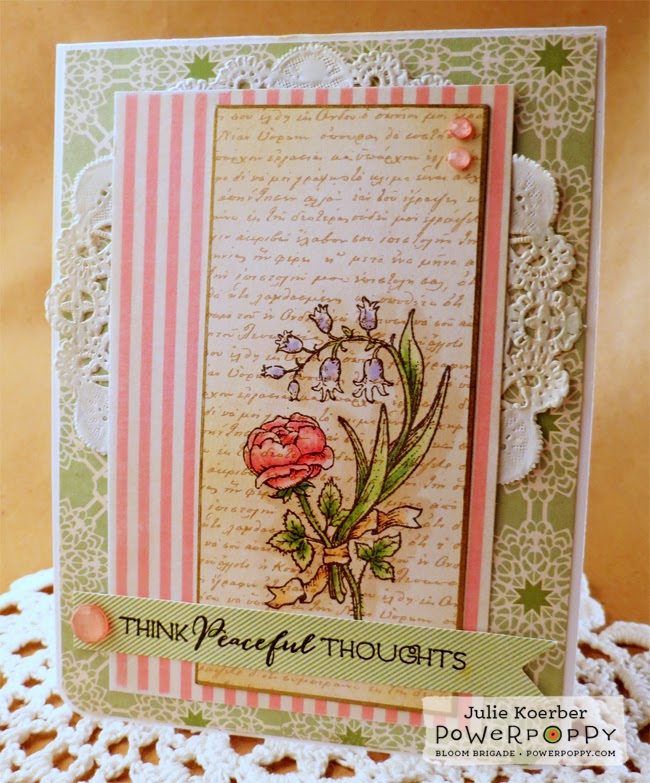
 And here's my creation using Power Poppy's Springtime Love set. It's funny, this set was still out on my desk from THIS creation! ;-) The sentiment is from Power Poppy's Good Thinking:Renewal set!


I took some decorative paper from Echo Park's Off the Record paper pack. The pink stripe is also from Echo Park I believe. I added a 4" doily behind my image and stamped my flowers directly on the decorative paper, coloring it with just a few Copics -- R81, R83, R85, G43, G20, BV00, B63 and E42 (for the shading around my flowers). I did add a little Antique Linen Distress Ink -- sponged it around the edge of my decorative paper and then added a little gold leaf border, some bling and a sentiment strip!  

Here's a close up!


And that, my friends, is it! Just click HERE if you want to give this sketch challenge a try and if I don't "see" you before Sunday, enjoy this weekend and have a blessed Easter!

Thanks for stopping by!

~Julie


Pin It

Thursday, April 17, 2014

Operation Overhaul!

A few months ago, I decided my craft room was bursting at the seams and -- when you can't find anything easily -- something's got to give! And while it's not fun sharing photos like this below, sometimes you have to experience this...... (and no, this was not staged - this was me pulling apart everything to scale back!)


Before you get to this! Welcome to my storage closet. 
I started my saving my pennies and investing in THESE organizational cubes. I love the way they turned out. The fabric cubes were from Target -- love that they were just $6 apiece! I put 6 by 6" paper pads in one and ribbon scraps in the other. The filing drawers hold all my papers. That plastic cart to the left of m cube storage is going -- I took some of the clasp together drawers and filled one cube with them. One hold tags, one holds stickers and border strips, another holds card ideas and tutorial sheets.I have two that are empty just for future use. I loved how these drawers fit perfectly inside the cubes.  

I have been looking to organize my cards for a while now by category so that I don't have to flip through boxes to find just the right card. I did donate a TON to my mom's Card 4 Kids program. I shipped off probably 70 cards so that the kids at Children's Hospital of Michigan have birthday, thank you and congrats cards for when they need them! 

I found these little bins at the dollar spot at Target and with the help of some kraft paper and an oval punch, I labeled them all....

And, they fit perfectly in the cubbies in my desk! 


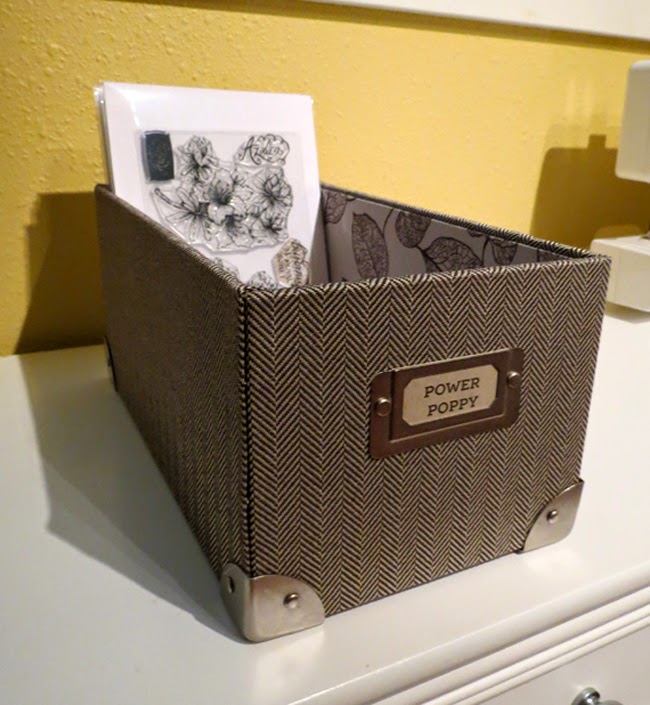
I also changed up the way I store my clear stamps. I used to use plastic clam shell boxes but I found that they really take up a ton of space and I wanted something that was more low profile. Thanks to a few fellow stampers, I found these sleeves by Avery Elle!


After I trimmed a piece of white card stock to give my package a firm backing, I set the stamps inside and then am storing them in these cut little boxes I found at Target for $7 apiece. I think I'll be able to fit about 100 stamp sets in each one (which is way more space than I need)!

I labeled them and have about four extras for different sets from different companies down the road! 


I admit, I am a sucker for Spellbinders dies and I added these small hooks a few years ago to hang my dies from. I added a few hooks here and then swapped out a cafe rod I had to store my punches for THIS bar from IKEA which is so much sturdier! If you wanted to use this for something other than punches, they have some cool hanging storage that works with this bar as well. They have little cups with hooks that hang off this bar. Check it out HERE -- great for pencils, markers or tools! I am *thinking* about adding one of these over my desk with my Copic markers grouped by color. 


I picked up this beauty a few years ago at Harbor Freight Tools -- it's a 12" Revolving Four Tray Bin for $19. It's perfect for reinkers, glitter glue containers and adhesives.


And... the last part of my overhaul was just reorganizing my plastic bins and making sure they were labeled. I bought a Dymo Letratag Labeler for work about 5 years ago and it came in handy! 


I still have a corner set up for my photography.....


 And, the overall room didn't really change much... still looks much the same!


I hate to say it took me 6 weeks to reorganize and downsize. I think by selling off some beloved stamps and organizers - I was able to get rid of about 30% of my things that needed a little more love! And... in the process, I have some room to move and places to store new and fun things. It's a win-win! :-)

Thanks for stopping by!

~Julie


Pin It

Sunday, April 13, 2014

Time for a Free For All!

Well I didn't get this card posted on Friday when the Free For All challenge launched-- but heck -- I had fun so that's all that matters, right? This week's challenge over at Splitcoast this week (FA216) was to take a slice. What does that mean? Well, you had to take a "slice" off of your card front. I had never done this before so it was super fun!

So, here's what I did!


I actually made my card square -- 4-1/8" by 4-1/8", rounded the corners and then got to stamping! I stamped the image from Power Poppy's Springtime Love in black ink on the slice strip twice. I stamped once, flipped the stamp and then again using Espresso Truffle Memento Ink. The sentiment from Power Poppy's Good Thinking: Renewal Set was stamped on the inside slice and then, before I got to coloring, I ran the card through my Grand Calibur using a wood grain embossing folder.  

Also, since I had some embossing, I did add a smaller flat panel for writing. I added the bow and then matted this entire card onto a 4-1/4" by 4-1/4" piece of black card stock. See?


Ok.. for the coloring, I thought that using Copics on this kraft would be a bit dull. So, I picked up my Derwent Inktense pencils. The fabulous Lydia Fielder has been using them a ton on her creations lately and I was just so inspired. Don't look too closely to my work -- I need some practice! I wanted it to have a '"scibbly" look. I added some splashes of white with the Moltow White Paint Pen. After I was done coloring, I added some dots of E31 Copic marker around the image. Not sure why I did this -- just experimenting! ;-)

Here's a closeup....


And that, my friends, is it! It was a fun challenge and if you want to give it a try -- just click on over HERE to the thread and HERE to the gallery! Fun stuff! Thanks for stopping by -- see you back here soon!


~Julie


Pin It

Friday, April 4, 2014

Free For All Friday!

Hello all! How's life in your neck of the woods? I hope really grand. I was busy working today (I work from home and am kind of my own boss) and got literally stuck in my work. Well, instead of trudging through, I decided to play hookie and ..... CREATE! Isn't that a fabulous idea??? ;-) I say yes!

It's been forever since I've been able to play along in a Splitcoaststamper's Challenge -- so with my decision to skip out on work for a bit, I went over there was a fun challenge calling my name! This week the Free 4 All challenge is to use a layer on top of another layer of the same color. So... here goes my creation!

I just love the look of white on white and especially when the second layer is full of texture. So.... that's why I picked up this Stampin' Up embossing folder called Arrows.


This card literally took nothing to create -- I had the mini Azaleas colored already and so, I merely cut them out, added some glitter glue for a little razzle dazzle and then assembled them in layers (using foam tape on the top flower) to give it some extra pop. The Copic Markers I used were R0000, R01, R30, R32 and R35. The leaves were G20, G40, G43 and G46. The stamps are from Power Poppy's Azalea set and the sentiment is from the Good Thinking: Renewal set -- also from Power Poppy. I added the sentiment on a patterned paper die cut (paper is from Bo Bunny) and almost done! I added some Sea Moss Seam Binding Ribbon (from Hug Snug) and added a little bling thanks to Queen and Co.

And... here's a close up!


And that, my friends is it! Want to check out the challenge for yourself? Just click HERE for the F4A215 Challenge!

~Julie


Pin It