Friday, December 22, 2017

Wishing You a Merry Christmas


Hello my sweet stamping friends! I sure hope you are cozy and warm wherever you are right now, nestled in and enjoying this beautiful season! The stockings are not yet hung at my place, but the Koerber home is looking and waiting in hope for a beautiful Christmas Day! 


And with the joy of Christmas alive in our hearts, I wish you and your loved ones tidings of comfort and joy. I say that because as I type, I am listening to the Choir of King's College sing this beautiful hymn -- God Rest Ye Merry Gentlemen -- and reveling in all this year has changed for me personally. There's too much to list but I sit back and thank the Lord, who came into this world as a vulnerable child to bring salvation for us all. What a beautiful and awe-inspiring gift! I pray you feel that beauty and awe in the coming days -- seeing it in friends and family, in generosity shared, in love expressed, in all the daily things we might otherwise take for granted. Know I keep you all in my thoughts and send prayers for safety, health, and happiness in the coming year with more blessings than you can even imagine! 

Now on to some card making fun! The Power Poppy Bloom Brigade decided in this hustle and bustle of the last few days before Christmas, we would take a break from creating, and simply show some of our favorite Christmas creations! 


As I scrolled through all of my Power Poppy creations, I didn't have to travel very far to find a few of my favorites. This one above might be the winner. I am not sure why -- maybe it's the soft coloring, the accents of white, the image itself or the soft blue hues -- or a combination of them all -- but this one came in the top three! You can check out the full card HERE.  I used Power Poppy's Winter Wonderland stamp set. What's even more fun is that I just sent this one out into the world yesterday with Christmas wishes attached! 


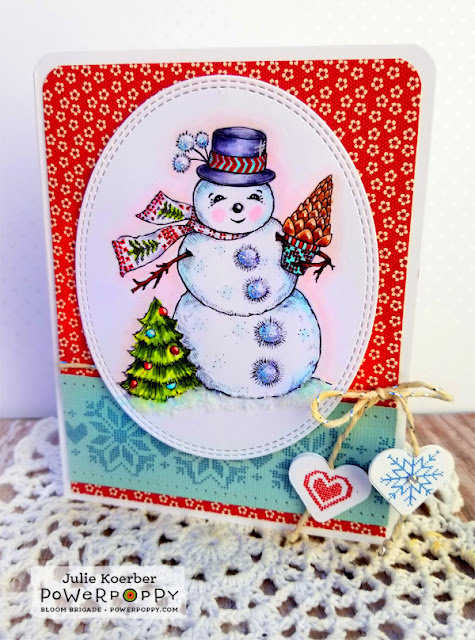
And because I found it hard to pick just one, my eyes settled on this one above as well! For this one, I used Power Poppy's Snow Kissed stamp set. What I love about this card is how this stamp set delivers a kind of homespun charm. That snow guy is just about the cutest thing ever and creating with him is even more fun! You can check out the full card details HERE. 


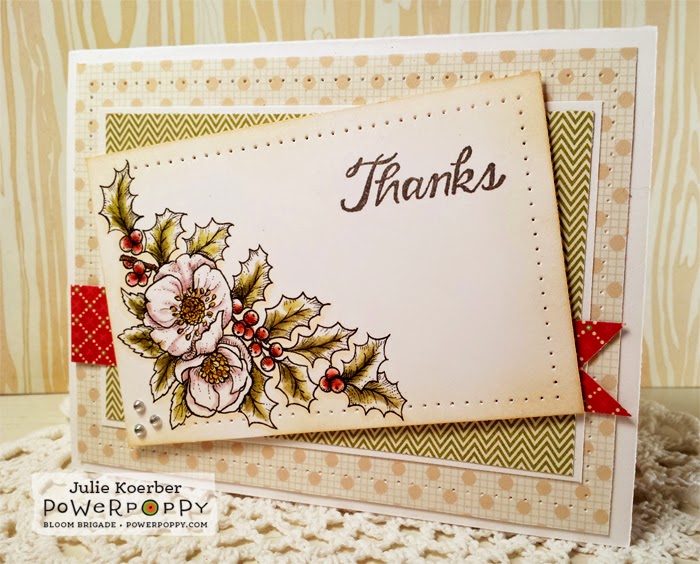
And lastly, because many of us like to follow up the holidays with some handmade thank yous, I included this one. The layout is simple but I love how the image from Heaven and Nature Sing just stands out. It is such an absolutely beautiful illustration and a joy to color up! Check out the full card HERE. 

As we get ready to celebrate with family and friends, those are a few of my Christmas favorites! I know the Bloomies have some of theirs to share as well! We have a kind of favorites of Christmas past hop. We all wanted to share and take some time to wish you all the very best! So, be sure to holiday hop on over to see...

Julie Koerber >>> you are here!


Before I bid you farewell, I have one more quick thing to share! I decided this year that I would try my hardest to add some homemade joy to my tree as well! Since we are all crafty peeps here, I thought what better friends to share my creations with than all of YOU!!! Thanks in advance for obliging me! ;-) As you can see, I grabbed some knitting patterns and downloaded some felt ornament patterns to be able to hang a little bit of my heart on the tree as well. Here's a few shots of how that turned out. While I wanted to have the tree full of homemade ornaments, I only managed to eek out 14. So, I have my work cut out for me next year! ;-)
So, on that fine note, I hope you enjoy all the holiday brings! I'm wishing you the Merriest of Christmases and I'll see you back here -- hopefully before 2018 hits! ;-)

Merry Christmas!
~Julie

Friday, December 8, 2017

It's Christmastime.... on the blog!


Hello sweet stamping friends! How has your week been? Are you starting to make your lists and check them twice? Do you know who's been naughty.... and who's been nice? ;-)

I am not sure if you've been following the flurry of activity over on the Power Poppy blog this week but, if not, I strongly urge you to check it out! Each day this week -- actually since the first of December -- a different designer has been a guest blogger on the Power Poppy Blog, showcasing a fun-filled project to get you in the spirit of Christmas! And, I actually tried one of them today!

On Day 2 -- Stacy Morgan challenged us all to make a gift card holder and gave a step-by-step tutorial on one of her favorite ways! You can click HERE to check it out! Well, I decided to try this and made mine into a card. So, needless to say, my dimensions had to be a bit different. The good news is, I am sharing that with you today!

Here's a peek at how the project turned out!

I will point out, right off the top, that this project was one that I wanted to create in a jiffy. You might notice that the coloring on this is a bit all over the place. Well, that was my intent! Just a quick watercolor wash using my trusty (and very old) Twinkling H20s. I got these paints when they first made an appearance on the scene and I really need to drag them out more! It was fun to just color outside the lines and get that dreamy look with a bit of sparkle as well. Here's a little close up for you! I wish you could see the sparkle!


And, just to let you know, I used the hellebore image from Power Poppy's Heaven & Nature Sing stamp set - stamping with Versamark and then embossing with gold detail powder! Okay... moving on! Here's how I created my gift card holder!


I started by cutting a strip of paper to measure 4-1/4" by 11". From there, I scored 4" in on each side. After you do so, You have a 3" section in the middle. I added another score mark at the 5-1/2" line to create my mountain fold in the center. This will become my gift card holder!

From there, using the Heaven & Nature Sing stamp set from Power Poppy, I stamped all over this piece using a tan water-based ink.

Once I was done stamping, I did go over all the stamped areas with a water brush to give some depth to the stamped flowers....


And I also stamped the sentiment from Holly Golightly in Versamark Ink and then heat embossed using gold detail powder. The sentiment on the front is from the Under Glass: Christmas Traditions stamp set. 


Now, you can see that once I taped it all down, it created that mountain in the center of the card. I even put a line of tape at the far edge of each side of the mountain fold so that it would stay together and keep that gift card in place. One more note! Before I stuck that down, I did use a large oval die shape to create the slot for my gift card. See?


Once cut, you can see that the gift card fits in that little slot perfectly! From there, the rest is just matting up your card. I used a window die for my front, setting the stamped sentiment inside and that was pretty much it -- an easy and earthy gift card holder that is now ready for me to share the spirit of Christmas!


And that, my friends, is it! Like I said, check out Stacy's tutorial HERE and if you are looking for a few more ideas, I did a gift card tutorial last year, just in time for the holidays, HERE! 

Now, keep in mind, if you run through all the tutorials and decide to give one of them a try, don't forget to link up your creation on THIS POST. Every project linked up will be in the running for our 12 Days of Christmas Power & Spark Challenge. Winner gets a $50 Shopping Spree to the Power Poppy Shop! Oh, what fun!

Thanks for stopping by and seeing what I've been up to! Now it's time to check in not only with the Power Poppy blog HERE for today's tutorial with the oh-so-fabulous Cindy Lawrence but the other Bloomies below!


Cindy Lawrence
Julie Koerber >>> you are here!
Stacy Morgan
Tosha Leyendekker


Hope you have a wonderful weekend and I will see you all back here real soon!
~Julie


Tuesday, December 5, 2017

Be sure to check out the Power Poppy Blog Today!


Hey all, if you didn't know it -- Power Poppy is hosting the 12 Days of Christmas Power & Spark Challenge! And, for 12 Days (it started December 1st), some of the Power Poppy designers are sharing some of their favorite Christmas projects -- just to help you get in the spirit!

Want to learn how to make this little box?


Just click HERE and you'll have a step-by-step tutorial! Hope you hop on over there! I'll see you back here real soon!

~Julie

Friday, November 17, 2017

A Pop of Pink!

Hello folks! Hope you had a wonderful week! It sure went fast for me, how about you? We were lucky here, we had gotten some snow and it truly felt like we were skipping or shortcutting fall for winter. Well, today was in the 50s so, I. Was. Happy! I like each and every season so, when another season tries to jump in line, I am not a fan! ;-)

So, my dear hearts, my creation for this week! Remember this little snippet that I shared with you last week?


Well, as promised, I am here to share my creation and show how this all played out! After coloring up my image, I knew that I wanted to keep my card on the simple side, just add a sentiment and maybe a little bling and call it good. So, that's what I did!


Instead of reaching for pink decorative paper, I decided to let the pink on my image shine by NOT leaning toward that shade in my layout. Instead, I added strips of blue and green and incorporated a little razzle-dazzle with the help of an iridescent-edged ribbon tied in a bow. In case you didn't recognize the image -- it's called Tree Peony -- by Power Poppy, of course. This little number is a digital stamp, which makes creating so fun. Simply download, print and color to your heart's content!

As I mentioned last week, these were the Copic Markers that I used to color this image up!


And if you didn't know, I was playing along in last week's Hues to Use! Check it out!


Here's a little close-up for you! I should point out that the sentiment I stamped on that image panel is from Power Poppy's clear stamp set called Burst of Kindness! I think it is perfect for those thank you cards that you just need waiting in the wings!


And that, my friends is it! Now it's time to check in with these fine ladies! 


It's time for the Bloom Brigade Parade! And, these amazing designers are all ready to show you what they've been working on this week! YAY!


Allison Cope
Christine Okken
Cindy Lawrence
Julie Koerber
Katie Sims
Stacy Morgan
Tosha Leyendekker


Thanks for stopping by! I'll see you all back here real soon! Have a wonderful weekend!~Julie

Friday, November 10, 2017

Friday Fun -- Power Poppy Style!

Hello folks! Hope you had a wonderful week! Even though the thermometer in my neck of the woods is acting a whole lot like winter, I decided to reach for a fall-inspired digital stamp from Power Poppy this week -- Apples in Season!  I can almost smell the cider with this image! I have to tell you, living in Montana where the soil and climate aren't conducive to apple orchards, I miss those days in my home state of Michigan where you could visit the cider mill, have a warm cup and nibble on a freshly baked donut with it. Ahhh... nothing like that, especially if there was a bit of a nip in the air!

So, my dear hearts, my creation for this week!


I started by printing off the image by converting the stamp to a light brown tone so that the lines of the image weren't so prominent. I also flipped the image before I printed. How do you do that? Simple! I can show you in PhotoShop! 


You simply click on Image, Rotate and then it gives you a few options. If you click on Flip Horizontal -- it will flip the image so that it is facing the opposite direction. That's just what I did here! 

Before I move on to the card details, I should point out that I chose this color palette for my creation thanks to Power Poppy's color challenge - Hues to Use. The beauty of this little challenge is the fact that it is a never ending challenge! You can go back since the beginning, and still add your linky! This challenge was from October 10th! 


So, with the palette taken care of, I used Copics to color up this image and used almost every red in my Copic arsenal - R20, R24, R27. R29, R01 to blend, YG03, UG06, YG17, G20, RV00, RV02, R81 and R83. Oh, I almost forgot! Before I colored up this image, I followed Nancy's tutorial HERE on how to use your Silhouette Cameo with digital images. That tutorial is BRILLIANT! I had no idea you could use this cutting machine with digital files, but she showed us all how! 

Here's a little close up for you! Sorry, it is a wee bit blurry... not sure what was going on. Maybe I wasn't wearing my glasses when I snapped this shot! LOL! 


The rest is just matting it all up! I added some die cut circles, stamped the green one with THIS sentiment from the Power Poppy Everything's Even Rosier clear set. Added a half doily in a kraft shade and accented with an antique gingham ribbon. And that, my friends is it!

Because I was on a little Hues to Use kick, I also colored up this image below from the digital stamp set Tree Peony, also from Power Poppy using this week's Hues to Use HERE!   While I didn't have time to craft a second card, I thought it would be fun to show it in progress! I am going to whip this one up and play along with Cindy's Power & Spark Portion Control Challenge! 

Here's the color palette for this week -- such rich shades of coral! Click HERE to see the challenge details! 


And here's the Copic colors that I used! 


Look for the full creation for my post next Friday! ;-) In the meantime, I know there's more creativity floating around in blogland thanks to the Bloomies!


Be sure to pay these fine designers and even finer human beings a visit!


Thanks for stopping by! I'll see you all back here real soon! Have a wonderful (and warm) weekend!
~Julie

Friday, November 3, 2017

Fluttering Hues

Hello folks! It's Friday, which means it's time to show off a little Power Poppy goodness! I had some time to play and so, before I got rolling, I cued up the latest....


I love these figs Marcella photographed on one of her trips this summer to the Farmer's Market in her town of Webster Groves. So delightful in color and she swears they were just as delish! I must admit to a bit of a snafu. When I looked at these hues on my phone screen, they looked far more purple. So, please excuse the lack of plum and the more purple flair! When I took a photo and popped this into my blog post, I shrieked! How could I have been THAT off! Oh well, such is life, right?


I had printed off the Power Poppy digi Sunset Sway months ago and never took the time to color it up! That's just plain wrong, isn't it!  After printing, I reached into my trusty bag of Copic Markers and these are the colors I grabbed!


Because this is a little larger of an image, I wanted to make sure it took center stage on my creation. So, I left the layout rather simple -- pairing up a few different, yet coordinating kinds of decorative paper, adding the sentiment from Easy Breezy Coneflower, and then accenting with some natural twine and a greenish yellow button!

Here's a little closeup for you! You can see that I did accent parts of this image with some of my favorite white gel pen!


And that, my friends is it! I hope you take some time to play along with Hues to Use before next Tuesday hits and we unveil a brand new color scheme. Keep in mind, however, if you don't play along this week, you can always visit HERE and go through all of our Hues to Use archives to play along in weeks or even months past! It's a never-ending linky, which means there's no timeline to play! :-)

Speaking of playing, the fabulous Cindy Lawrence is hosting a brand new Power & Spark Challenge which kicked off TODAY over at the Power Poppy Blog HERE! But, before you go hopping, here's a little peek at the challenge!


I will let you click on the link above to read all about the challenge! Yes, I will just tease you like that! I hope you check it out -- there's a $50 shopping spree on the line! And if you're in the mood to hop, I know these fine ladies below would love to show off some of what they've worked on this week!


Thanks so much for stopping by and sharing a bit of your day with me! Hope you have a wonderful weekend and I'll see you back here soon!

~Julie

Friday, October 27, 2017

Oh Mr. Gingerbread Man!


Hello sweet peeps! I know my blog has been buzzing this past week with all the new offerings from Power Poppy and.... today is no exception! Just two days ago, a brand new digital stamp set arrived on the scene that is going to make creating tags and little Christmas treasures so much fun! 


I absolutely adore this set because of the fact that these little gingerbread people can be shown in a front and back design! Here, you have spicy gingerbread cookies, decorated oh-so-sweetly with, like I said, a mirror image for even more creative fun! This set even comes with a cozy gingerbread house to serve as a tasty accent or even the centerpiece of your holiday card.

On to my creation!


Because of the front and back nature of this image, I thought it would be super fun to create a "peek-a-boo" kind of window card so that when you opened up the card, you saw the back side of your little dough man! 

Check it out.....  (you can see how I also decked out my card front using the Frosted Gingerbread clear stamp set as a background. I stamped in brown and accented with a white gel pen!)

So, to get my little gingerbread man, stepping out from the frame, I put glue dots on the top of the hat on the lower leg that would be leaning out... 


 And then, I attached him.. just so!


From there, I colored up the backside and overlayed this image! 


I should mention that when I colored him up, these were the markers (below) that I used! I have to tell you that I had a kind of blond moment. Why didn't I even THINK to print this little guy out on kraft colored paper? Never even crossed my mind! That would have been too easy! ;-)


Because I didn't want just a simple white background showing through the window of my card, I did use some green decorative paper and made sure to stamp my sentiment (also from the Frosted Gingerbread clear stamp set) below the window so that it wouldn't show! I then accented with a red sparkle pen and white gel pen -- for a little something extra! 


And here's one last look at it all matted up! Add a little bow and fun two-toned button and this little guy is ready to make his grand holiday entrance! 


And that, my friends, is it from me today! Be sure to head on over to the Power Poppy Blog HERE for a dose of good vibes! It's Good Vibe 5 and there are some fun little snippets of info for you, just waiting to be shared!

Have a fabulous weekend and I will see you back here soon!
~Julie

Tuesday, October 24, 2017

The Happiest Holiday Collection is HERE!

It's here! It's here! The Happiest Holiday Collection 2017 IS HERE in the Power Poppy Shop! After 8 days of tantalizing you with fresh new holiday fare, you can now hop, skip, jump, run, or cartwheel over to see these sets for yourself and get your hands on them -- just in time for holiday creation. And, on top of ALL of this new polymer, Marcella even has a special to sweeten the deal for you! Check it out! 


Today brings another Power Poppy Hop showcasing all of the sets in the release and guess what? The gang is all here! You'll have to stay tuned for the link list below so that you can pay the Bloomies a visit and see what fun-filled and festive creations they are sharing as we wrap up this week of holiday fanfare! 

On to my creation! 


I wanted to cue up THIS set -- Glitter House Village for my card today since I didn't get a chance to create with it when the other gals were sneak peeking this lovely set! I find these little holiday villages to be so charming -- coloring them up evoked just the same feeling! If you "Google" Glitter House Villages, all kinds of fun images pop up -- from sparkly gilded varieties to dusty silver scenes to houses with pastel pops to others that carry a more vibrant vibe. I can just see the endless possibilities! And, is it a daytime sky? Or, one like mine, that offers a bit of twilight with abundant snowflakes falling gently below!

I wish I could share all the Copic Markers that I used for this little village but because I colored each house -- one at a time -- I was just reaching into my marker stash and putting them away as I went!  When all was said and done, I did want to bring a splash of sparkle to my scene, so I went a little crazy with the glitter glue!

After I added all the color and glitter, I opted for a super simple layout to help make this scene shine, adding some red and green decorative paper adding one of the sentiments from the set front and center! Oh, I almost forgot, the star that is on the front of my card, is one of the elements of this set that I stamped off, colored up, cut out and popped up for a little something "extra" on my creation! Too fun if you ask me!

I chose Glitter House Village for my creation today but there's a bevy of stamp sets that are being shown off today! Be sure to hop on by to these ladies below to see what they have in store for you all today!


Allison Cope
Christine Okken
Cindy Lawrence
Julie Koerber >>> you are here!
Kathy Jones
Katie Sims
Stacy Morgan
Tosha Leyendekker


I should point out, the fun isn't officially over just yet! The Power Poppy Instant Gardeners will be unveiling a brand new digital stamp set with a holiday flair tomorrow -- it is the 25th after all! Be sure to tune back in then over on the Power Poppy Blog!

See you all back here real soon!
~ Julie

Monday, October 23, 2017

Happiest Holiday 2017 Day 8: Winter Wonderland!

Hello peeps and welcome to yet another addition to the Happiest Holiday 2017 Collection by Power Poppy. Today's offering is "drool-worthy," with its stunning blossoms and berries unfurling with a holiday flair. Don't take it from me, however, take a gander with your own eyes!


Introducing Winter Wonderland, a dramatic holiday bouquet that comes complete with poinsettia, pepper berries, dusty miller and anemones. This truly joyful cascade of holiday beauty will provide all kinds of coloristas with an exciting coloring experience and unforgettable results! Mix-and-match sentiments allow for simple phrasing or stacked and packed holiday greetings!

On to my creation!

I had a blast coloring up this beauty! I had never heard of pepper berries but googled it and ended up using THIS photo as my inspiration! 

Here's the Copic Markers I used for the berries...

Since Dusty Miller is a greenish grey, I decided to keep my foliage a little more true to life and used these Copics for those leaves...


For the anemones, I kind of followed Marcella's lead in the graphic she created coloring the petals soft tones with hues of faded purple and pink...


And these are the markers I reached for to color up the poinsettias. I didn't want a real vibrant red, I thought maybe that would be too much with all the softer hues used elsewhere...


And here, my sweet stamping friends is a close up for you! If you look closely, you can see that I ended up adding some white gel pen accents -- it's my new favorite thing! When I was done coloring, I trimmed up my piece and then fussy cut around the top before layering on a piece of distressed blue decorative paper. I added a gilded ribbon and bow above and called it good for the exterior of the card! 


On the inside, I just took pieces of the sentiments offered to create my own large and scripty sentiment. While I eye-balled this creation, I can see where the MISTI would come in handy for pairing up the sentiment pieces for assembly line fashion creations for the holidays! 


And that, my friends, is it! I love the fact that this holiday botanical offering is so big -- making card fronts just bold and beautiful! 


Want to see the Winter Wonderland some of the Bloomies created using this set? Hop on over and see for yourself their amazing creations! And, don't forget to hop on over to the Power Poppy blog to hear a little bit about Marcella's inspiration behind this brand new holiday set! 


Allison Cope
Christine Okken
Julie Koerber
Katie Sims


Thanks so much for stopping by and spending just a wee bit of your day with me! Tomorrow is the BIG DAY! If you've been hopping all week, checking out the Bloomie's creations, you'll be happy to know that tomorrow is the day when all of these amazing new stamp sets hit the Power Poppy Shop so that YOU can get your hands on them and create your cards for the upcoming holiday season! How exciting is that? We think so! We'll see you here tomorrow for the big reveal! 

Until then,
~Julie