
Hi all! Have you been following the fun that I have been whipping up over on the Power Poppy Blog on Tuesday's? Every Tuesday, I help usher in a new challenge to try to spark a little creativity. We're calling it.....
 And the whole idea behind it is that -- I will literally throw up an idea and let the creative bits fall as they may! So, this was the challenge for this past week!

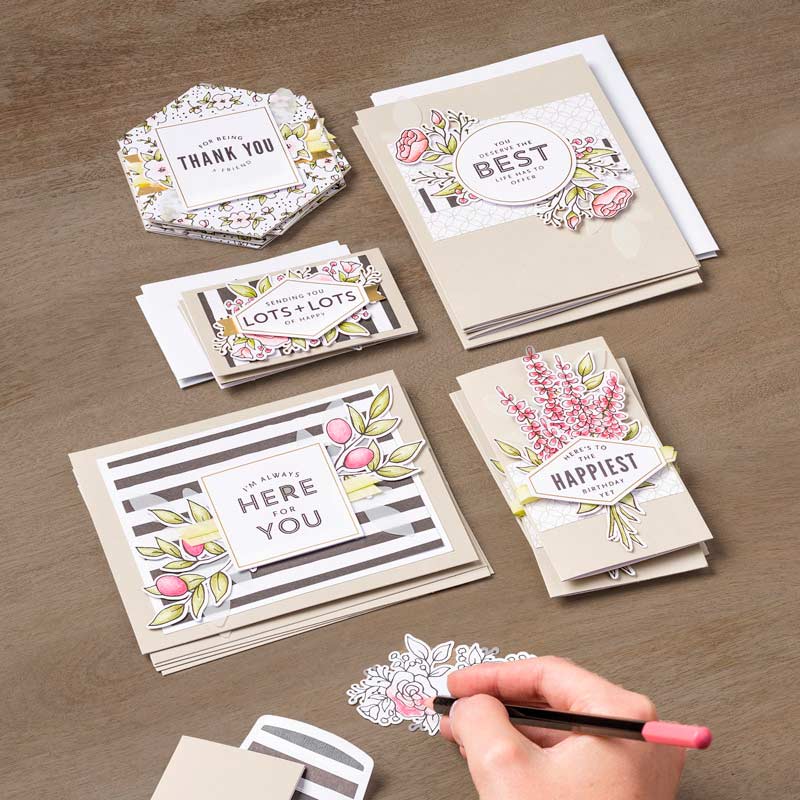
When I issued the challenge, I shared a little of the inspiration behind it all. Recently, I've been seeing a lot of cards and creations with frames at the center of them. I like the look! I saw it HERE when I opened up a Stampin' Up catalog. And, I watched it live and in living color with the fabulous Jennifer McGuire HERE recently. So, I scratched my head. I lost some brain cells thinking and I came up with a way to mimic this look using my favorite stamps and a little digital manipulation! So, this week's challenge is all about using shapes as a kind of focal point in our cards or creations! You'll have to click on over HERE to see my tutorial for the card I posted over on the Power Poppy blog! That's also where you'll find exactly what you need to do to play along! Today's the last day to enter in order to have a shot at winning at $25 gift code to the Power Poppy Shop!
So, on the blog, I showed how to create frames using PhotoShop Elements. And, as promised, I am going to give you a peek at the other two cards I made using this same tutorial!
For starters, here's a look at the page of shapes I made....

After printing, I printed off a second page of masks using a removable Avery label...

Here's a look at the card with the hexagon frame! In my tutorial, I mentioned that I could not have done this witout the MISTI stamping tool. If you are stamping over a mask, there are times when the mask leaves a void. If you are using the MISTI, it allows you to reink and then stamp a second time. 99% of the time, that will do the trick to alleviate that void!

Here's a peek at the other two cards after I masked to give you an idea of what I did....
 I will say that the Sunflower card was a bit trickier because I had to create a mask and then a reverse mask. I masked the circles first so that I could sponge on some ink through my stencil design. Here's a pic showing the panel after I sponged on the ink and removed my circle masks.


And that, my friends, is it! I little "how to" in masking and the different ways you can use masks to add a little impact with a framed focal point. Hope you give this a try! I had a ton of fun with all three of these cards!

Thanks for popping on over to say "hi!" Hope you have a wonderful weekend and I'll see you back here soon!
~Julie


When I issued the challenge, I shared a little of the inspiration behind it all. Recently, I've been seeing a lot of cards and creations with frames at the center of them. I like the look! I saw it HERE when I opened up a Stampin' Up catalog. And, I watched it live and in living color with the fabulous Jennifer McGuire HERE recently. So, I scratched my head. I lost some brain cells thinking and I came up with a way to mimic this look using my favorite stamps and a little digital manipulation! So, this week's challenge is all about using shapes as a kind of focal point in our cards or creations! You'll have to click on over HERE to see my tutorial for the card I posted over on the Power Poppy blog! That's also where you'll find exactly what you need to do to play along! Today's the last day to enter in order to have a shot at winning at $25 gift code to the Power Poppy Shop!
So, on the blog, I showed how to create frames using PhotoShop Elements. And, as promised, I am going to give you a peek at the other two cards I made using this same tutorial!
For starters, here's a look at the page of shapes I made....


And then, I reverse masked so that I could stamp some of the sunflowers from the In Praise of Sunflowers stamp set in the actual circles!

Here's a look at the finished card. I ended up coloring my image with Copic markers and coloring all the backgrounds behind the sunflowers in different pale shades just to give it a little extra "oomph!"

The last card I did was super easy. It was as simple as cutting out the mask, masking the frame and then stamping over top with the help of the Misti. This time, I used the Olive and Oak Expanded stamp set and stamped using Memento Luxe Rich Cocoa. I like the depth of this ink and it works well with watercolor, which is what I planned to do!

And here's my finished card! I used water-based markers, scribbled on a palette and then picked up the color using a water brush. After I was done coloring, I did accent with a white gel pen and then flicked some of the water color back on my main panel for a little extra effect. See?


Thanks for popping on over to say "hi!" Hope you have a wonderful weekend and I'll see you back here soon!
~Julie