Friday, October 27, 2017

Oh Mr. Gingerbread Man!


Hello sweet peeps! I know my blog has been buzzing this past week with all the new offerings from Power Poppy and.... today is no exception! Just two days ago, a brand new digital stamp set arrived on the scene that is going to make creating tags and little Christmas treasures so much fun! 


I absolutely adore this set because of the fact that these little gingerbread people can be shown in a front and back design! Here, you have spicy gingerbread cookies, decorated oh-so-sweetly with, like I said, a mirror image for even more creative fun! This set even comes with a cozy gingerbread house to serve as a tasty accent or even the centerpiece of your holiday card.

On to my creation!


Because of the front and back nature of this image, I thought it would be super fun to create a "peek-a-boo" kind of window card so that when you opened up the card, you saw the back side of your little dough man! 

Check it out.....  (you can see how I also decked out my card front using the Frosted Gingerbread clear stamp set as a background. I stamped in brown and accented with a white gel pen!)

So, to get my little gingerbread man, stepping out from the frame, I put glue dots on the top of the hat on the lower leg that would be leaning out... 


 And then, I attached him.. just so!


From there, I colored up the backside and overlayed this image! 


I should mention that when I colored him up, these were the markers (below) that I used! I have to tell you that I had a kind of blond moment. Why didn't I even THINK to print this little guy out on kraft colored paper? Never even crossed my mind! That would have been too easy! ;-)


Because I didn't want just a simple white background showing through the window of my card, I did use some green decorative paper and made sure to stamp my sentiment (also from the Frosted Gingerbread clear stamp set) below the window so that it wouldn't show! I then accented with a red sparkle pen and white gel pen -- for a little something extra! 


And here's one last look at it all matted up! Add a little bow and fun two-toned button and this little guy is ready to make his grand holiday entrance! 


And that, my friends, is it from me today! Be sure to head on over to the Power Poppy Blog HERE for a dose of good vibes! It's Good Vibe 5 and there are some fun little snippets of info for you, just waiting to be shared!

Have a fabulous weekend and I will see you back here soon!
~Julie

Tuesday, October 24, 2017

The Happiest Holiday Collection is HERE!

It's here! It's here! The Happiest Holiday Collection 2017 IS HERE in the Power Poppy Shop! After 8 days of tantalizing you with fresh new holiday fare, you can now hop, skip, jump, run, or cartwheel over to see these sets for yourself and get your hands on them -- just in time for holiday creation. And, on top of ALL of this new polymer, Marcella even has a special to sweeten the deal for you! Check it out! 


Today brings another Power Poppy Hop showcasing all of the sets in the release and guess what? The gang is all here! You'll have to stay tuned for the link list below so that you can pay the Bloomies a visit and see what fun-filled and festive creations they are sharing as we wrap up this week of holiday fanfare! 

On to my creation! 


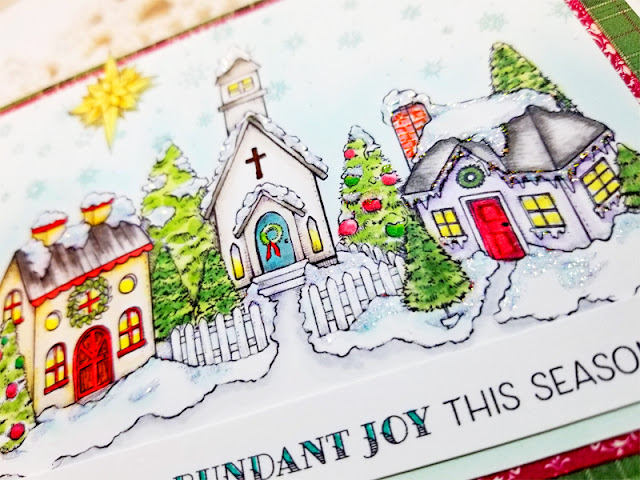
I wanted to cue up THIS set -- Glitter House Village for my card today since I didn't get a chance to create with it when the other gals were sneak peeking this lovely set! I find these little holiday villages to be so charming -- coloring them up evoked just the same feeling! If you "Google" Glitter House Villages, all kinds of fun images pop up -- from sparkly gilded varieties to dusty silver scenes to houses with pastel pops to others that carry a more vibrant vibe. I can just see the endless possibilities! And, is it a daytime sky? Or, one like mine, that offers a bit of twilight with abundant snowflakes falling gently below!

I wish I could share all the Copic Markers that I used for this little village but because I colored each house -- one at a time -- I was just reaching into my marker stash and putting them away as I went!  When all was said and done, I did want to bring a splash of sparkle to my scene, so I went a little crazy with the glitter glue!

After I added all the color and glitter, I opted for a super simple layout to help make this scene shine, adding some red and green decorative paper adding one of the sentiments from the set front and center! Oh, I almost forgot, the star that is on the front of my card, is one of the elements of this set that I stamped off, colored up, cut out and popped up for a little something "extra" on my creation! Too fun if you ask me!

I chose Glitter House Village for my creation today but there's a bevy of stamp sets that are being shown off today! Be sure to hop on by to these ladies below to see what they have in store for you all today!


Allison Cope
Christine Okken
Cindy Lawrence
Julie Koerber >>> you are here!
Kathy Jones
Katie Sims
Stacy Morgan
Tosha Leyendekker


I should point out, the fun isn't officially over just yet! The Power Poppy Instant Gardeners will be unveiling a brand new digital stamp set with a holiday flair tomorrow -- it is the 25th after all! Be sure to tune back in then over on the Power Poppy Blog!

See you all back here real soon!
~ Julie

Monday, October 23, 2017

Happiest Holiday 2017 Day 8: Winter Wonderland!

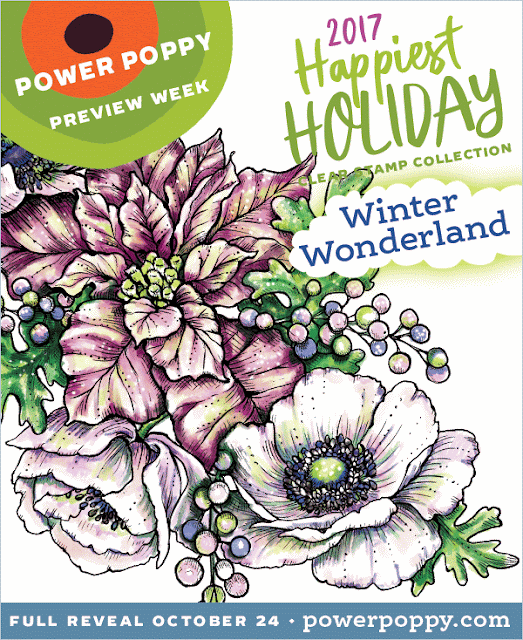
Hello peeps and welcome to yet another addition to the Happiest Holiday 2017 Collection by Power Poppy. Today's offering is "drool-worthy," with its stunning blossoms and berries unfurling with a holiday flair. Don't take it from me, however, take a gander with your own eyes!


Introducing Winter Wonderland, a dramatic holiday bouquet that comes complete with poinsettia, pepper berries, dusty miller and anemones. This truly joyful cascade of holiday beauty will provide all kinds of coloristas with an exciting coloring experience and unforgettable results! Mix-and-match sentiments allow for simple phrasing or stacked and packed holiday greetings!

On to my creation!

I had a blast coloring up this beauty! I had never heard of pepper berries but googled it and ended up using THIS photo as my inspiration! 

Here's the Copic Markers I used for the berries...

Since Dusty Miller is a greenish grey, I decided to keep my foliage a little more true to life and used these Copics for those leaves...


For the anemones, I kind of followed Marcella's lead in the graphic she created coloring the petals soft tones with hues of faded purple and pink...


And these are the markers I reached for to color up the poinsettias. I didn't want a real vibrant red, I thought maybe that would be too much with all the softer hues used elsewhere...


And here, my sweet stamping friends is a close up for you! If you look closely, you can see that I ended up adding some white gel pen accents -- it's my new favorite thing! When I was done coloring, I trimmed up my piece and then fussy cut around the top before layering on a piece of distressed blue decorative paper. I added a gilded ribbon and bow above and called it good for the exterior of the card! 


On the inside, I just took pieces of the sentiments offered to create my own large and scripty sentiment. While I eye-balled this creation, I can see where the MISTI would come in handy for pairing up the sentiment pieces for assembly line fashion creations for the holidays! 


And that, my friends, is it! I love the fact that this holiday botanical offering is so big -- making card fronts just bold and beautiful! 


Want to see the Winter Wonderland some of the Bloomies created using this set? Hop on over and see for yourself their amazing creations! And, don't forget to hop on over to the Power Poppy blog to hear a little bit about Marcella's inspiration behind this brand new holiday set! 


Allison Cope
Christine Okken
Julie Koerber
Katie Sims


Thanks so much for stopping by and spending just a wee bit of your day with me! Tomorrow is the BIG DAY! If you've been hopping all week, checking out the Bloomie's creations, you'll be happy to know that tomorrow is the day when all of these amazing new stamp sets hit the Power Poppy Shop so that YOU can get your hands on them and create your cards for the upcoming holiday season! How exciting is that? We think so! We'll see you here tomorrow for the big reveal! 

Until then,
~Julie

Sunday, October 22, 2017

Happiest Holiday Day 7: Tweet Tidings

Hello folks and welcome to a very happy seventh day of Power Poppy's Happiest Holiday 2017 Release! I can't even believe all the festive, fun, colorful, whimsical, jolly, sparkly and artistic creations we've witnessed so far this week and we still have two days before the full collection will be live in the Power Poppy Shop! 

Today we have a pair of sweet tweets that will joyfully sing your holiday wishes, in the perfect tune! 

Introducing Tweet Tidings! This little chickadee from the Chickadee in Barberry digital stamp set was getting lonely and felt it was his turn to shine in sparkling clear polymer. From his perch in a snow-capped backyard Barberry bush, this dude has all kinds of wise sayings to share. With sentiments that herald the new year and celebrating what matters in life, this set is filled with go-to imagery for cards that will be treasured for years to come.

On to my creation!


Okay, I will admit it. I cheated on this scene! I saw the beautiful graphic Marcy created to showcase this stamp set and loved how she layered the two images to become one. The way these little guys on their branches were drawn, putting the two together is an absolute breeze --- making creating with them super fun!

After stamping in black, I reached for my Copic markers and grabbed these to color up the Chickadees and branches....


And these for the berries, snow, leaves and the shadowed backdrop....


And here, my sweet stamping friends, is a closeup! You can see that I did add some white gel pen highlights here and there... 


The rest is just matting it all up! I used a few die cut and punched shapes to bring this card to life and accented with some metal red embellishments on the stamped and punched sentiment! When all was said and done, I also added a wee bit of glitter glue to the snow for a little extra bit of sparkle! I have to say, I love this illustration and know it will be fun for not just holiday cards but winter and thinking of you types of creations as well! 


This stop on the Power Poppy Hop is just one of a few today, so be sure to visit not just the Bloomies below but the Power Poppy Blog, if you haven't already, to hear a little bit more about Marcy's inspiration for this wonderfully whimsical set!


Julie Koerber >>> you are here! 


Tomorrow is the final set of the release and wowza, you are going to be glad that you stuck around to see this one. It is a breathtaking botanical winter beauty, just begging to be colored up in full glory! Until then!

~Julie

Friday, October 20, 2017

Happiest Holiday Day 5: Berry Sweet Holiday

Hello sweet stamping friends! Are you just loving Power Poppy's holiday release? I sure hope you answered with an exuberant "YES!" because all of us here behind the scenes are just flat out giddy at these latest offerings! There is something for everyone -- from sweet treats and beautiful botanicals to a few appearances by Santa himself!

Today's offering is one that is sure to please those you want to share sweet holiday wishes with! 


Berry Sweet Holiday offers all things sweet for holiday cards that can't be beat! You loved the digital stamp set -- Merriest Berries -- now that image is available in this full-fledged clear stamp set. The stitched-ribbon centerpiece is anchored by a giant candy cane and bubbles over with holly berries and mistletoe. This image supplies a sweet and snappy punch that instantly says HAPPY! Another favorite digi, the Felt Leaves and Fruits Wreath, is now immortalized in clear polymer as well, with its easy-to-color design and comfy-cozy-crafty vibe. Lots of accents and sentiments round out this sweet set!

On to my creation!

Because there are so many fun, felted doo-dads in this set, I thought I would showcase how you can  make these little guys the centerpiece of a card by stamping them all -- here and there! I stamped in black ink and then, grabbed my Copic Markers, reaching for these colors!


From there, I die cut the sentiment from the set, colored it up with red accents and matted the whole thing up on candy cane decorative paper -- just because! I think the effect is jolly, just like the set itself! You can see I added some razzle dazzle thanks to a little glitter glue and glitter paper as well! 

Here's a close up for you! 

And that, my friends, is it -- a perky and simply sweet holiday creation that is ready to send a serious dose of cheer!

Speaking of cheer, the Bloomies are on standby, ready to share their Berry Sweet Holiday wishes!


You'll have to make the rounds to see what fabulous creations they are serving up today!


Julie Koerber>>> you are here! 


Coming up tomorrow, Power Poppy lights up the night with a darling Christmas scene that just adds all kinds of charm to your holiday creations! Until then!


~Julie
Thursday, October 19, 2017

Happiest Holiday Day 4.... Flowering Santa!

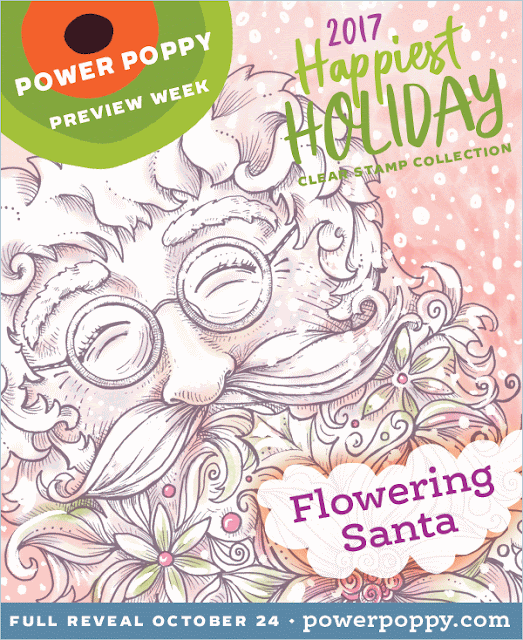
Hello Peeps! If you scrolled down a wee bit and caught sight of today's stamp set graphic, you might have let out a little squeal! At least, I did when I first set sights on this happy-go-lucky Santa adorned with all kinds of Christmas foliage. He's just too cute for words with that jolly smile and the squint in his eyes! 

Check it out, will you?


Big, bold, and laden with blooms! Flowering Santa offers a warm, welcoming smile, twinkling eyes, and a beard that will not be soon forgotten. Santa's decorative curls overflow with holly, stars, and poinsettias — and when shaded using monochromatic tones or metallics, will create a supreme showstopper. Very merry sentiments are perfect for overlays or card interiors.

And now... to my card!


So, what do you think? Darling image, huh? I stamped him in black ink and then, let the Copics fly giving him life with soft pastel pinks and greens mixed in with greys and blues to add that icy flair. Here's a peek at the colors that I used! 


And here's a peek at this cute-as-can-be Santa, close up! 

After I matted this all up with the glitter paper and silver button, I decided that Santa needed a little extra sparkle. I went digging in my embellishment drawer and pulled out small rhinestones in clear and blue and added them to his beard for a little extra razzle dazzle. In real life, they appear more subtle but give this card just that extra bit of pop! 


Looking at this Santa, I am sure you can see all kinds of color combos that you could lean toward. And guess what? You'll see quite a few as you make the rounds to these fine ladies below! Stop by and see what they've been up to!


Coming up tomorrow, Marcella will unveil a set with all things sweet for holiday cards that can't be beat! Pop back in and see what's in store!

~Julie

Tuesday, October 17, 2017

Happiest Holiday 2017: Day 2!

Hello Power Poppy fans and welcome to day 2 of the HappiestHoliday 2017 week of sneak peeks! Yesterday, we welcomed a frosty and cute little snow guy. Today’s offering takes on a more rustic flair. Do you love the woodsy look and aim to share that vibe with your holiday cards? Well, my friends, then this new Power Poppy set is right up your alley!


Rustic Rejoicing is a celebration of all things woodsy, as we rejoice and give thanks! Two unique focal images offer elegant imagery to set your holiday cards apart. A loopy ribbon that you can color up any old way you wish sets off a pretty bough with pinecones and jingle bells! Taking a pause from spreading peace throughout the land, a dove rests in a fir tree, olive branch poised. Add glowing detail to the holiday bulbs for just that extra bit of sparkle!

For my creation, I chose the rustic cones complete with a perky red ribbon and a wee bit of sparkle!


After stamping my image, I reached for my Copic markers and grabbed E31, E23, E25 and E0000 for the pinecones. When I was done coloring, I did accent the scales of the cone with some fine tip brown marker accents. The pine branches were colored up with G40 and G43. The bells were colored with Y26, Y28 and blended with Y00. The red ribbon was colored with R14, R24 and R27 and blended with R30 before being accented with some white gel pen dots. I also added a little glossy accents to the bells, even though it didn’t show up in my photo! Add a layer of glitter paper, a sentiment from the set and a fussy cut accent from the set and you’re good to go!

Here’s a close up!


I have to say – I tried something a bit risky! I did highlight around my image using the Copic Marker G0000. After matting it all up, I thought it was lacking, so I grabbed E50 and E51 and added a distressed feel by shading around the outside of my cut shape. After I added that, I still wasn’t pleased so I took a distressed background stamp, inked it up using a light tan ink and added that to the corners, stamping off and giving two of the corners a more faded effect. I will say I held my breath! I admit, it was not the smartest thing to do – stamp on an image that you just spent an hour coloring — but, I think the additions did help bring the image more to life. So, all is good!

Want to see what the Bloomies did as they went off Rustic Rejoicing?


Be sure to hop on over and pay them a visit to see for yourself! The gang is all here today!

Julie Koerber >>> you are here! 


Be sure to tune back in tomorrow when Santa has a brand new look – complete with a botanical flair! See you then my sweet stamping friends!

~Julie

Monday, October 16, 2017

Happiest of Holidays 2017 - Day 1!

Hello my peeps! Today is a super dooper exciting day here on my blog! Why? Well, today is the kick off to a fun-filled week of sneak peeks! The Bloomies are joining forces all this week to show off  Power Poppy's Happiest Holidays 2017 Collection!!! If you've been waiting and wondering if Power Poppy was going to get busy decking the halls with a holiday flair in time for your holiday card making -- the answer is a resounding YES! And, I happen to think this is the best holiday collection Marcella has ever drawn! Yep, I honestly do!!

Today's sneaky peek includes one darling snow guy, just ready to spread massive doses of holiday cheer! 


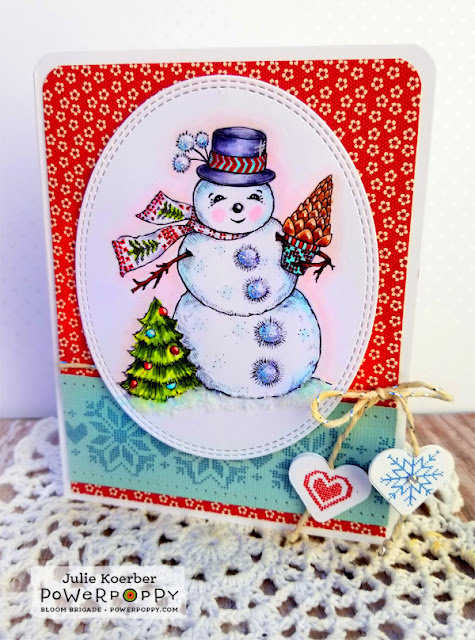
Power Poppy's first snowman in clear polymer looks as if he's popped straight from the woodsy forest with a potted tree in hand, and he may also have ducked into the pom-pom department of the craft store. With Scandinavian stitched details, Snow Kissed comes complete with a coordinating stocking and several small elements to create repeating backgrounds or snowy skies!

On to my creation!


I have to tell you, I have a love affair with snow guys. Despite their cold as ice personas, they warm my heart with their expressive and jolly little faces! This snow guy is as cute as the dickens and coloring him up was a pure joy! 

I colored him with Copics and didn't really reach for many -- a few shades of green for the tree - YG21, YG23, YG25; a few shades of red R24, R29, R39 for accents; a few shades of cool blue for his icy exterior - BG0000, BG00, BG10; some purplish greys for the hat, BV20, BV23, BV25; and E31, E23, E25 for the pine cone tree. 

If you look at the blue border near the bottom of the card, you'll see one of those repeating elements I mentioned -- a Nordic snowflake and heart pattern that just sets the right tone on any wintery creation!

Here's a close up so that you can see what I did with some of the other fun accents! I made heart shaped charms that I attached to some silver accented twine! 


And here's a peek at the inside using one of the set's sentiments!


And that, my friends, is it! We have a full cast of characters sharing this set today.....


So stop by, say "hi" and see how these fine ladies handled being "Snow Kissed!" 


Allison Cope
Cindy Lawrence
Julie Koerber >>> you are here!
Katie Sims
Stacy Morgan
Tosha Leyendekker


Thanks for stopping by! Tomorrow, the sneaks continue with a rustic set that puts nature's spin on rejoicing for the holidays.

See you then!
~Julie

Friday, October 6, 2017

Creating in a jiffy!

Hello all and Happy Friday to you! Today, I wanted to share some tips and tricks for creating en masse! I know this is all probably obvious stuff, but I really have streamlined this process and thought I would share! Last week, I shared this card with you all! 


Well, a dear friend of mine who lives in Florida saw this post and asked if I could make four more just like it so that she could share with some of her knitting friends. For this lady, I said -- ABSOLUTELY! Anything for you! ;-) Because I am normally awful at creating in an assembly line fashion, I thought I'd share a little bit of my creative process with you.

So, I started by digging through my paper stash and I picked out one base color, one color for my die cut frame and a little pop color for that decorative band in my card above. After that point, I die cut, trimmed and assembled all of my card bases in one fell swoop! See? I even printed off my digital images and pre-die cut those as well!


After that, I literally settled into a marathon night of TV watching. I mean, "This Is Us" was on, so it really wasn't all that hard! :-) What I loved about this process was the fact that it took less than an hour to pick my papers, die cut and assemble all of the card bases. From there, I could color match my Copic Markers based on the papers that I used!  And here are the four additional cards that I came up with!!

CARD #1 (Psst! This one would fit for last week's Hues to Use!)


CARD #2


CARD #3


CARD #4


So, like I mentioned, this is not "Rocket Science" -- but it is a streamlined approach and maybe it will help you when you are mass producing for birthdays or even your Holiday cards!

Since it's Friday, we have a Bloom Brigade Parade as usual! Be sure to stop over to the Power Poppy Blog because we have a brand new Power & Spark Challenge that's super fun. And then.... hippity hop to see these fine ladies!


Thanks so much for stopping by and saying "Hello!" Hope you have a wonderful weekend and.... I'll see you back here soon!

~Julie