Showing posts with label Not A Card. Show all posts

Friday, October 25, 2019

Bloomie Friday: A treat for you!

Hi all! Since it's Bloomie Friday at Power Poppy, I thought just in case you missed my little tutorial on the Power Poppy Blog, I thought I'd share a snippet here and then, if you like, you can click HERE to see the step by step tutorial! I was the hostess this past Monday for Inspire Me Monday! I figured with the 'Night of Fright' upon us, I would share a SUPER EASY, SUPER CUTE project that you can literally whip up in a jiffy! The folding portion of this project takes less than a minute -- no joke -- allowing you to just take your time and enjoy dolling up this little treat bag for the little ghosts and goblins in your life!

Here's a peek at the finished project 


It's made with a square piece of paper --- really any size! It just depends on how big you want your pocket to be when you are done! The one I made, above is from 8" by 8" piece of paper and as you can see, it creates the perfect little pocket for fun-sized candy bars!


It's just the right size! 


I wanted to show you just how big or small you could go with this treat bag! I started with a 6" by 6" piece of paper and honestly, this is small enough for a few Hershey's kisses, a Ghiradelli square, or one fun-size candy bar. Maybe this one would be best for dollar bills? ;-) As you go up in size, the more you can fit! I actually started with a 12" by 12" piece of paper but when I was done, I thought, wow -- that's pretty big! That might actually make a nice little gift bag in a jiffy for smaller gifts? So easy! 


After seeing Instant Gardener Nancy Sheads color up this cute kitty from Power Poppy's Feeling Fall stamp set, I knew I wanted to give her video coloring tutorial a try - so I stamped with Memento Ink Tuxedo Black and cued up the video and colored away following all her cues! If you missed this tutorial, you need to check it out HERE. It was so fun to follow along! Just a little note, if you want instant gratification, Power Poppy just released this cat image in a Halloween digital stamp set called Boo Cat and Pumpkins.  So many fun images in this digital set!


So, when I was done, this is what my treat bag looked like! You can stuff it with candy -- I chose mini Ghiradelli squares -- and even hang this little treat on a doorknob as a sweet surprise!


I hope you like this little tutorial (click HERE to see the step-by-step version) and I hope you give it a try yourself! It can be used for so many different occasions --- Christmas (maybe you use these instead of an Advent calendar?), Easter, Valentine's Day, May Day! So many opportunities!

Be sure to stop by these ladies' homes on the web to see what crafty awesomeness they've whipped up for you this week!


Thanks so much for stopping by! Hope you have a wonderful and creative weekend ahead!
~Julie 

Friday, December 21, 2018

Tag... You're It!

Hello sweet folks! If you celebrate this beautiful season, are you ready? Have you made your lists and checked them twice? I have to say, I am about 2/3 of the way there. I am trying to "be still" however and realize that the real reason for the season is so much more important than if I bake cookies or get that one last gift. :-)

Having said that, we all need a "time out" to create, don't we? That's why this week over on the Power Poppy Blog, I ushered in a super dooper easy challenge for this week's Creative Confetti! I tried to focus on something small that you could do to 1. get in the spirit and 2. take some coloring time for yourself!


HOW TO PLAY: It's just as simple as the graphic says! Create a gift tag! Now, while my little bit of inspiration below is a Christmas tag, it doesn't have to be! Make one to have on hand for birthdays or any other holiday for that matter. I just knew this was something quick and easy that would still give you some time to create! Once you are done creating, all you need to do is link up your creation HERE! 

On to my creation! 


I decided, for my tag, to pick up a medium that I don't often gravitate toward  -- watercolor! It's soothing and I love the dreamy feel it creates when your project is all wrapped up. To get started, I picked up the Power Poppy set called Let Your Heart Be Light. I love, love, LOVE those poinsettias!

To create, I have to say I followed some of the same principles that Ally used in THIS tutorial. Now, I don't have Brusho but I did use Distress Inks to both stamp (Vintage Photo) and paint (Barn Door, Peeled Paint, Scattered Straw, Wild Honey, Antique Paper).  I started by stamping in Vintage Photo and then added a wash using Tattered Rose Distress Ink using a water brush. From there, I just added droplets of ink from my reinkers to a palette and diluting the color, gradually built up my color to where I wanted it to be. Now, I don't pretend to be an expert on watercolor. I have a lot still to learn about shading and really controlling the color but, each project is a chance to hone in on that. 

Here's a close up for you! I am kind of a "scribbler" when I watercolor and just let the ink flow where it wants to. Again, stuff I need to work on! ;-) 


Now, it's your turn! Do you have a last minute tag you'd like to create for that special gift or special someone? I hope you play along with me this week HERE because "Tag, You're It!" After you get those fingers inky, remember to link up your creation below. If you play along, you'll be in the running for a $25 gift code to the Power Poppy Shop! 

I happen to know that a few of the Bloomies are on standby, hoping you'll hop on over and pay them a visit! Go and see what they have creatively whipped up for all to see! ;-)

Christine Okken
Julie Koerber >>> you are here!
Tosha Leyendekker


I hope you have a beautiful holiday with family and make some amazing memories to cherish for years to come!

Blessings & Peace!
~Julie

Friday, September 4, 2015

Sweet Little Sumpin' Sumpin'!

Hi all! How's your September starting out? I hope that a new month brings a whole new spark of creatitivy and what better way to get that mojo a flowin' than to usher in a new  Power Poppy Power & Spark Challenge! This one is hosted by the amazing colorist and super sweet designer.... KATIE SIMS! 


HOW TO PLAY: This month Katie would love nothing more than for you to get great ideas for your gift giving season! Here's what Ms. Katie had to say about her September Challenge!

"Hello and a happy September to you!  This month’s Power & Spark challenge is all about giving.  We all know the paper crafting community has some of the biggest, giving hearts around so let’s celebrate that with “Gifts from the Heart." Show us your creative gift presentations or a hand crafted gift….or both!  Try stamping  your own wrapping paper, decorate your own gift bag or tag, craft a gift set of note cards....you choose how to show your art and heart for a special someone.  Even though the holidays are just around the corner, any time is a great time for gift giving so this challenge is open for any occasion." 

If you'd like to read up on the Official Rules, just click on over to the the challenge post HERE!Remember, if you play along, you just might win a free clear or digital stamp set of choice from the Power Poppy Shop! You have until September 30th to enter!


ON TO MY CREATION!

For my little bit of show and tell today, I decided to share one of my favorite gifts of all time -- my favorite Lavender Coconut Oil Lotion. This stuff smells absolutely delish and I love the fact that it has three ingredients in it -- all of which I can pronounce! I use it every day and in addition to making my skin soft and glossy, it brings a dose of aromatherapy as well! Who doesn't love the smell of coconut and lavender? ;-)

So, here's a peek at the gift set -- a cute little 4-1/4" square card to serve as a little gift note! And then, the mason jar can be dressed up by stamping the lavender onto a 2" punched circle that fits -- oh so perfectly -- on the top of your mason jar!


For the stamps, I used Power Poppy's Lavender stamp set -- perfect! After stamping in Memento Tuxedo Black ink, I grabbed my Copic markers and used BV00, BV02 and BV04, G20, G21, G24, BG0000, BG000, BG01, and G0000. For the jar topper, I used the same marker colors but added the little background lavender stamp with Vivid Violet Mist and then stamped the word Lavender in Lavender Vivid ink.  

Here's a peek at the card...

Here's a look at the jar topper -- sweet and simple with a little bit of glitter glue sparkle and a little bit of gingham ruffle! 


And, since I know you'll love this recipe, I thought I'd share! It's super dooper easy! 

LAVENDER COCONUT LOTION 

INGREDIENTS
  • 1 cup of extra virgin cold pressed coconut oil. I bought Nutiva Coconut Oil at Costco and it will likely last me forver!
  • 1 teaspoon of Vitaminn E Oil
  • 6 to 10 drops of lavender essential oil 

DIRECTIONS
Because coconut oil is a hard oil, you need to heat the oil to get it more fluid to mix the vitamin E and essential oils with it. I soften by sticking in the microwave for 30 seconds to a minute. Mix in additional ingredients. Stick in fridge until it solidifies to a soft butter feel. Using a hand mixer, mix until lotion is whipped. Store in a cool, dark place in a jar of choice. Keep in mind, coconut oil has a very low melting point, so on hot days, this lotion may return to liquid form It's okay! Just let it harden and rewhip if desired. I usually just let it set back up and use as normal. 

And that, my friends is it! I hope you whip some up and know that you can always turn to Power Poppy to make your gift extra special with our Lavender stamp set! 

Now it's time to hand the baton to my fellow Bloomies so that they can run off with all their creative ideas and inspire you ALL! So, stop by, say hi, and let that inspiration fly!


Julie Koerber >>> you are here!


Thanks for sharing a bit of your day with me! I hope you have a wonderful weekend ahead and for those of you in the States -- Happy Labor Day! Enjoy some rest and creative relaxation! ;-) See you back here soon!

~Julie


Pin It

Friday, February 13, 2015

February is HERE!

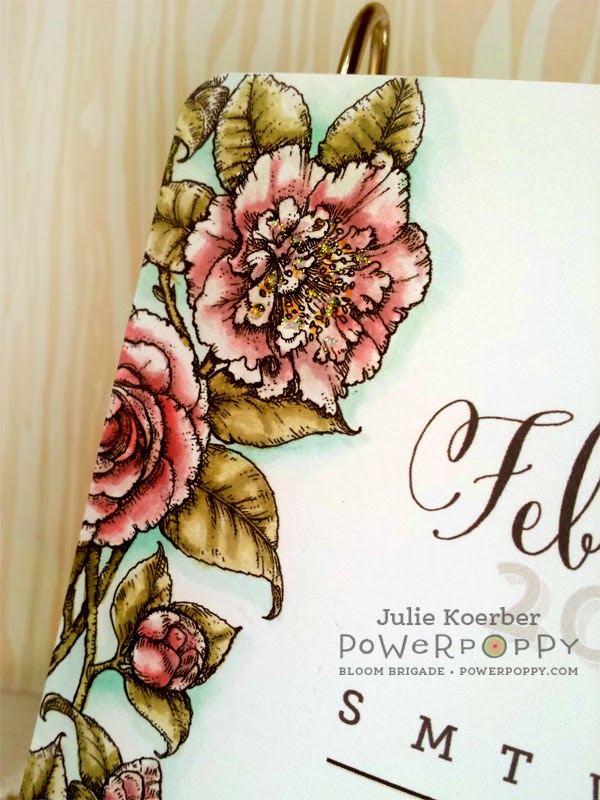
Hello all and Happy Friday!!! Hope your week is ending on a high note! If you saw THIS post over on the Power Poppy Blog earlier this year, you know that all year long, I am going to be taking Power Poppy Digital Stamps and customizing a calendar. It's funny, I originally thought this little number would sit on my work desk, but I decided instead to share it with my mom! Now that we are half way through February, I thought I'd share the one I crafted for this month!

I used the same tutorial as the link above and lined up the Camellias Digital Stamp up along the left side of my calendar.

From there, it was as simple as trimming up my calendar, rounding the corners and then... COLORING! I decided to use Ranger Distress Markers for this one and picked up these colors: Worn Lipstick, Spun Sugar, Tattered Rose, Shabby Shudders, and Peeled Paint. When I was done coloring it up, I took two Copic shades -- BG0000 and BG11 and added some shading around my image. And, to add a little razzle dazzle to the centers of some of the flowers --- glitter glue! Here's a close up!


And that, my friends, is it! A FEW FUN ITEMS OF NOTE! If you love Power Poppy's Digital Stamps, mark your calendar! This Sunday - February 15th - Power Poppy will reveal the latest addition to the Power Poppy Instant Garden. And, those fabulous designers known as the Instant Gardeners will be on hand to show off this new image! So on Sunday, make sure to head on over HERE to the Power Poppy Blog!

While you're surfing, don't forget about the Power & Spark Challenge -- one way you can express your creativity AND maybe win a stamp set of choice! Check it out!

Since it's Friday, some of my fellow members of the Bloom Brigade have some wonderful creations to share, so hop on over and see.....

Christine Okken
Cindy Lawrence
Julie Koerber >>> you are here!
Leslie Miller
Stacy Morgan
Tosha Leyendekker

Thanks so much for stopping by! I hope you have the best of the best weekends and for those in the U.S. -- HAPPY VALENTINE'S DAY! May love & joy rule the day! :-)

~Julie


Pin It

Sunday, February 23, 2014

A Sweet Project & A Sweet 60 % Off Sale!

Today is the day all of you bargain hunters have been waiting for! Prices are now officially as low as they can go in our Gambler's Sale at Flourishes -- meaning everything left in the store is 60% off. That's right -- EVERYTHING!

The gamble is over and now the rush is on to pick up anything left in the store that you've had your eye on. We're not sure when these deals will end, so snatch them up before the items you want sell out! Simply use the code GAMBLERS60 in the coupon box at the time of check out to get this fabulous discount!

One of the stamp sets that is still up for grabs is about as sweet as can be! It's called Berry Sweet Frames and it is fabulous for not only cards but 3-D items as well! Here's a peek at this fun-filled set!


And here's the die set that matches it! Perfectly Pierced Frames...

And here's how I put these two together to make a cute candy jar!

I started by stamping the gingham background and label stamp on Flourishes Classic White. See how these perfectly match the dies?

From there, I cut the images out. I also had a berry shape cut out of Flourishes Classic White thanks to the Silhouette Cut File Berry Sweet Frames.

As you can see, I colored up the berries with Copic markers and used the Poppy, Fields, Iced Aqua and Sunflower collections grouped by Flourishes HERE. 

Now.. to put the candy jar together, I attached the die cut and stamped frame using glue dots.

I attached ribbon, securing using glue dots in the area where the label and berries will covered. 


And here's a look again at the final project. As you can see, I did attached some ruffled gingham ribbon and then accented the project not only with a little glitter glue but some wooden buttons that I colored with R27 Copic Marker and accented with some green and white twine. 


And that, my friends, is it!  The Flourishes Design Team has been at it again -- creating beautiful cards to show off and inspire! So, head on over and see.....
Thanks for stopping by and again, don't forget to use the code GAMBLERS60 for 60% off your entire order!

Before you go -- I cleaned out my stamp room and have a bunch on ....

Click HERE to see some of the goodies up for grabs at a BARGAIN! :-)

~Julie


Pin It

Sunday, October 27, 2013

Don't Open Until Christmas!

Hi all and happy Monday! I have a fun, easy and super quick project to share that is perfect for the holidays! All you need is one super cute stamp set and a handful of Christmas themed papers. When all is said and done, you'll have a fun-filled way to dress up your Christmas packages with style!

Last month, Penny Black unveiled one of Becky Fleck's new stamp sets called Christmas Tags. Here's a peek!


Isn't it cute???? I see so many fun tags for the holidays! Here's a look at what I created using this stamp set!


I just love how colorful and fun they are! The paper I used is a mix from My Mind's Eye, October Afternoon and The Paper Studio (from Hobby Lobby). What's fun is the fact that I made five tags in about a half hour -- easy peasy! I started by scanning the stamp set and using my Silhouette Design Studio software to make a cut file for this stamp set. After I was done tracing the image, I did create about a 6% offset so that my tags would have a white base. I cut out the images and then, stamped almost the entire set on four different patterned papers so that I could mix and match patterns and layer. I stamped using Memento Tuxedo Black Ink, and Memento Lady bug. I added some May Arts gold and silver cording and a splash of seam binding ribbon and.... of course... bling! 

Here's a close up of each tag for you! 


What I forgot to photograph was the back side of at least one of these tags. As you can see by looking at the stamp set above -- this set has a fabulous little "To:" and "From:" stamp set so that you can add that to the back and make sure your packages are just as unique as you are!

If you want to check this stamp set out on the Penny Black site, just click HERE! And, Becky tells me that on the PageMaps blog, sometime soon she'll be doing a giveaway with this set -- so be sure to hop on over and see what she has in store!


AND, BEFORE I GO -- I need to give away the Address Book set that I promised to dole out last week! I put all the names in the hat and the winner was..... DIANNE who wrote...


"EXCELLENT work , three fabulous cards, very creative work doing three, you have show cased these stamps beautifully, thanks for sharing, hope you have a wonderful week, big hugs..October 22, 2013 at 10:35 AM"

Dianne, just shoot me your snail mail address and I'll get your stamp set popped in the mail! 

Thanks for stopping by!
~Julie

Pin It

Thursday, September 5, 2013

Time to 'Get in Shape!'

Image

Hello Flourishes Fans! I don't know about you but I love this time of year -- when the leaves start to change colors and there is a brisk feeling in the air! Many of us decide, yours truly included, to get back into "stamping shape" in the fall. That's why this Flourishes challenge is perfect for you -- turning your fingers to some paper crafting fun!

In just a few short days Flourishes will be unveiling its beautiful September Release of  FIVE sets, and playing in this challenge is your chance to win the whole September Release! Want to know how? All you need to do is create a Shaped Card OR a 3D Item. You can either create a card using any non-standard shape (we encourage you to think creatively), or a lovely box, ornament, home decor item, or anything 3D....it's all up to you! 

On to my creation (plus a little fun tip!) I don't know about you, but it frustrates me when I have a die cut shape and don't have a mat for it. I love matting images and having an accent that way. So, I came up with a plan to combat that! And here's how you start. Create two die cuts and cut one in half vertically, one in half horizontally. 


Take your decorative or main mat and attach the top and bottom of one of the half die cuts.....

 Then, add the sides. You can see there are little notch outs on each side, but I thought that was a fun decorative flair and I like the look!

And then, I added a die cut circle with the cute little candy cane from Sweets of the Season! Colored it up with Copic Markers (see list below for colors), added a punched snowflake, a little bling, some paper piercing and some glitter glue!


How did I make my card? Well, I took the Classic Keyhole Die and did this.....


I put the die on the folded card stock so that a portion of the folded edge wouldn't be cut.  On the inside, I added this cute little sentiment using Love Letter Memento Ink.


And, here's my finished project below! Want to know how I created the bag? It was a tutorial that I picked up over on the Scor-Pal blog HERE. I added some decorative paper, a fun little crystal button, some twine and see the top of the bag? That is actually a folded over piece that was created using Flourishes Classic Frames Die!


 You can see when I show you a side shot how the flap just folds over thanks to that die! How did I keep it shut? I just added a strip of repositional tape. I thought about adding a ribbon, and I might before I stuff this with sweet goodies and give it away. I might even add a little more bling to accent the flap! So many options!


And that, my friends, is it! Hope you play along with the Flourishes DT! It will be so much fun seeing YOUR creations! How do you enter? Just click HERE for all the official rules!

And now for some wonderful shaped inspiration, our Design Team has pulled out all the stops to get your creativity jump-started:
Thanks for stopping by today and we look forward to seeing what you create! We’ll see you here on Monday September 9th when our FIVE wonderful September Sneak Peeks start! Enjoy getting back into stamping SHAPE! ;-)

~Julie
SUPPLIES:


Pin It

Sunday, April 28, 2013

Itty Bitty Box!


How would you like to learn how to make this itty bitty box? Well, I just so happen to have a tutorial HERE today over on the Flourishes blog! So..... be sure to check it out!


~Julie


Pin It