Showing posts with label Power and Spark Challenge. Show all posts

Friday, July 6, 2018

Inspire Me!

Hello stamping friends!This month over on the Power Poppy Blog, yours truly had the chance to dream up the challenge for the latest Power & Spark Challenge! And.... I can't wait to see how you take it to the next explosive level! ;-)

Are you ready? Let's see what's in store!


HOW TO PLAY: Every Monday here on the Power Poppy blog we invite the best of the best creative minds to share a little bit of their creative process. The hope is that they will "inspire" and spark a crafty revolution! Each Inspire Me Monday feature offers either a coloring lesson, a technique or maybe even a fun little digital "how to!" You can find all of our Inspire Me Monday features HERE on this link. Once you scroll through all these fun and informative posts, to take on this challenge, all you need to do is pick one as your source of inspiration and give that coloring lesson, technique or tutorial a try! Just that simple!

On to my creation! Goodness, this was a tough one. I literally went through every Inspire Me Monday. Did you know we've had this feature on the blog since April of 2014? WOW! That's a lot of inspiration waiting in the wings! So, after going through and revisiting a ton of fun posts, I chose THIS post by Ally Cope -- Fun With Masks! I had just bought some masking sheets and wanted an "excuse" to rip them out of the package and give them a try! 

First up, here's a peek at one of Ally's cards so you get the gist of what I did when I followed in her creative footsteps! 


I loved just how fun and easy this technique looked! While Ally used some masking sheets made by another stamping company, I found these online a few weeks back and wanted to have them in my stash for masking digital stamps. I figured if I printed the digi on the paper and cut it out, I'd be able to do some of the cool ink background techniques that Amy Shulke takes on in some of her classes! (Click the link to see for yourself!)


I realized after I took the picture above, that you can't really see the label number -- it's 6465 and I bought it on Amazon HERE, just in case you were curious! ;-)

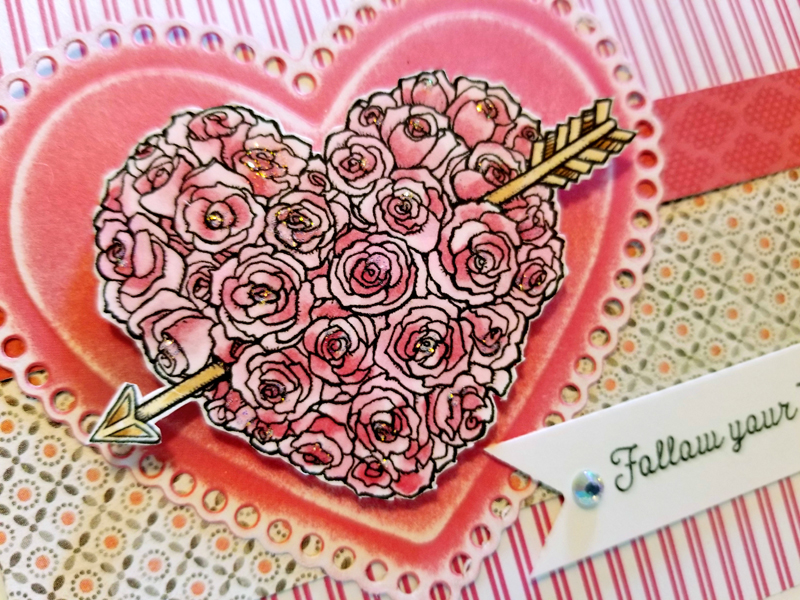
So, as you can see below I used Power Poppy's Abundant Petals Stamp Set and after I stamped all over my 4" by 5-1/4" piece of white cardstock, I used the Abundant Petals Coordinating Dies to cut out my masks! I like the fact that when you put the mask down, you can kind of still see the stamped image below so you know that you are in the right spot!


From there, I took two daubers and started creating my sponged background. As you can see, I used Spiced Marmalade and Picked Raspberry Distress Inks. Now, please don't look too close at my sponging, I am not the greatest at sponging ink on backgrounds! But, I never stop trying! ;-) I will say I was impressed at how well my masks stayed put! 


From there, I lifted the masks, added a stitched scallop frame die and the sentiment that I embossed in white from the M-Powering Words stamp set.   


All in all, this was a super easy card to create and a fun technique that I am pretty sure I'll give a try again soon! Now it's YOUR TURN to take one of these Inspire Me Mondays for a spin! When you do, don't forget to link up your creation below! 

If you want to read up on the Official Rules.... just click HERE! 


Before you go, you can't leave without hitting up these links below and seeing what some of our fabulous members of the Bloom Brigade have to share! Get ready, as always, to be WOWED!


Christine Okken
Julie Koerber >>> you are here!
Stacy Morgan
Tosha Leyendekker


Thanks for popping by! I hope you all enjoy your weekends my sweet stamping friends!

~Julie

Friday, June 1, 2018

Buzzing with Fun!

Hello happy stampers! I have some fun things to share with you all this Friday. First up, I have a peppy little card that was super simple to make AND I have news of a brand new Power Poppy challenge that could land you a shopping spree to the Power Poppy Shop!

So, let's get to the action, shall we? This month, Stacy Morgan is hosting the Power & Spark Challenge and she's challenging us to go "Round and Round!" How? Well, all you have to do is round those corners, use a rounded mat, or take your project the extreme and make your entire card round! Just that easy peeps!

For my creation, I decided to combine a couple challenges. I'm playing along in the Power & Spark Challenge and I'm using this week's Hues to Use too!  Click on the link to see the racy little color combo at the center of this week's challenge.


After the release of Power Poppy's Creative & Curious collection, I knew I wanted to take the Bee Kind Toile for a spin in a really traditional way. Google Toile Prints and you'll see so many monochromatic takes on this beautiful design element. So, with the black, grey and yellow color scheme in this week's "Hues" -- I had the perfect palette to work with. I started by stamping the floral elements all over my main matted panel in black ink. Afterward, I colored the flowers and leaves with Copic Markers, reaching for C00, C01, C03 and C05. I then die cut a double stitched circle and cut the outer stitch off. I matted it on a black die cut circle and then on the white piece, stamped one of the flowers from the set along one side to create a frame.

The beautiful thing about this stamp set is that it features mirror images so that I could take the mirror image and create the frame along the other side of my circle. When I got close to the top, I was stumped. I had a white space that wasn't big enough to stamp another flower. But, I didn't want that white space. So, I grabbed one of the little bees from the set! Ta Da! Here's a close up for you!


You can see I added some glitter glue to the leaves for a little extra razzle dazzle and some white gel pen to the centers of the flowers to help those little petals pop a bit more. Mat it up on a yellow piece of decorative paper to help that little buzzy bee command a little more attention, add a bow and a little bling and... done! And that, my friends, is it! to enter this little creation in Stacy's challenge, I used a double circle mat and created the circular frame as my "Round and Round" elements! So check out this month's challenge HERE and I really hope you play along! 


Before you go, you can't leave without hitting up these links below and seeing what some of our fabulous members of the Bloom Brigade have to share!


Thanks so much for stopping by and spending a little bit of your day with me! I hope you have a wonderfully creative weekend!

Julie 


Friday, March 2, 2018

Two fun challenges just for YOU!

Hello friends! If you were over on the Power Poppy blog earlier this week, you might have spotted this post. For those who weren't -- you're in luck! I have some fresh creative eye candy to share and it's something YOU can have fun with as well if you play along with me for this week's......


If you didn't know it, every Tuesday, yours truly helps host a color-fueled challenge that's a super fun way to stretch your creativity AND get some free stamps too if you're chosen as one of Power Poppy's guest hostesses! It's called HUES TO USE and all you need to do is use this little trio of colors in your next card or project. Yep, just that easy! 

MOVING ON TO THE LATEST COMBO! When Marcella spotted this amazing swirl of color above, she was at the Smithsonian Museum of Natural History in our nation's capital. This, my friends, is Tight Malachite and as Marcy said when she first set her sights on it, "Dare you not to swoon!" Well, I did indeed swoon and then I decided this would be a wonderfully fun color combo for.. HUES TO USE! I'll admit, it's a bit tricky at times to pull off monochromatic color combos. But, you know what? I know you can do it! And, I can't wait to see how you pull it off! Want to play along? Just click HERE for all the deets! 

Want to see how I took these colors for a whirl?


For starters, I picked up Power Poppy's Succulent Singles and Prairie Cheer stamp sets (for the sentiment). I stamped two of the smaller leaves directly on my decorative paper and then, stamped a bunch onto white cardstock to cut out later. Actually, I could have used the Succulent Singles Die Set that goes with this stamp set but I had a lapse in judgment and forgot to do that! EEK!

Now, here's the fun part. I decided that instead of letting ink play a prominent role in my creation, I would heat emboss. I dug deep into my drawer of embossing powders. Deep! I have so many embossing powders and many of them are more than 15 years old -- so underused! Take a look at the three powders I picked. They are from a company called BMuse. The company is still around but no longer makes these amazing colors of embossing powder. I have Copper, Aged Copper and Bronze. Here's a peek at what they look like, pre-emboss.


And, because you really shouldn't use Copic Markers with embossing powder (I hear that it damages the tip of your marker), I decided to reach for my Distress Markers and picked up these colors below. I never color directly onto my image when using Distress Markers. I scribble them onto a plastic palette or even a large acrylic block and then pick up the marker with either a blender pen or water brush. This time I used my Dove Blender pen. I love how this allows you to add color gradually and almost with a watercolor effect.

And here's a close up of how those embossing powders turned out! It's so hard to photograph the metallic sheen but they are really quite fun in real life. The Aged Copper has that bit of navy in it, which picks up on the navy in the base portion of my card. I love that blue tint, the distressed bronze and the copper. LOVE!


And here's a little better shot of the coloring! I love the almost dreamy wash on each petal. And, to be honest with you? I just scribbled on the color -- didn't really spend a ton of time on it! Isn't that the best?

And that, my friends, is it! Now it's your turn to take these colors and put our own spin on them! After you're done, don't forget to link up your creation below and let us all see your take on this color combo challenge!

But, guess what? This isn't the only active challenge right now over at Power Poppy! Today, Ms. Ally unveiled a brand new Power & Spark Challenge and it's a super fun one! Check it out! 

 
That's right, all you need to do is be inspired by a piece of fabric, a fabric look, and then, create using a bit of that inspiration! You can read Ally's details HERE! 


I happen to know some of the "Bloomies" are on standby, just waiting to share a bit of their creativity with YOU! So, stop on by to these lovelies if you will! 


Thanks for spending a bit of your day with me! I love your visits! :-)
~Julie 

Friday, February 16, 2018

Love & Thanks

Well hello there! Happy Friday! Who is ready for a weekend??? I am! I am! We are hitting the road tomorrow to watch my darling daughter play her last JV Basketball game and then, I plan to cuddle in, cook, and maybe snuggle up by the fire for a bit. Afterall, we just got a heap of snow over night and old man winter doesn't seem to want to let up. So, when life gives you lemons.....

If you popped over to the Power Poppy blog earlier this week, you might have caught sight of the creation I am about to share! It is this week's....


That's the challenge we pose every week that invites you to use our color cues A.K.A. Hues to Use and then create using this color combo!

Here's a little bit of the backstory on this little piece of color inspiration below. If you remember back to the fall, Marcella married the love of her life, Doug. What an event it was! Marce created a whimsical woodland wedding that just paid homage to their different loves as a couple. Can you imagine beautiful greenery (Marcy's love) intermixed with Doug's love of all things motorcycles! This photo showcases the sparkle-daubed bridal headpiece handmade by one of Marcella's friends who is a milliner. It has clusters of bling and vintage leaves with a splash of silvery sage! Here's a peek at your color cues for this week! (HERE'S a darling picture of Marcy actually wearing this beauty!)


Aren't those colors just delish together? I love not only the photo with that glint of mettalic (which you can use instead of the light grey), but the super vintage colors like that dusty rose and sage!

HOW TO PLAY ALONG WITH US: To play along with us is simple -- use these three colors to spark a bit of creativity in your crafting space and then, when you're done, link up your creation using our linky HERE ON THIS POST! It's just that easy peeps! 

Want to see how I put these colors for a test drive?


When I picked this color combo, the image that first popped into my head was the digital stamp set Hellebores.  I knew these delicate flowers come in shades of pink and I have always loved the flouncy look of this illustration. So, off I went, printing, coloring and matting it up! I should mention that the sentiment is from the set Nice Things to Say! I ended up stamping it with Versamark and then embossing with a detail silver embossing powder. After printing off my image. I grabbed my Copic markers and used these to color the image from top to bottom...


Here's a closeup for you! 


And that, my friends, is it! Now it's your turn to take these colors and put our own spin on them! After you're done, don't forget to link up your creation (link is above) so I can see your take on this color combo challenge! I should mention, this card would also work for Kathy Jones' Power & Spark 'Love to Sparkle' Challenge too! If you haven't checked it out, click HERE to read all about it! Super fun! 

Need a little more inspiration to get you through the weekend? Never fear! The Bloom Brigade is here!


Check out these lovelies below and just some of their crafty pursuits for the week!

Julie Koerber >> you are here!


Thanks for stopping by and sharing a wee bit of your day with me! I hope you have a fabulous weekend and I'll see you back here soon!

~Julie 

Friday, January 5, 2018

Grab a Map!

Hello Friends! It’s a new month.... AND a NEW YEAR! And with all those new things, the Power Poppy Bloom Brigade thought we'd ramp up the fun and deliver not one, not two, but TEN ways to bring on a bit of design power with that undeniable creative spark. And, what's even better than all of that is the fact that we have a partner in crime for this month's challenge. Check it out!


For this month's Power & Spark Challenge, we're asking you to "Grab A Map!" and get in on some Power Poppy Fun! We've teamed up with Pagemaps.com's CardMaps to showcase 10 new sketches featuring some of Power Poppy's fabulous stamp sets. You can find all ten sketches along with design team samples HERE!  And, you can read all the official details surrounding this month's challenge HERE! Play alog and you will be in the running for a $50 shopping spree to the Power Poppy Shop! Woo Hoo! But wait, there's more! Becky Fleck, the fabulous Pagemaps guru, is also offering a $25 Power Poppy gift card and all you need to do is leave a comment on THIS post! The Pagemaps contest closes January 22nd, so hop on over soon! We can't wait to see what you create. 

Moving on! Let's check out the Cardmaps sketch that I used for my creation!


And here's a look at my finished card!


Since Valentine's Day is coming up in a few weeks, I thought this digital image - Follow Your Heart - would be a perfect fit! After printing my image on Neenah Classic Crest cardstock, I colored it up with Copics and used a mix of light reds and deep rose shades. I also added a little bit of glitter glue before fussy cutting the image.

The rest is just matting it all up! I used scraps that I had in my decorative pink paper folder, mixing and matching and die cutting along the way. The heart die is an old one from Spellbinders called Spellbinders Lace Hearts.  I added the sentiment also from the Follow Your Heart set and created a flag similar to the one in the sketch.


Add a little razzle dazzle with the help of some rhinestones and... ta da! Done! Just that easy! I love sketches for just this reason -- it takes all the guesswork out of creating and lets you focus on some of the other fun parts of card making -- like picking the right papers, adding just the right touches and... COLORING! 

And that, my friends, is it from me! Now it's time to make the rounds and see what some of our fabulous designers created when they were challenged by.....


All ten of these lovelies have a different sketch and a different sample to show off! While you can check out all the cardmaps HERE, you really need to give some love to these ladies below, pick a sketch and then, join us in the fun! Hop on over and see....

Julie Koerber >>> you are here!


And that, my friends, is it! So glad you stopped by to say "hi!" Hope you have a wonderful weekend and... I'll see you back here soon!

~Julie

Tuesday, December 5, 2017

Be sure to check out the Power Poppy Blog Today!


Hey all, if you didn't know it -- Power Poppy is hosting the 12 Days of Christmas Power & Spark Challenge! And, for 12 Days (it started December 1st), some of the Power Poppy designers are sharing some of their favorite Christmas projects -- just to help you get in the spirit!

Want to learn how to make this little box?


Just click HERE and you'll have a step-by-step tutorial! Hope you hop on over there! I'll see you back here real soon!

~Julie

Friday, September 15, 2017

Krafty Christmas Coloring!

Hello all and happy Friday to you all! I have a fun little card to share that's actually showing off not one, but two Power Poppy Challenges going on as we speak! On top of it all, I actually have a Christmas card to sock away for when I need it later this year. I know! Say it isn't so!

So, let's get right into all this fun, shall we? Earlier this week, Kate Sanders ushered in this little color challenge for Hues to Use showing off a bit of late summer flair! You can check out the deets on this fun-filled party HERE! 


Earlier this month, Christine urged us all to partake in....


You can read all about this little challenge HERE! 

And so, my sweet stamping friends, I decided to tackle both with my creation for today!


I knew I wanted to use one of Power Poppy's brand new additions to the Instant Garden for this one! Who doesn't just love coloring up new images, so I printed off this baby -- Merriest Berries -- which offers up three different images with a few beautifully scripted sentiments to match! I printed it off on kraft card stock and then.... grabbed these!


 I honestly don't think I've touched my Prismacolor Pencils in an eternity. So, this was good to try my hand at a different medium for a change. When I started coloring, you can see my little mistletoe branches had quite the shade of mint going on there....


 The beauty of colored pencils, as many of you know, is the fact that layering color can be done with ease. This shade still peeks through but you can tone it down by reaching for greens that are more grassy or even olive as I did! See?


You can see that I also took some cool shades of Copic and added a bit of a shading underneath my image. I should say that I did this before I started my coloring. I've been told that because of the waxy nature of Prismacolor pencils, you do not want to touch your Copic marker nibs to this because it will likely get gummed up thanks (or no thanks) to the wax.

And this, my friends, is my finished card! I added some antiquey decorative papers, a half doily and some gilded twine and... ta da! Done!


Here's a close up for you! You can see that do add back in some definition, I did use a Copic Fine Liner over top. I know I just told you that I didn't want to touch my Copic Markers to this waxy surface but for the liner, I did. I risked it! ;-) I think the result was worth it, just to bring back some of that fine line....


And that's it from me today! Be sure to hop on over to see....


These ladies have some fine works of art on display and they'd love it if you hopped on over to pay them a visit!


Thanks for spending a bit of your day with me! I have some coloring projects on my desk... as we speak... so I know I'll be back soon to share with you all! :-)

Have a great weekend!

~Julie


Friday, September 1, 2017

A little racy.....


Hello peeps! Just in case you missed the unveiling over on the Power Poppy blog earlier this week, I thought I'd share it right here on my little 'ole place on the web! I have to say, I love hosting Hues to Use and finding a bit of color inspiration in the most unusual places! 

Here's a peek at this week's color palette, which was captured on a fun little marketing piece Marcella designed that truly embodies the love she has not only for "her man," but "her man's hobbies!" Doug, if you didn't know it, loves to fix up vintage motorcycles and "kicks it vintage" regularly with his lady at a monthly get together with fellow enthusiasts. So, when I spotted this card done by Marce herself promoting an upcoming event, I said, "YAAAAASSSS!" This must be our muse for Hues to Use!


With the color combo above as my guide, here's what I came up with my sweet stamping friends!


To create this little moto-inspired wonder, I started by printing off the Power Poppy digital stamp set Well Hello Dahlia. I then colored it all up using Copic markers and chose these shades for the flowers: YR68, YR04, YR07, Y02, R14 for the large flower; Y15, Y35, and Y38 for the yellow flower off to the right; BG01, BG04 for the right vase; BG000 and BG10 for the left vase; R01, RV00, and R32 for the left flower; G20, G21, and YG67 for the greenery and B00, B91, B93 and B95 for the center vase. The bottoms of the vases were shaded with BV0000 and BV01. The highlight around my image was done with G0000.

Here's a little close-up!


After that, it was all about matting it up! I used a few different sizes of pennant flags and then, added the little Well Hello Dahlia sentiment thanks to a 1-3/8" circle punch matted on a shape cut by a 1-1/2" circle punch. Add a little twine-strung button and... ta da!

And that, my friends, is it! So soak up these shades and get crack-a-lackin' with your craftin'! Once you're done, don't forget to link up your creation on THIS POSTSharing your talents could have you taking center stage on the Power Poppy Blog as the guest hostess with the mostess! Now, wouldn't that be fun!

Speaking of fun, it's time to head on over and pay these lovely ladies a visit!


Christine is the hostess this month for this fun-filled challenge too! 


So click HERE for the fun and krafty details about this month's Power & Spark! Then, don't forget to join us and play along! 

Until next time, my sweet stamping friends!
~Julie

Friday, June 2, 2017

Let Your Creativity Soar!

Hello folks and Happiest of Fridays to YOU! Are you ready to take flight with a brand spankin' new challenge designed just for Power Poppy Creative PEEPS? Well, being that it is a new month, there's a new Power & Spark Challenge and this one already earned its wings! Yours truly is the hostess this month so I invite to take a creative step back and... check it out!


HOW TO PLAY: This little challenge has us in search of digital and polymer winged creatures to help our creations soar! For our Junebug Challenge, all you need to do is use a 'bug' on your card! Just that simple -- ladybug, buzzy little bumble, beautiful butterfly, it's up to you!  You'll have to click on over HERE to see the official rules! I've also rounded up a fun little list of all the fabulous winged wonders in the Power Poppy Stamp Set arsenal that you can easily grab to get in on this challenge action! 

On to my creation! I had this digital stamp set  -- Climbing Clematis -- printed and ready to go and had it laying on a stack just waiting to be colored so I thought -- no time like the present! 


This card is really pretty easy peasy! I used die cut shapes to get literally every cut. The sentiment is also from the Climbing Clematis digital stamp set and the paper is a mix of Stampin' Up and some scraps from my decorative paper bin. I had a blast coloring this image and really love the vibrant colors. I used my Copic markers, of course, and reached for B60, B63, B66, RV00, G20, G21, G24 and G28. The butterfly was colored with Y35, YR04 and YR07. The whole image was highlighted thanks to RV0000 and R00. Then, when all was said and done, I did accent the little fluttering butterfly with some white gel pen and some sparkle gel pen as well! 

Here's a close up for y'all!


And that, my friends, is it! I almost forgot to mention -- if you play along and are the lucky winner for the Power Poppy drawing, you win a.....


$50 SHOPPING SPREE
AT THE POWER POPPY SHOP! WOOT WOOT!


Isn't that fabulous? You'll need to get those fingers inky and join me in the fun!

I will add -- there's so much going on at the Power Poppy Shop this weekend that you just might need to buckle yourself in for a few days! First up, if you missed the Good Vibe 5 for this week, just click HERE to see ALL the ab fab inspiration that Marcella has rounded up for you! It's a post that is always BIG on the warm fuzzies! And then, mark your calendar for next Monday, June 5th. That oh-so-special day just so happens to be Ms. Marcella's BIRTHDAY! And boy does she have a digital party planned! Look for a sprinkling of new sprouts in the Instant Garden, ready to download, print and create with! I CANNOT WAIT! Can you?

See you back here real soon!
~Julie

Friday, May 5, 2017

Sharing a Little Power & Spark!

Hello all and welcome to another fun-filled Friday! I have to say, this day is proving to be my favorite day of the week for so many reasons. One of which is sharing a little bit of Power Poppy inspiration with you to help jumpstart your creative weekend! 

Before I forget, did you know that Power Poppy has a brand new 'sprout' in their Instant Garden? If you want to take a peek, just click HERE to see one of Marcella's newest illustrations that you can download, print and then color up right quick! Squeee! I am using this new digital stamp for my card today so you'll be able to see it in full color first! ;-) Here's a little peek at the new set Plant Kindness! 


This fanciful set offers flower-filled seed packs and heirloom plant listings, rosy-faced journals and calico garden gloves — these are a few of Marcella's favorite things! Color up this cheery gardening vignette for a quick card and plant a little kindness along the way! Just click HERE to see! 

While you're here, however, you need to check out our latest Power & Spark Challenge hosted by the most fab Aussie I know- Ms. Kathy Jones! 


HOW TO PLAY: This challenge is just as it sounds -- it's all about FRAMES! Just hear what Ms. Kathy has to say about her challenge to us all!
"This challenge is as easy as Framing It Up! Simply frame your image on a card, decorate a frame or frame your stamped piece as a bit of home decor!"

Do you want to know something super fun? When it comes to the Power & Spark Challenge, Ms. Marcella has UPPED THE ANTE when it comes to the winnings! Now, instead of winning a stamp set of choice you actually win a.....

$50 SHOPPING SPREE AT THE POWER POPPY SHOP! 

Just click HERE for all the official details!

Okay moving on! Because I just couldn't wait to color up Power Poppy's newest digital offering, I decided to mix it up and use it while playing along in Kathy's new Frame It Up Challenge! I had so much fun, I decided to make TWO projects for today!


This first one is pretty self-explanatory. Print the digital image, color with Copic markers (too many to list!) use a pair of rectangle die cuts to create a frame for around your image, distress/sand the frame (used C'ordination cardstock) for an earthy feel, sponge main image with Ranger's Antique Linen Distress Ink for a little added depth, mat onto card decked out in bright, springy colors and accented with candy dots and a bit of jute! 

Here's a close up! 


And here's how I decked out the inside! The little strip of herbs along the left side of my card was done using some Memento Cottage Ivy ink and one of the stamps from the Sage Advice clear stamp set! 


 Now one funny thing happened while crafting the card. I had printed this image below to use on the inside of my card but I printed the Plant Kindness sentiment entirely too large! So, I grabbed more stamps from the Sage Advice stamp set and stamped those around the sentiment, decked it out with some paper piercing and added a dark green mat and voila!


Now you might ask, what are you going to do with that? Well, I am following Kathy's lead in this Frame It Up Challenge and using this as a statement to ponder in a space on my work desk! I had this little easel and thought it just fit perfectly there! 


And that, my friends is it -- a card and a little reminder to live each day planting and sharing a little bit of kindness and love! 💗

Now, it's time to pay a visit to some of the sweetest stampin' sisters a gal could ask for.... THE BLOOMIES! Just click on through our linky list and see what kinds of wonderful they've been up to!

Thanks for stopping by and spending a bit of your day with me!
~Julie