Showing posts with label Bloom Brigade. Show all posts

Thursday, November 12, 2020

Power Poppy Quiet Christmas: Forest Fellas!


Hi all and welcome to PART TWO of Power Poppy's Quiet Christmas release! Back at the end of October, the Bloomies showcased five new holiday and winter-themed sets that won so many of you over. Well, get ready for the second installment with more illustrations bound to knock your creative socks off! Today's set is for the lover of those creatures that dwell in the forest and this set comes with a whole host of sentiments that will have you reaching for this set all year long! 


Take a peek at the new set Forest Fellas! Isn't it absolutely adorable? I love each and every one of the "fellas" in this set and know I will have fun creating. Because I have an affinity for owls, I had to reach for that image first! 

On to my creation! 


When I was "Googling" owls, I realized this one bore a resemblance to the Barred Owl. Oh my gosh, click the link and you'll see -- so cute! I know, many of you might say, an owl? Cute? Yep. That's my story and I'm sticking to it! 

I colored this fella using the photos of the owl as my guide and literally scribbled shades of brown all over the feathers and then with the tip of my Copic, flicked color on the body to give the impression of texture. Not sure it worked! I am not the best at feathers, fur or hair. :-) After I was done coloring him up, I added BV0000 and BV00 to the background to give a kind of wintery feel and added some white gel pen to give the effect of snow. I really think it turned out cute and I will have fun sending this bit of snail mail off to a friend! 


Want to see what the rest of the Bloomies did with this darling set? Just hop on over to see these fine ladies and don't forget to pay the Power Poppy blog a visit to see the back story on this set from Marcella herself! 


Tomorrow's set is one with another woodland theme. It's creative and over the top fun, so swing on back and see for yourself! 


Until then! 


Friday, August 28, 2020

Power Poppy: Healing Bouquet!

Hi all! The sweet treats continue today with another brand new illustration fresh from the Power Poppy Shop!  These juicy new images are from Power Poppy's Fresh Squeezed Scents Collection and each is just as divine as the other! 

On to my creation!

Set your sights on this new image -- Healing Bouquet! It is rich in color and healing properties with sage, lavender, lotus, lemon and colorful porcelain vine! I colored this up with Copic markers and just kind of let the color flow. It's one of those images that you can just get lost in the process. I tried to add a little texture along the way to the lemon, adding dots of color and changing up the range of yellows as I went along. I also added a little white gel pen accents to both the lemon and berries --just to give both a  little more depth. The sentiment is from the retired set called Dynamic Duos Glads and Gerberas. 

Here's a little close up for you! 


And, as you can see from my finished card above, I used a die-cut set to create my layers, a little foam tape to pop it all up and a couple of rhinestones to add a little pizazz! I have to say, this is just a beautiful illustration that was such a joy to color up! 


There's so much more juicy creativity thanks to the Bloomies! Just hop on over to these fine designers below and you'll see for yourself! 


See both new sets HERE! And remember, with digital images, it's instant gratification! Just buy, download, print and color with reckless abandon! 

So glad you stopped by!  


Friday, February 28, 2020

It's Power Poppy Friday!

Hi all!  It's Friday, which means there's a little Power Poppy fun on the ole blog today for all of you! Earlier this week, did you see the Inspire Me Monday tutorial I posted? Well, if you missed it, you can click HERE to check it out because, my friends, this is the basis for this week's Creative Confetti challenge! So, two bits of fun! And, on top of that, I have a bonus creation here for you today using the same technique!

On to my creations! 


Just to give you a little bit of my tutorial this week, I showcased a super duper easy peasy way to create a graphic card with lots of visual punch! And, the MISTI stamping tool was key. If you keep your stamp positioned in this tool, it allows you to stamp overtop a previously stamped image, which opens up some different design possibilities, like the one I showcased! In a nutshell, you stamp the image, color it using a fine-tip black pen and then, situating it in the same way as when you initially stamped the image, stamp the image again using embossing ink and then heat emboss using a detail embossing powder. You get an embossed silhouette that is super quick, yet impactful! I started with the Power Poppy Vibrant Thanks stamp set for all three of my creations.


Isn't that fun? I just love that sweet little flower. The sentiment I added is from Power Poppy's Lilac Time stamp set. 

Now for a closeup of that Zinnia after I stamped with Versamark and added that detail back in with white detail powder. I just love the depth! I also added a sentiment that I also heat embossed. The sentiment is also from the Vibrant Thanks set as well.


And, here's a third card that I just made last night using vibrant shades of purple and the third flower in the Power Poppy Vibrant Thanks stamp set. I was inspired by Theresa Pollack's card HERE that she made after giving this tutorial a try. I love just how many different color combos you can try with this -- endless opportunities!!


I love that this technique delivers a design punch without a ton of effort. These cards took minutes to create and are the perfect way to create a little snail mail love in a jiffy!

So, if you want to give this technique a try, please do and then, click on over HERE to enter it in this week's Creative Confetti Challenge! Then, you'll be in running for a $25 gift code to the Power Poppy Shop! So, get those fingers inky and play along with me!

These lovely ladies also have a little Power Poppy eye candy to share, so be sure to hop on over and see what they have in store!

Nancy Sheads
Gloria Stengel
Leslie Miller 
Barbara Walker
Lisa Johansen
Stacy Morgan 

So glad you stopped by! I hope you have a beautiful and creative weekend!

Until next time,
Julie 


Friday, February 21, 2020

Friday Fun!

Hi all and happy Friday to you! I have a little Power Poppy fun to share today and I get to also share a little Power Poppy love crafted by some of my fellow Bloomies! Earlier this week, I ushered in the weekly Creative Confetti Challenge and this one is so easy, I really think anyone can join in the fun!

To play along in the challenge and read up on all the details just click HERE. The basic gist of the challenge is to frame up your main image on your card!

On to my creation


I was going through some of my pre-stamped images and found these little die cut flowers from the Abundant Petals stamp set, using the coordinating Die Set as well. And, after I "auditioned" them together, I decided that I had just the right combination to create a bit of color in a card corner. So, I colored it up using Copic markers - R81, R83, RV00, and RV0000 for the petals and YG00, YG23, and YG25 for the leaves.

I took some decorative paper and created a frame by lining up two stitched rectangle dies and, using a Post-It Note, situated and tacked them down on the paper before running them through my die cut machine.

After I cut out the frame, I cut another panel using only the largest die out of this cream and green graph style paper so that it would layer up perfectly. I used the 'Thank You' sentiment from the set and heat embossed it with gold detail powder. 


After I was done with my card, I wondered if it looked a little too plain? So, I did dig into my sequin stash and added a little bit of bling. Not sure which one I like better. What do YOU think?


If you leave a comment, let me know which version you like better -- clean or with a little extra bling! I sure hope you join me in this week's Creative Confetti challenge! I can't wait to see your take on the challenge. Every entry is one shot at a $25 gift code to the Power Poppy Shop! Woo Hoo! 


That's right, some of my fellow stamping sisters have some goodies to share, so make sure you head on over and see.....


I know you won't be disappointed that you did!
Until next time!
Julie

Friday, January 31, 2020

Bloomie Friday and a little Creative Challenge!

Hi all and happy Friday! If you're looking for ways to be inspired in your card making endeavors -- man, I think I have a fun one for you this week! This week's Creative Confetti Challenge that I ushered in earlier this week encourages us all to step out of the card making world to find inspiration from some of the masters in the art world. Look at the scenery, the colors, the graphic impact, the lines, the message. This week's challenge is all about interpretation, and that's why it makes it so much fun! Check it out!


HOW TO PLAY: Scroll through the artwork HERE and be inspired by one of the works. Then, create with that work of art in mind - you might take the look, the colors, the message - it's up to you! There are no hard and fast rules with this challenge! The only thing I ask is that when you post your creation on social media or your blog, share a link to the work that inspired your creation!

On to my creation! When I scrolled through the prints at Art.com, I could see so many opportunities to stretch my creative limits but there was just something about this soft print that caught my eye. It looked dreamy and today, (since the sun isn't shining here) I thought I needed a little soft and dreamy in my life!


I knew it might be tricky to get the perfect image to go along with this scene. I first thought about Power Poppy's Sunset Sway, but after scrolling through my digital stamps, I settled on THIS one, Bubbles and Fizz! I thought the foliage was dreamy like the inspiration art and I thought about the ways I could create that fun tonal backdrop.

I started by dropping the grey tone image onto a 4.25 by 5.5 canvas in PhotoShop Elements and then moving and positioning two of the images to create the look of foliage coming up from the bottom. After printing, I die-cut and then covered the outer edge of my die cut, right along the stitched edges, with Post-It notes to mask this off from any ink.


Then, I used Copic markers to create the fade of color. I wanted to use Distress Inks at first but I thought masking those little bits and bobbles might be a wee bit too difficult, so... markers it was!  I used G20, BV0000, BG70 and BG72 to create this backdrop. After I was done, I took some slate blue ink and then sponged some ink on using a spotted style stencil. I wanted to create a wee bit of texture to the backdrop. I colored up the leaves and flowers too. I realize my inspiration photo was purple and white flowers but I thought this needed a pop of color. This flower is called a Golden Wattle. It's native to Australia and it truly looks like pom-poms of sunshine! See? (click the link for photos!) 


From there, I just matted it all up, picking up on the yellow and sage colored green. The sentiment, which is also a digital image, is from the 
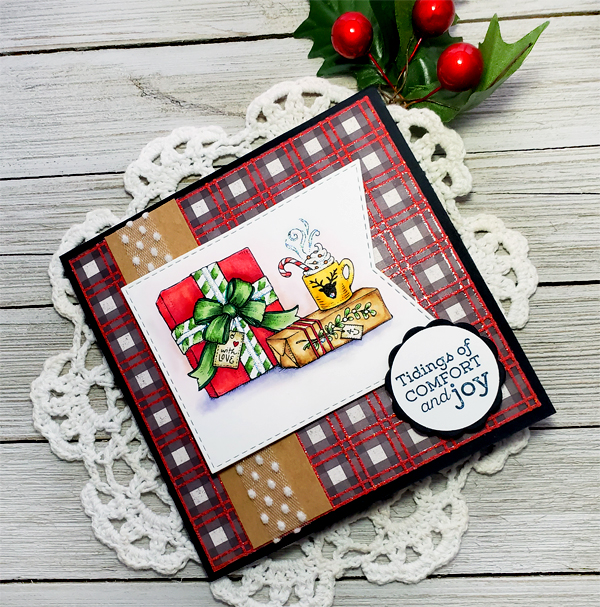
Saucer Magnolia set.   I used a die for the sentiment, punched a hole on each side and then used some gold cording as an accent. Here's a look at the finished card....


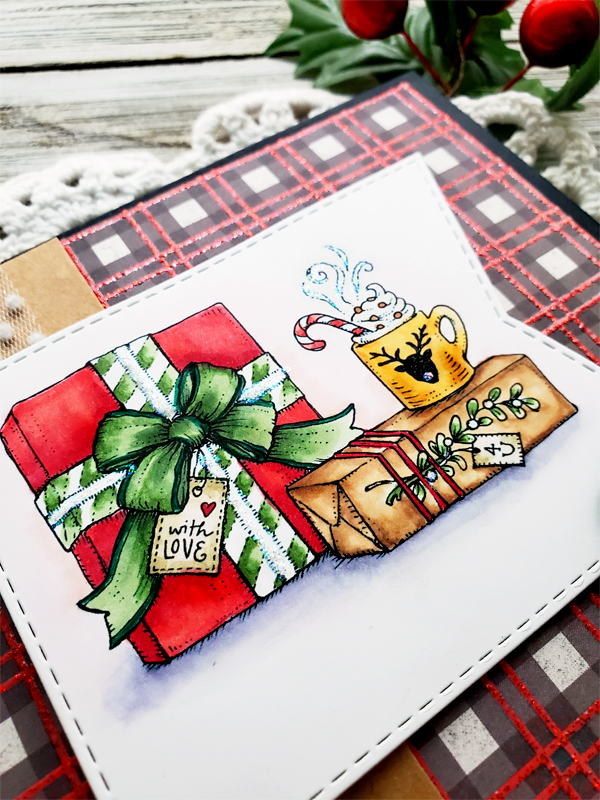
And, here's a little close up for you! Of course, I had to add a little splash of glitter to those bubbles to make them a little fizzier! ;-)  I think glitter makes a card happy. Just sayin'!


And that, my friends, is it!   Now, I know if you looked at my card, you might have a hard time seeing the original work but some of the elements are indeed there -- the color fade of a backdrop, and the foliage springing up from the bottom. The similarities after that are few. That's the beauty of this challenge, I didn't say "copy" the work of art. I said, "be inspired by it!" :-)

I hope you do have some creative downtime this week and can join in on the fun of  Life Imitating Art! After you're done, just link up your creation below so we can all see AND so you can have a shot at winning a $25 gift code to the Power Poppy Shop!


Be sure to stop on over and catch a little bit of these ladies' creativity! I know if you hop, skip and jump their way,  you won't be sad you did!

Stacy Morgan
Gloria Stengel is making a guest appearance with a fab Valentine that you'll love!


Have a beautiful and creative weekend!


Friday, December 20, 2019

I'm mad about PLAID!


Hello all and happy Friday! .So are you done with your Christmas shopping? Have all your cards sent and cookies baked? Well, I am not quite there yet but I am getting pretty close! Baking is set for this weekend and I am hoping everything turns out delish! 

Since there is such a hustle and bustle this time of year, earlier this week I thought I would make our Creative Confetti Challenge super dooper easy for everyone to play along! If you missed it, here's the challenge! I hope you join me! I think card making is a definite stress reliever and this is the perfect time of year for that! 

All you have to do is create with a little bit of plaid somewhere on your card or creation! You can click HERE for all the official details! 

On to my creation! 


While I didn't have buffalo check plaid, I did have this sparkly plaid that looks a cousin of that check print! I thought it looked super cozy with the image I chose from Power Poppy's Cozy Cupfuls stamp set. I stamped using Tuxedo Black Memento ink and then colored my image up with Copic Markers sticking with vibrant reds (R32, R35, R37) kraft colors (E51, E53, and E55), shades of gold (Y21, Y32, Y35 and Y28) and then touches of green (YG61, YG63, and YG67). I did add some shading with R0000 and R00 on the top (which you can barely see in the photo) and BV00, BV000 on the bottom. Add a strip of kraft paper, some fun ribbon and a little popped up sentiment and... done!

Here's a little close up for you! As always, Christmas cards need a little glitter! ;-)


And that, my friends is it! Be sure to stop by some of my fellow Bloomies places on the web to see what wonderful things they've whipped up for you all!


Thanks so much for stopping by! I hope you have a blessed holiday season full of joy, wonder and everyone you love!

Until next time!
~Julie

Friday, December 13, 2019

Another little Christmas idea!

Hello peeps! Happy Friday to you all! I can't believe I am saying this but, did you realize there are only 12 days until Christmas? What? Holy cow! I have cookies to bake, presents to wrap, a few little bits of shopping and... most importantly... I need more time to just "be still" and feel the real reason for the season. So, I am hoping that I can do all of that and cherish each and every moment. How about you? Are you ready?

Well, if it is an extra card idea you need, I thought I'd share one I whipped up yesterday in my stamp room. It's a super easy design and it uses one of the new digital stamps just released by Power Poppy called Handmade with Love Tags. The beauty of this set is that there are 8 images in this set AND you get the images with and without sentiments.


I decided to print off this particular tag -- which features this darling deer -- without a sentiment and I blew up the image a bit so that I could make it a card front. And, since Lisa challenged us all on this week's Creative Confetti to use non-traditional colors to create, I decided to take her up on her challenge! You can click HERE to see the color palette for yourself but it was a nautical navy, an evergreen and a silvery grey.

I colored this image up with Copic markers and when I was done, added a little bit of sparkle thanks to a Wink of Stella clear glitter marker and then added some "snow" with the help of some watered down white acrylic paint and a stiff-bristled paintbrush.

Here's a closeup for you! I should mention that the sentiment is from the Power Poppy clear set called Glitter House Village. 


I have to say this is such a charming image to color and I loved every second of it! I think I might save this card not for a Christmas card but maybe a Christmas thank you. It's a nice card to send, actually, anytime during winter! So, we'll see how it ends up in the mail!


It's time to hop on over to these fine ladies to see what they've whipped up for you this week!


Julie Koerber >> you are here!


On that note, I hope you have an amazing, creative and festive weekend!

Happy stamping!
~Julie 

Friday, November 8, 2019

Power Poppy Friday!

Hello all! I have my very first Christmas card of the season to share. I know. Shocker! I am typically a "Last Minute Lucy!" This card below is actually one that I plan to use as a Thank You after the season! Since it's Power Poppy Friday, I thought it was a good time to share! I hosted Creative Confetti earlier this week (click HERE to see the challenge) and helped usher in a fun sketch for you to try your creative hand at! Check it out....


On to My Creation! 


I used Power Poppy's Snow Kissed clear set for my card. I just ADORE this little snow guy! This image is really kind of on the larger side but with my layout, I knew I wanted my snowman just peeking out of the top. So I stamped him using Memento Tuxedo Black ink and then used a stitched circle die to cut him out.  On the top rectangle, I used one of the nordic patterns in the set to tie in the Fair Isle/Nordic look! I colored the snow guy up with Copic markers and really didn't use a ton of them -- a couple reds, a couple greens and then BV20 and BV23 for his hat. I accented with RV0000, some white gel pen and, of course, glitter glue! Love those little sparkles on anything snow!

 If you've not seen this set, here's a peek at the entire set for you!


I am showing you because you can see that the sentiment I used is only a part of the sentiment in the set. So.... how did I do that? It's as simple as a little bit of masking tape!


So, I added the tape covering up those top words before inking it up. I realized after I constructed my card base that the top portion just wouldn't fit. So, thanks to a little tape.... 


I inked it up, pulled off the tape and then stamped! A perfect fit! After I was done stamping, it was just as simple as matting it up, adding some fun stitched ribbon and a few little red rhinestones. Easy Peasy! To get in the spirit, I actually cued up some Christmas tunes as I created and it was so fun, I am actually looking forward to some marathon afternoons in my stamp room. Now, to come up with some ideas! ;-) 

Well, since it's Friday, you know what that means!


This fabulous lady had some time this week to create, so be sure to stop by and say"hi!"


Thanks so much for stopping by! I hope you have a beautiful and creative weekend ahead! I'll see you back here real soon!

Until next time!
Julie 

Friday, November 1, 2019

It's Bloomie Friday!

Hello sweet peeps! How was your week? Did you spend time with any little ghosts or goblins this week? ;-) We had a slew of kids come by last night for candy and it is always a hoot to see the costumes and just the sheer excitement on those kids' faces. Love it! 

Earlier this week over on the Power Poppy Blog, I ushered in a challenge for all of you who LOVE freebies! Check it out! 


HOW DO YOU PLAY? Simply use one of Power Poppy's Free Digital Downloads to create this week! Since the images we are using are FREE -- what's holding you back from joining us? Go shout it to your best stampin' buds! Tell a neighbor! Heck, shout it in the streets! :-) Bottom line, we want to see you join us and fill up the link list HERE ON THIS POST with tons of creativity!

Now, here's part of the challenge. I am not going to tell you where to find these lovelies in the store but, trust me, they are there, ready and waiting for you to download, print and color up with your own personal style! Just click HERE to travel to our digital stamp pages! I will tell you there are FOUR free images for you if you look! ;-)  While you're there, make sure to check out some of the "not" freebie digis. There are some beauties in the Power Poppy Shop! 


On to My Creation! 


For my creation, I used one of the newest Freebies called Sending Warm Hugs! I just love that little sunflower -- totally adorbs! I printed, colored up with Copic Markers and reached for G21, G24, G28, Y32, Y35, Y38, E25, E27, E23. I accented with a little BG0000 and BG10. And, when all was said and done I scribbled on some lines using a white gel pen. Why? No idea. I just felt like it! LOL!

Here's a close-up for you! 


From there, it's just matting it up, adding a button and... ta da! Easy Peasy! You have a few more days to play along! The link list is open through Monday night -- so I hope you make some time to get creative and join me! Every entry has a shot at winning a $25 gift code to the Power Poppy Shop!


Thanks so much for stopping by! Hope you have a wonderful weekend and I'll see you back here real soon!  

Until next time,
~Julie

Friday, October 25, 2019

Bloomie Friday: A treat for you!

Hi all! Since it's Bloomie Friday at Power Poppy, I thought just in case you missed my little tutorial on the Power Poppy Blog, I thought I'd share a snippet here and then, if you like, you can click HERE to see the step by step tutorial! I was the hostess this past Monday for Inspire Me Monday! I figured with the 'Night of Fright' upon us, I would share a SUPER EASY, SUPER CUTE project that you can literally whip up in a jiffy! The folding portion of this project takes less than a minute -- no joke -- allowing you to just take your time and enjoy dolling up this little treat bag for the little ghosts and goblins in your life!

Here's a peek at the finished project 


It's made with a square piece of paper --- really any size! It just depends on how big you want your pocket to be when you are done! The one I made, above is from 8" by 8" piece of paper and as you can see, it creates the perfect little pocket for fun-sized candy bars!


It's just the right size! 


I wanted to show you just how big or small you could go with this treat bag! I started with a 6" by 6" piece of paper and honestly, this is small enough for a few Hershey's kisses, a Ghiradelli square, or one fun-size candy bar. Maybe this one would be best for dollar bills? ;-) As you go up in size, the more you can fit! I actually started with a 12" by 12" piece of paper but when I was done, I thought, wow -- that's pretty big! That might actually make a nice little gift bag in a jiffy for smaller gifts? So easy! 


After seeing Instant Gardener Nancy Sheads color up this cute kitty from Power Poppy's Feeling Fall stamp set, I knew I wanted to give her video coloring tutorial a try - so I stamped with Memento Ink Tuxedo Black and cued up the video and colored away following all her cues! If you missed this tutorial, you need to check it out HERE. It was so fun to follow along! Just a little note, if you want instant gratification, Power Poppy just released this cat image in a Halloween digital stamp set called Boo Cat and Pumpkins.  So many fun images in this digital set!


So, when I was done, this is what my treat bag looked like! You can stuff it with candy -- I chose mini Ghiradelli squares -- and even hang this little treat on a doorknob as a sweet surprise!


I hope you like this little tutorial (click HERE to see the step-by-step version) and I hope you give it a try yourself! It can be used for so many different occasions --- Christmas (maybe you use these instead of an Advent calendar?), Easter, Valentine's Day, May Day! So many opportunities!

Be sure to stop by these ladies' homes on the web to see what crafty awesomeness they've whipped up for you this week!


Thanks so much for stopping by! Hope you have a wonderful and creative weekend ahead!
~Julie