Friday, December 26, 2014

a holiday full of thanks!

Hello all! Goodness, it's been two weeks since I've posted here on my little ole place in the blogosphere! I got caught up with Christmas spirit and literally spent the last two weeks trying to round up some holiday cheer with shopping and baking and decking the halls! It's been nice to just be with family and enjoy all that this time of year has to offer.I hope you are enjoying the season as well!

Today, I thought I'd share a card I whipped up last night. I have to have some holiday "thank yous" on hand and so this will be the first of many to come! ;-)

On to my creation!

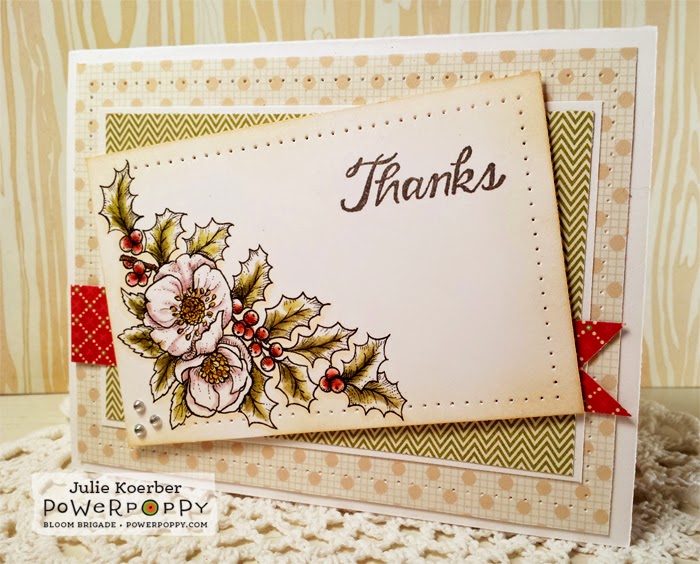
I have to say that I was in a bit of a food coma from eating toooooooo much on Christmas day, so when I set out to color up this grouping of Lenten Rose from the Power Poppy stamp set Heaven and Nature Sing, I needed a "blue print" for my card a.k.a. a sketch! I started this this little Sweet Sunday Sketch from Karen Giron. This sketch is a few weeks old (from November 30th) but I loved it, so I decided to use it as my inspiration! 

To start, I stamped my image using Memento Tuxedo Black and then grabbed some Distress Markers and used these ones to color up my flowers, leaved and berries!


And, here's a close up! 


For my card, I sponged on some Antique Linen Distress Ink, added some paper piercing and bling. You can see too that with my coloring, I really just scribbled on the color. I took an acrylic block, scribbled the marker on the surface and then picked the color up with a Dove Blender pen, again, scribbling on the color. I like the uneven and unpredictable look. ;-) The paper is a mix of Teresa Collins and Echo Park papers that I had in my scrap bin. The "Thanks" stamp is actually from Power Poppy's Play Ball set!

And that, my friends, is it! Some of my fellow Bloom Brigade members whipped up some craftiness thi week too! You'll have to stop on by and say "hi!"

Allison Cope
Christine Okken
Julie Koerber >>>> you are here!
Katie Sims


Thanks for spending a part of your day with me! Hope you have a wonderful weekend ahead and I'll see you back here soon!


~Julie


Pin It

Friday, December 12, 2014

Sh-Sh-Sh-Shake It Up!

Hi all and happy Friday! I'm here with another dose of Power Poppy snappy happiness! How's that to describe a bit of cardmaking? ;-) Actually, the card that I am going to share today is one that I have had in my head for AWHILE! 

I envisioned this pretty church scene (from the O Holy Night stamp set) bathed in red! And, I had also seen some very cool creations using this stamp set and making it a shaker card. I immediately said, "Ooooo, I wanna try that!" So, my dear friends, here's my creation!


I stamped the church image using Love Letter Memento Ink, cut it out using a circle die from Spellbinders and then, I used one of the Shake It Pouches from Impression Obsession. These little numbers not only make shaker cards easy but they have adhesive on the back of them to make assembly a breeze! Before I attached it over my stamped image, I did add glitter, sequins, and snowflake confetti. See? (I have to mention my stamp room is so dry I had an issue with static. I am hoping that the glitter stuck on my shaker eventually falls off!)


The rest is just matting it up! I used (for the most part) decorative paper from the Candy Cane Lane collection from Teresa Collins. I added some rhinestone swirls, some May Arts Ribbon, a Queen and Co. bit of bling and a little tag featuring the word "Peace" from the Merry Littles stamp set from Power Poppy! Even though it looks like there's a lot going on with this card, it was really quite fast and easy! One more Christmas card done! Now they just need to sign and address themselves so I can get them in the mail! ;-)

Need a little more inspiration to get your wheels spilling for weekend creating? Never fear, the Bloom Brigade is here! Stop on by and say "hello" to these lovely ladies!

Allison Cope
Cindy Lawrence
Dawn Burnworth
Julie Koerber >>> you are here!
Leslie Miller
Tosha Leyendekker

Thanks for stopping by! I hope you have some fun things planned for the weekend! I am going to go watch my daughter play basketball and HOPEFULLY get some Christmas shopping done. To date, I have one present, YES ONE purchased for the big day. Need to get moving, shopping and baking before the big day arrives! ;-)

~Julie


Pin It

Friday, December 5, 2014

Celebrate the Season!

Hello all! Hope your week is ending on a high note! I have to tell you, I am looking forward to a little down time this weekend! ;-)

Being that it's Friday, that means the Bloom Brigade is here to share a little Power Poppy goodness! Even though Power Poppy just released some AMAZING digi stamps HERE, I decided I really need to keep going on my Christmas cards! So, here's my card!


I picked up the Bough Wow Wow stamp set for this one! The beauty of this card is the fact that the image is one I actually colored up a few weeks back during some coffee talk with my mom. I stamped using Espresso Truffle Memento ink and then, grabbed a WHOLE BUNCH of Copic markers! Here are the colors I used: B00, B02, B04, YG28, YG26, YG21, G20, G43, G40, G46, R20, R24, R27, V01, V04, V06, Y21, Y35, Y38, YR0000, E42 and BG0000. 

My image was cut out with Majestic Labels Twenty Five and the rest.... is just matting it all up! I actually found my card base in a package on clearance at Michaels -- I loved the mod design and the fact that the pack came with five different colors! I added a strip of decorative red, a strip of gold bling, some May Arts ribbon, gold cording and then a Stampin' Up button! I needed (of course) a little extra razz-a-mat-azz, so I added some glitter glue (Stickles Diamond), on to the berries. See?


And that, my friend, is it! A colorful card ushering in Christmas well wishes! I'm not the only "Bloomer" sharing the fabulous illustrations from Power Poppy, check out these ladies creations too!

Allison Cope
Christine Okken
Julie Koerber >>> you are here!
Leslie Miller
Stacy Morgan

Thanks so much for stopping by this Friday! I'll see you back here soon!

~Julie

Pin It

Monday, December 1, 2014

It's a Winter Blitz Power Poppy Hop!

Are you ready for an all out Power Poppy Hop? Well, I am! The past two days, the Bloom Brigade has been showing off Marcella Hawley's latest illustrations and the fun thing about this release? It's all digital-- meaning you can order, print, color and ENJOY immediately! 

And here's a peek at the florals you can cherish.... right now!


Camellias and Winter Pick-Me-Up are both digi images that come with beautifully scripted sentiments to help you in your card making all year long! 

So to honor this oh-so-special hop, the Bloom Brigade is joining forces to show off another take on this mini digi release! And the fun news? If you comment on all of the designers' blogs today, you'll be in the running to WIN this entire digi release! FUN!

On to my creation!


Doesn't this little bouquet of winter blooms just make you SWOON? It sure made me and I have to say, I could not wait to print this beauty off to color it up! I printed, grabbed my Copic markers and had a blast just trying to bring this floral burst to life. I used these Copic colors: R01, R0000, E23, E25, BV01, BV0000, B61, B63, B66, V01, YG21, YG23, G20, YG0000, YG01, Y35, Y38, Y21, E40, E42. E0000. 


The rest is just matting this all up! I kept my layout rather simple. I used Spellbinders Labels Fourteen for my main image and while my die was still on the stamped image, I took a sponge dauber and sponged on some Cool Peri Ranger Adirondack Ink. I also added (while you can't really see it) some glitter glue to the base of each pussy willow for a little splash of fun. The sentiment was punched out with a Stampin' Up punch and accented with some tiny gold embellishments. Add a kraft doily, some May Arts lace and gold cording and... ta da! Done!

What did the rest of the Bloom Brigade whip up for this Winter Blitz Power Poppy Hop? Well, you'll have to see for yourself! I know you won't be disappointed! And remember, every comment you make on their blogs is one more chance to win this digi release!

Allison Cope
Christine Okken
Cindy Lawrence
Julie Koerber >>> you are here!
Kathy Jones
Katie Sims
Leslie Miller
Stacy Morgan
Tosha Leyendekker

Thanks so much for stopping by! I'll be back with more.... SOON!
~Julie


Pin It

Sunday, November 30, 2014

A beautiful breath of Winter!

Hello all! I have something extra special today -- brand new designs from Power Poppy. This one is a break from the holiday to celebrate the Winter Blitz Collection, a beautiful array of later winter blooms. They are without a doubt -- breathtaking! And guess what? These designs are all digital, meaning that you can click, buy, print and COLOR all in a matter of minutes!

If you missed yesterday's release, just click HERE to see the digital stamp called Winter Pick-Me-Up. It's a stunner!

On to today's release! Take a gander at these lovelies called Camellias!


This twiggy floral is actually two varieties of the flower intertwined in an extra special way! Again, the beauty of this release is the fact that you can have this image now HERE to color up your own way! ;-) 

On to my creation! When I saw this image, I knew that I wanted to use this image twice as a border on my main panel. So, using Photoshop, I removed the background and then layered the images. I added the sentiment and then.... started to color! 


To color my flowers, I used Distress Markers in Shabby Shudders, Peeled Paint, Tattered Rose, Worn Lipstick, Spun Sugar and Scattered Straw. After I was done coloring, I did add some shading around my image with Copic markers and I used R01, R0000, and E40. I also added some of the shading around the edge of my panel too and then added a bit of goldleaf pen around the edge too. 

There's really not a ton to my layout -- I wanted to make sure that my panel took center stage. so, I matted my main image onto a pink piece of decorative paper and then again on an ivory card stock base. I added a little pennant flag accent with a gold button strung with gold cording. Here's a close up!  


And that, my friends, is it! With this beautiful branch of blossoms, it's a given that the Bloom Brigade will create a feast for the eyes! So, hop on over and see....

Allison Cope
Christine Okken
Dina Kowal

Thanks so much for stopping by! Tomorrow the Bloom Brigade will be back to wrap this release with a good ole fashioned Power Poppy Hop! And, if you hop around and see what we've created for you and comment on our creations, you'll have a chance to win the entire digital release! So, come on back now, y'hear? ;-)

~Julie


Pin It

Friday, November 21, 2014

A Mini Post for a Mini Card!

Hello all and Happy Friday! Hope you had a fantabulous week and are looking forward to a restfully creative weekend ahead! I have plans to fire up my crock pot, put on Pandora, maybe snuggle up with a movie and.... COLOR! That's one of  my new favorite things-- to grab my Copics, a clipboard and a comfy blanket and cozy up to color while watching something fun. It's so "Winter!" ;-)

One of the Power Poppy things I colored recently is this little doo-dad....

So easy, right? Well, this image is from Power Poppy's Merry Littles stamp set. I happened to find these fun little 3" by 3" cards while exploring Michaels the other day...


How cute are these??? And, with a pricetag of just a $1 -- who can afford to go wrong for 10 mini cards and mini envelopes! They also come in red and white too! I think they are perfect for gift bags or to top off a hostess gift of some sort! 

Now to the card deets --- I stamped in Memento Espresso Truffle and then colored up my image with R20, R24, R27, G20, G40, G43, G46, Y21, Y23, E40 and BG0000. I punched with a 1-1/4" circle punch and then matted it on one of Spellbinders Blossom dies. I can't find the die on Spellbinders' store, so it might be retired? After I matted it up, I added some pennant style flags in coordinating decorative paper. Add some bling, some glitter paper and.. ta da... DONE!

Here's one last peek! You can see I decked out the envelope using the little bow from the Merry Littles set too! 

Need some more Friday inspiration? Well, the Bloom Brigade is full of it! You'll have to hop on over to their places on the web, take a gander and tell them "hi!" :-)


Allison Cope
Julie Koerber >>>> you are here!
Leslie Miller
Stacy Morgan


Have a fabulous weekend and I'll see you back here soon!
~Julie


Pin It

Friday, November 14, 2014

Have yourself a 'Merry Littles' Christmas!

Hi all and happiest of Fridays to you! I've got some Power Poppy goodness to share with you today that's quick... and FUN! I hadn't yet played around with the Merry Littles set that was just released earlier this month by Power Poppy. After looking at the set and all the little pieces and parts (did you know there are 18 stamps in that set????) I thought I would try my hand at making my own wreath!

So, here's a peek at my finished card so you know what I'm sharing!


And here's the super quick and easy way I put this together! I took one of my Spellbinders circle dies and using a pencil, traced the shape onto a 4" by 4" piece of card stock. Using Memento Cottage Ivy ink, I stamped the branch, following the line of the circle. See?


Here's a peek at the stamp set so you can see which stamp I used! I also used that darling little bow!


I stamped the bow in Love Letter Memento Ink and then colored it up with R27, R24 and R32 Copic Markers. I cut the bow out and then popped it up with a little foam tape. After my wreath was "assembled" I stamped the word Merry Christmas from the Poinsettia stamp set and added some red glitter glue to those "berries!" Here's a close up! 


And that, my friend is it! The rest is just matting it up! I used some of the scraps from my decorative paper bin. I also found some red glitter paper to try to bring out the glitter dots that I added to my wreath! Oh, and I erased my pencil lines after my ink was dry! That's it!

You'll have to make the rounds to see what the rest of the Bloom Brigade has in store! I know they always have fabulously creative things to share, just in time for some weekend creating!


Allison Cope
Christine Okken
Cindy Lawrence
Dawn Burnworth
Julie Koerber
Katie Sims
Leslie Miller
Tosha Leyendekker


Thanks for stopping by and sharing some time with me! See you back here soon!

~Julie


Pin It

Monday, November 3, 2014

Power Poppy FUN!


Hello all! Just a little note to say that I'm hosting Inspire Me Monday over on the Power Poppy Blog today!!! Want to learn how to create with resistable embossing? What's that you say? Well, you'll just have to hop on over HERE to check it out! :-)


See you back here soon!

~Julie


Pin It

Saturday, November 1, 2014

The BIG DAY is here!

Hello all! The big day is here! After "teasing" you all with beautiful images that we KNOW you want to get your hands on to create and color with, you don't have to wait any longer!
http://powerpoppy.com/collections/happiest-holiday-collection 

There's Bough Wow Wow, O Holy Night, Merry Littles, and Heaven and Nature Sing! Just click the links to see them for yourself in the store!

Well, it's pretty much tradition for the Bloom Brigade to take one of the sets from the week and show it off one more time for our Power Poppy Hop on Release Day! So, here goes!


Yesterday, I was telling you how I was using a new medium and I laughed -- I pretty much used Distress Markers for each card of this fabulous release! I am having a ton of fun playing. For this creation, I knew I wanted to make that little Lenten Rose accent in the set Heaven and Nature Sing -- well, SING! It's just too beautiful to  be an accent or even a background, don't you think?

I stamped using Memento Espresso Truffle and then reached for these markers - Shabby Shudders, Peeled Paint, Worn Lipstick, Barn Door, Forest Moss, Scattered Straw and Wild Honey. I added some spritzing with the Distress Marker Spritzer using Antique Linen and then I used W01, and W03 Copic markers to shade around my image, blending with a Copic blender. I also added some white paint pen dots on the berries. And... that's it for coloring! 

The paper is Teresa Collins Christmas Cottage. Add a half doily, a Labels Twenty Two die cut (embossed and sanded around the edges), some 1/2" satin ribbon some red pearls, a splash of paper piercing,  a little gold ribbon and... ta da! 

Here's a close up!


And that, my friends, is it! You'll have to see what the rest of the Bloom Brigade chose to show off for this oh-so-fun Power Poppy Hop! I guarantee, it will be a fun way to spend a part of your Saturday! ;-)

Allison Cope
Christine Okken
Cindy Lawrence
Danielle Kennedy
Dawn Burnworth
Julie Koerber >>> you are here!
Kathy Jones
Katie Sims
Leslie Miller
Stacy Morgan
Tosha Leyendekker


Thanks for stopping by and sharing a little creative fun with me! I'll be back in my stamp room this weekend to have some more fun to share ... real soon! Have a fabulous weekend!

~Julie


Pin It

Friday, October 31, 2014

Sneaks Day 4: Heaven & Nature Sing!


Hi all and welcome to Day 4 of the Power Poppy Sneaks for our Happiest Holiday Collection -- Part 2! Today's set is one that literally took my breath away!!!


Heaven and Nature Sing features little birdies on a branch of holly adorned with a few Lenten Rose blossoms for a splash of pizzazz! Don't you just love these sweet little creatures? The set also comes with a Lenten Rose spray, and a few more holly pieces to use to create with reckless abandon! I see fun tags, borders and backgrounds in this set's future for sure!

On to my creation!


I started by stamping the image with Memento Espresso Truffle and then, picked up something new in my craft room -- Tim Holtz Distress Markers. I absolutely LOVE these. I really hesitated getting them because I thought my Copics didn't need any competition. But after trying them, they really are a wonderful medium that gives you deep color without a ton of effort. I used Shabby Shudders, Stormy Sky, Spun Sugar, Worn Lipstick, Barn Door, Forest Moss, Scattered Straw and Wild Honey. I did a mix of coloring directly on my image and scribbling the marker on a palette and picking it up with a blender pen.

After I was done coloring, I did sponge on some Antique Linen and then used this little number -- the Distress Marker Spritzer to get those little spray marks. I think this is a super fun effecrt!


All of the paper is Teresa Collins. I added a bit of pink Hug Snug ribbon and a Queen and Co. goosebump rhineston. There are a few dots of white paint pen to give the birdies' eyes and some of the berries a splash of highlight and.. ta da! Done!

This image is so gorgeous, I know that you are going to want to see all the different ways the Bloom Brigade put their creative touch on it! So, hop on over and see....

Allison Cope
Christine Okken
Cindy Lawrence
Dawn Burnworth
Dina Kowal
Marcy @ the Power Poppy Blog!


Tomorrow, we wrap up the sneaks with a Power Poppy Hop showcasing the sets one more time AND guess what? All of them will be live in the Power Poppy Shop for the buying! What wonderful sets to help you get a jump start on your holiday card making blitz!

See you back here tomorrow!
~Julie


Pin It

Wednesday, October 29, 2014

Sneaks Day 2: O Holy Night!

Well, if you liked yesterday's Power Poppy sneak peek Bough Wow Wow, you're going to love today's offering just as much! It's a classic image that truly captures the peaceful feel of the season!


O Holy Night, featuring a classic snow-covered church on Christmas Eve, can be stamped classically in one color for an on-the-go creation or can be colored up in its full moon-lit glory! This image is paired with five reverent sentiments, perfect to share the true meaning of the season!  

On to my creation!


I knew when I saw this image that I wanted to stamp it in navy blue AND I wanted to make sure it was really razzle dazzled up with glitter. With that in my head, I decided to dig through my dies and find one that would truly help this image take center stage! I turned to the die called Fancy Ribbon Threader.  from Spellbinders! I stamped the image using Nautical Blue and then matted it below my framed die cut. I will say that this die is normally solid in the center (not a frame). After embossing the die, I kept the die on my paper and used an X-acto knife to cut out that center panel. I threaded the ribbon slots with some sheer, irridescent trim white ribbon and then added a frame of rhinestones! The base was embossed with the Spellbinders Embossing Folder called Holiday Magic. Add some Diamond Stickles glitter glue and.. ta da! Done!

I can guarantee you that the rest of the Bloom Brigade has taken this set and put a whole new and beautiful spin on it! So, what are you waiting for? Stop on by and see what gorgeous creations their ever-so-talented hands created using it!

Allison Cope
Christine Okken
Cindy Lawrence
Danielle Kennedy
Dawn Burnworth
Julie Koerber >>> you are here!
Katie Sims
Stacy Morgan
Tosha Leyendekker
Marcella @ Power Poppy


Tomorrow's set is all about the merry little images that help to ring in the season with a festive flair! So, be sure to hop on over to the Power Poppy Blog  tomorrow to see what the Bloom Brigade has in store!


~Julie


Pin It

Tuesday, October 28, 2014

Sneak Peak 1: Bough Wow Wow!

Hello all! Are you ready to help Power Poppy "ring" in more fun for the holiday season ahead? Well, the Bloom Brigade sure is! Today marks day 1 of the Happiest Holidays Collection -- PART TWO! Over the course of the next four days, we'll be showing off new stamp sets to make your holiday season even merrier! 

Ready for the first sneaky peak? This set just makes my heart flutter!


This set -- Bough Wow Wow -- truly puts the WOW into Christmas Boughs! This set features two splashy, greenery-stuffed swags! Who doesn't love a holly-packed swag full of vintage glass ornaments? Or, how about a boxwood bough stuffed with warm and fuzzy things like wool mittens, ribbon streams and fuzzy little pom poms? Too fun! 

On to my creation!

Okay, I have to admit that I need to freshen up my winter/Christmas paper offerings. After digging through my patterned paper packs -- I found one I do love from last year! Remember Echo Park's Keepin' Cozy? Love the reds and blues and I decided to use that paper to set the tone of my creation! I stamped my image using Memento Espresso Truffle and then reached for something kind of new in my stamp room --- my Ranger Distress Ink markers! I used Shabby Shudders, Stormy Sky, Spun Sugar, Worn Lipstick, and Forest Moss. To color up my image, I did a mix of coloring directly on my image and scribbling the marker on a palette and picking it up with a blender pen. I am loving having these markers in my stash of goodies! So fun to use!

When all was said and done, I added some accents with a white gel pen and then, of course, some glitter glue! See?

After I die cut an oval with my image and added some sponged Broken China Distress Ink, I added a Stampin' Up button, a half doily, some red and white twine and some little enamel dots from Stampin' Up in the corner! And that, my friends, is it!

Because this set is so perfect for ushering in some holiday cheer, you will have to stop by and see how all the "Bloomers" used this merry little set! 


Julie Koerber >>> you are here!


I'll see you back here tomorrow as Power Poppy pulls the lid off another new set! "Soft" and "Peaceful" are two words that you could use to describe this beauty! See you back here then! 

~Julie


Pin It

Monday, October 27, 2014

Something's Sketchy!

Hey all! It's Monday -- which means I pull out a sketch from the PageMaps archives, tinker, create and then, share it here! For today's card, I wanted to challenge myself to take one of the sketches and simplify it -- making it a 10 minute creation! Who doesn't need a few of those up their sleeves for those cards "in a jiffy" occasions?

Here's a peek at the card....


And here's a peek at the sketch! 


You can see, the sketch has a wee bit more going on -- like the scalloped border and some accents behind the image. I chose to simplify! I traded a button for a floral and washi tape for the punched border. The ruffled accent over top the sentiment went underneath. While I took a cleaner take on the sketch -- you can still see that it's there! ;-)

My stamp is from Penny Black's Truly Great cling stamp set. I love that sentiment! It's so nice when a sentiment can take center stage, don't you think? The paper pad is called A Mother's Love by My Mind's Eye. The flower is Prima. The washi tape is from Stampin' Up and the ribbon is Hug Snug Melon. Just that easy!

Here's a close up of that cute sentie! I had to -- of course -- add a little bling! ;-)


If you need a little sketchy inspiration, it's only a click away HERE at Pagemaps' CardMaps gallery! You can click HERE for the newests sketches and HERE for the whole shebang that Becky Fleck has created! Too much fun if you ask me!

Hope you have a fabulous start to your week and I'll see you back here soon!

~Julie

Pin It

Friday, October 24, 2014

Get Smooshed!

Hi all! If you joined me Monday, you know that I am hosting one of the fun-filled Hope You Can Cling To challenges over on Splitcoaststampers!! And, if you haven't yet -- you should play along! Not only are all the challenges a blast, BUT, there is an opportunity to lift the spirits of women battling breast cancer at MD Anderson. AND, There's also about $5000 in prizes from some of your favorite crafty companies!

Just click HERE to join in on the fun!

My challenge is all about the  Ink Spray Smash Technique! And, what's fun is the fact that this past Monday, Dina Kowal created a brand new video on the technique! Just click that link and scroll down to see. She took some fun twists with this one!

I also took this technique and threw in a twist! I wanted to show you step-by-step!

HERE'S WHAT YOU NEED:
  • a complimentary array of re-inkers
  • a mister
  • glossy paper
  • stencils
  • sponge


Start by dropping every one of the reinkers all over the glossy card stock, have a second piece of glossy card stock waiting in the wings!


Using the mister, spray paper until you get the colors to run. Then, grab that second piece of paper and literally "smash" them together! I even twisted the paper a bit to really mash the colors together!


After letting the colors dry a bit, this is the result!


Because I wanted to add a little more interest, I grabbed a few of my Tim Holtz Layering Stencils and took the Love Letter and Tangelo Memento inks and a sponge and sponged some more ink over top!


I also used the stencil called Stripes. And, this below is the result!


And here's a look at my finished card! You can see that I stamped the Paper Lantern stamp from Power Poppy's Sunny Harvest set over top using Memento Tuxedo Black. After heat setting the ink, I did use YR04, YR07, YR09, R27, and E55 Copic Markers to add some color and depth to the paper lanterns. After that, I added a white paint pen and added some dots and highlights just to add a little more drama! 


The rest is just matting it up! I have to say that I used the extra piece of paper for my sentiment (also from the Sunny Harvest set!). I used the Spellbinders Labels Seventeen for my main image, added some crazy paper piercing, May Arts crochet trim and... ta da! Done! 

SO.....WHY NOT GIVE THIS TECHNIQUE A TRY and....join me with Hope You Can Cling To? The  Master Challenge Thread can be found  HERE.  (My challenge is HYCCT1420.) You have until November 7th at noon CST to be in the running for some of those fabulous prizes! :-)

And, because we want to lift the spirits of women undergoing cancer treatment, please help us with our Hope You Can Cling To Card Drive!!!


DONATE CARDS BY SENDING TO:
The Department of Volunteer Services – Unit 115
Attn: Maggi Suttles
UT MD Anderson Cancer Center
1515 Holcombe Boulevard
Houston, TX 77030

Before I let you go, if you're looking for a little creative inspiration to kick off your weekend, look no further! Some members of the Bloom Brigade have been busy at work just to give you a little card making eye candy! So stop on by, and say "hi!" ;-)

Allison Cope
Christine Okken
Danielle Kennedy
Dawn Burnworth
Julie Koerber >>> you are here!
Tosha Leyendekker

Thanks for stopping by! I sure hope you join in on the fun!

~Julie


Pin It