
Hello peeps! Earlier this week over on the Power Poppy Blog, I ushered in a different kind of Creative Confetti Challenge. I hope you check it out and play along with moi! ;-) It was based on a tutorial the talented Ms. Dina Kowal did more than a few years back. Want to see? Click here! She took us through -- step by step -- on how to create what she called a "9-block card." It was designed to mimic the effects of a quilted square and that, my friends, was the inspiration! You can check out all the details on the challenge HERE but I thought I'd share the process of creating my card here on my blog too!


And then kept moving my slivers of paper as I went!

You can see just how easy this made it!

And here's a look again at the final "puzzle" all put back together!
Here's a closeup. Don't look too hard! You can see that I am just a wee bit off on my top three boxes. The paper must have shifted as I was making my little squares. It's okay though. Most people won't notice that hopefully!

And here's the cheery little sentiment that I added onto a punched circle and put on my card thanks to some silver cording! The sentiment is from the Power Poppy set Potted Primroses. Love that set!

So, now it's your turn to color up something, cut it up and piece it all artistically back together! While it was a bit tough cutting up this image, I do love the effect and was glad I cued up Dina's tutorial for inspiration! You should give it a try!
 Time to take a little trip to see what these lovely ladies whipped up for us all this week!
Christine Okken
Julie Koerber >>> you are here!
Katie Sims
Stacy Morgan
Thanks for stopping by! I hope you have an amazing and creative weekend and I'll see y'all back here soon! 💗
~Julie

So, I wanted to give you a reference point so that you could "see" where I was going through my little step by step tutorial below. I am giving you a tutorial because I did my grid creation just a wee bit differently than Dina. She had a grid die. I wasn't so lucky but in the process of making this card, I remembered a little trick a fellow stamper taught me once. So, I reached into the cobwebbed recesses of my mind and dug that little trick out!
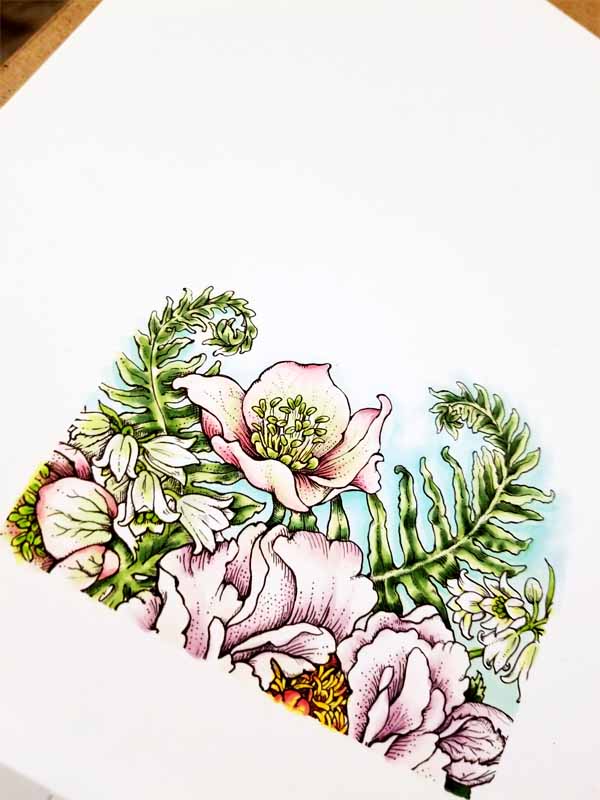
I started by printing off the brand new digital stamp by Power Poppy called Bowl of Beauty. Man, is it a beauty or what? I did only print off a portion of the image and I did blow it up a bit so that you could "see it" when I cut it up and re-assembled! Here's what it looked like after I finished coloring it with my Copic Markers! I have to admit I had a hard time taking my paper cutter to this one. I actually said to my husband, "I can't do it!" And you know what he said? "Don't complain, you knew you were going to do it when you started. Just do it!" HA! A little tough stamping love for me! ;-)
Now here's the little trick! I cut a few slivers of card stock to measure 1/8" wide. This would serve as my guide for layering all my little 1" squares! I started at the top and side....
And then kept moving my slivers of paper as I went!
You can see just how easy this made it!
And here's a look again at the final "puzzle" all put back together!
Here's a closeup. Don't look too hard! You can see that I am just a wee bit off on my top three boxes. The paper must have shifted as I was making my little squares. It's okay though. Most people won't notice that hopefully!

And here's the cheery little sentiment that I added onto a punched circle and put on my card thanks to some silver cording! The sentiment is from the Power Poppy set Potted Primroses. Love that set!

So, now it's your turn to color up something, cut it up and piece it all artistically back together! While it was a bit tough cutting up this image, I do love the effect and was glad I cued up Dina's tutorial for inspiration! You should give it a try!

Christine Okken
Julie Koerber >>> you are here!
Katie Sims
Stacy Morgan
Thanks for stopping by! I hope you have an amazing and creative weekend and I'll see y'all back here soon! 💗
~Julie
1 comment:
What a gorgeous card, Julie! I really love this image and how you've cropped it and softly colored it. But the design is also so captivating. Love the beautiful grid and how you've achieved it. Thanks for the inspiration! Hugs and love! xoxo
Post a Comment