Friday, September 25, 2015

Here Comes Santa Claus!

Hi all and Happy Friday! I have an extra special affair for you today. Power Poppy has something to share that just sprouted in their  Instant Garden. I have to say that it is so stinkin' cute...you will just HAVE to have it in your digi collection! It sparkles. It glitters. It's FULL of Christmas flair! 

Let's get right to it and give you a little sneaky peek of Glittering Glass Santa! 


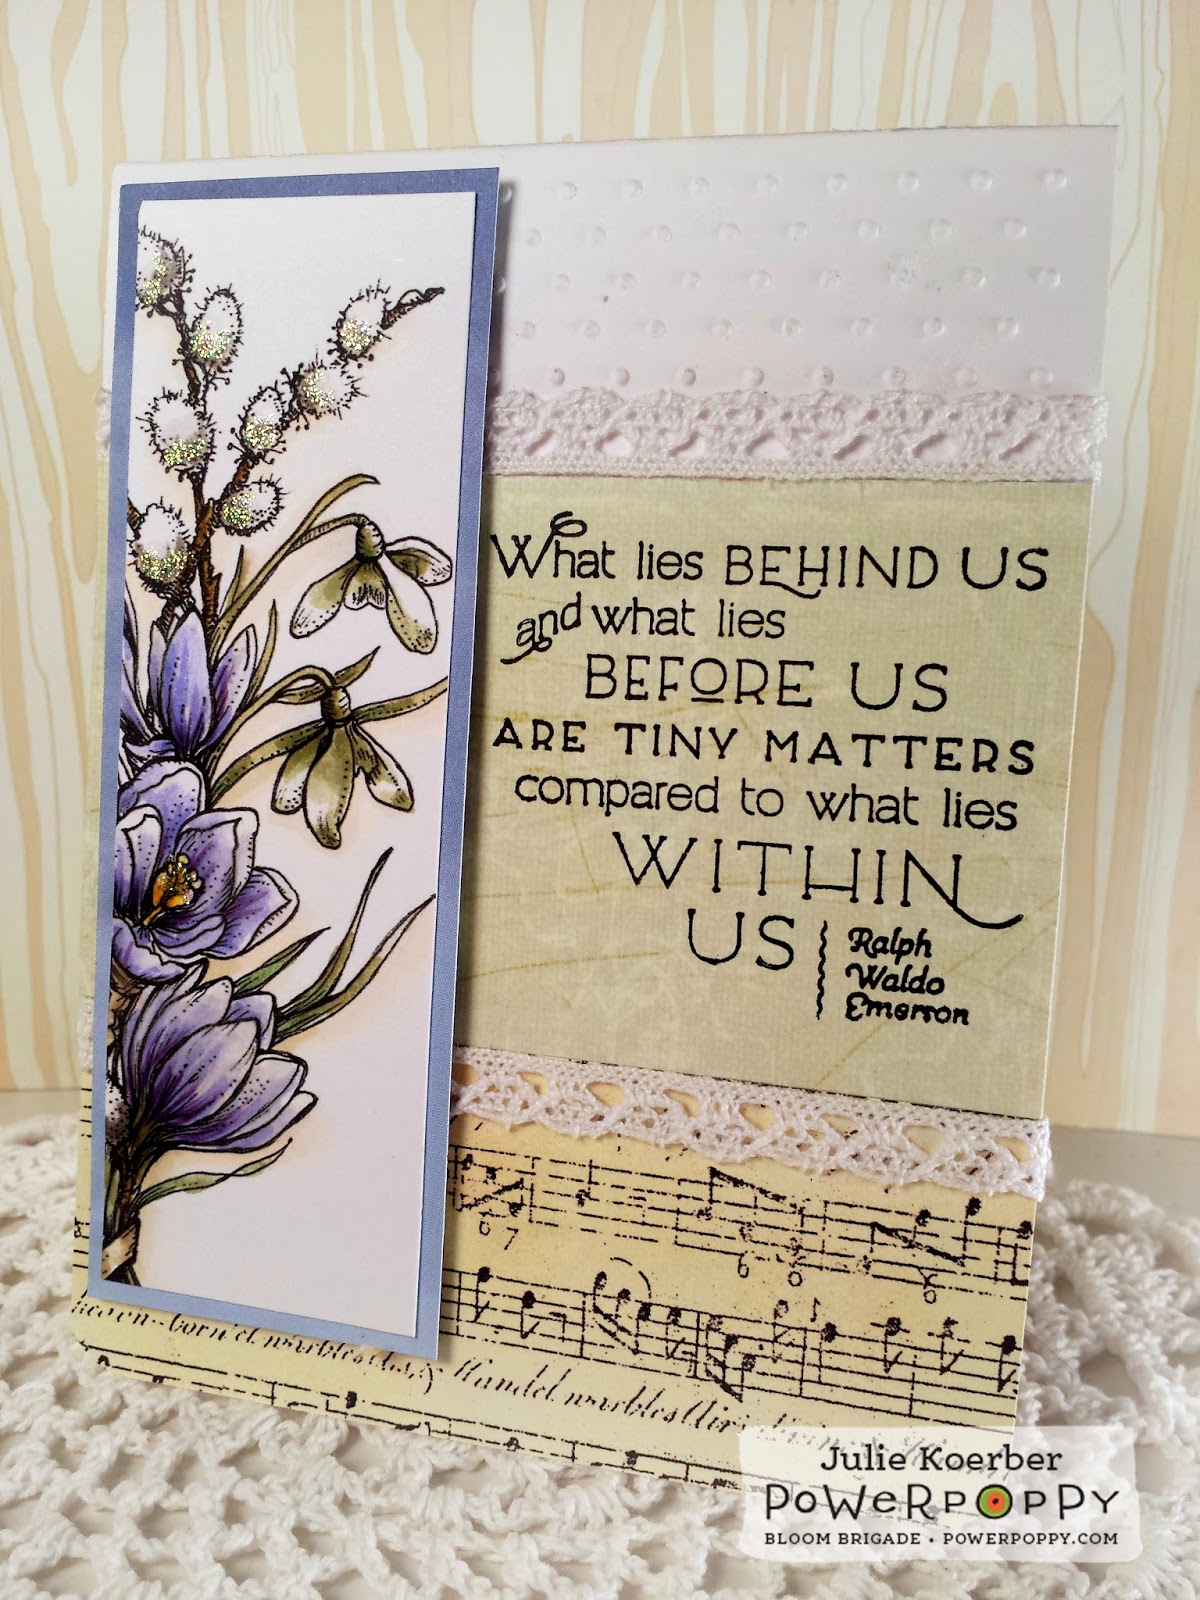
After printing this little guy on Cougar Opaque White Card Stock, I grabbed a few of my Copic Markers to bring him to life! I used R01, R14, R21, R24, R27, R29. C00, C01, C03, BG0000, BG01, YG13, G20, G07, G20, G40, G43, G48, E00, RV00, RV02. Once I was done, the rest is pretty simple! I used a stitched border die, added a little grosgrain ribbon, a little gold cording with a mini jingle bell added and then matted it all up! The sentiment is also from this digital stamp set. I colored with the same reds and blues that I used in my main image. And, as you can see, I did add some white paint pen accents and glitter glue! 

Here's a peek at the inside! I used a sentiment from Power Poppy's Poinsettia stamp set (used Espresso Truffle Memento Ink) and a little accent stamp (used Toffe Crunch Memento Ink) from the Bough Wow Wow stamp set

Here's a peek.....


And, here's a close up!


And that, my friends, is it! This whimsical Santa is a perfect addition to Power Poppy's already chocked full holiday collection! Sure, it might be a wee bit early to think Christmas, but we have lots of cards to dole out during the holiday season! It's a list you'll be adding to and definitely checking twice! So, get a jump start! ;-) You can find all of Power Poppy's Instant Garden Digital Stamps RIGHT HERE! Adding Santa to your stamp room is as easy as clicking a download link from the email that’s sent to you after purchase, then printing, coloring, creating, and (most importantly) enjoying! 

My fellow Bloomies have been busy bringing this little Santa to life! You'll have to stop on by and see their take on this sweet image! For the full link list, please visit.....


Before I go, I do have an important announcement for all those in Power Poppy Land! If you haven't taken part in this month's Power & Spark Challenge, now's your time! There are only six days left on this challenge and it too is somewhat holiday themed! Just show your spin on gift giving. Share a handmade creation that you plan to gift. Share a gift tag you've made. Or, show how you dress up a box thanks to a stamp or two or three! Then once you're done, click on over to THIS CHALLENGE POST and link up your creation on the linky! The winner will get a choice of a free or digital stamp set from the Power Poppy Shop! Woo hoo! Contest runs through September 30th at 8PM EST.


Thanks for popping in to say “hi!” I hope you have a fabulous weekend ahead and have a little down time to get crafty! ;-) See you back here soon!

~Julie

Pin It

Friday, September 18, 2015

Peace & Strength

Hello happy stampers! I have a card to share today that showcases Power Poppy's newest member to the Instant Garden -- Olive & Oak.  What I never knew was that the olive symbolizes peace and oak symbolizes strength. What a beautiful fusion of images to send this message to someone you care about!

I have a friend who just started radiation for breast cancer. As I sat and colored this image from top to bottom, I had her in mind with every colorful stroke of my marker. I knew when I was done, this card was going straight to her mailbox! ;-) 


When Marcella penned this beauty, she said it would be perfect for not only fall but for more mascculine cards. I think it's a classic image that could be used in so many different ways! 

On to my creation! After I printed this image on to Cougar Opaque white card stock and die cut it using a faux stitched border die, I picked up my Copic Markers to color it up. Here's what I used: E31, E33, E23, E25, E27, G20, G21, G24, G28, YG21, R59, R32, R01, E09, E04, Y38, Y35, Y21, Y11, YG13. After the leaves, acorns and olives were colored up, I did use W00, W01 annd W03 to shade around the image. 

I will say that the sentiment is from Power Poppy's stamp set called Lilac Time. In the stamp set, you'll see it's a stacked sentiment. I actually just inked up each word separately so that I could put it on this sentiment strip. (I used Memento Rich Chocolate and Potter's Clay inks). The paper is BasicGrey and the button is a gold one from Stampin' Up. I also added just a wee bit of white gel pen to add highlights to the acorns.

Here's a close up!


And that, my friends, is it! Now it's time to hop on over to see what the rest of the Bloom Brigade whipped up this week. I have a feeling you'll see a little more of this image too! ;-)


Allison Cope
Christine Okken
Cindy Lawrence
Julie Koerber
Leslie Miller
Stacy Morgan


Thanks for stopping by and seeing what I've been up to! I wish you the best of weekends. I'll be watching some high school football, watching some college football and watching my daughter kill it at softball tryouts. Should be an action packed weekend! Hope you have fun in all you do! See you back here soon! ;-)

~Julie


Pin It

Friday, September 11, 2015

Hello Friends!

Happy Friday Y'all! Since it's Friday, that means I'm here with my Bloomies to share a little creation from my crafting space! While this beauty that I'm showcasing today was released a few weeks ago, it's the first time I had time to use it -- and I had a blast coloring it up!

On to my creation! Say hello to Easy Breezy Coneflowers! It's a new digital stamp set from Power Poppy


Before I printed this beauty off, I did change the color by lightening to more of a brown tone. If you still are new to digital stamps, I did a tutorial a while back on how to use these images to their fullest. You can check it out HERE to see some of what I did today!

After printing, I colored this duo of flowers up with a mix of Copic markers: G20, G21, G24, G28, V01, V04, V0000, E09, YR01, R01, and RV0000. Then, once done coloring, I did add a little razzle dazzle with the help of some glitter glue!  The layout is pretty easy peasy. I used one of MFT's dynamics -- Stitched Jumbo Fishtail Banner. Add a sentiment (from the Simply Camellias stamp set), some bling... and that, my friends, is it!

Okay... moving on! Did you see that Power Poppy  kicked off a new challenge last week? Check it out folks!


HOW TO PLAY: All September long, share your gifts from the heart and showcase ways you might creatively package up goodies, adorn them with stamped tags, or set them in handmade bags or boxes. Have a fun gift card holder? Share it! This Power and Spark Challenge is all about your creative gift presentations or handmade gifts! Show your art.... and your heart! You can read up on all the Official Rules and link your creation right here on THIS CHALLENGE POST. The winner will get a choice of a free or digital stamp set from the Power Poppy Shop! Who wouldn't want that? Contest runs through September 30th at 8PM EST. 

Now it's time to go check out what these lovlies have been up to and don't forget to say "hi" while you're there!

Julie Koerber >>> you are here!


Thanks for sharing a bit of your day with me! Hope you have a fabulous weekend ahead and I'll see you back here soon!
~Julie


Pin It

Friday, September 4, 2015

Sweet Little Sumpin' Sumpin'!

Hi all! How's your September starting out? I hope that a new month brings a whole new spark of creatitivy and what better way to get that mojo a flowin' than to usher in a new  Power Poppy Power & Spark Challenge! This one is hosted by the amazing colorist and super sweet designer.... KATIE SIMS! 


HOW TO PLAY: This month Katie would love nothing more than for you to get great ideas for your gift giving season! Here's what Ms. Katie had to say about her September Challenge!

"Hello and a happy September to you!  This month’s Power & Spark challenge is all about giving.  We all know the paper crafting community has some of the biggest, giving hearts around so let’s celebrate that with “Gifts from the Heart." Show us your creative gift presentations or a hand crafted gift….or both!  Try stamping  your own wrapping paper, decorate your own gift bag or tag, craft a gift set of note cards....you choose how to show your art and heart for a special someone.  Even though the holidays are just around the corner, any time is a great time for gift giving so this challenge is open for any occasion." 

If you'd like to read up on the Official Rules, just click on over to the the challenge post HERE!Remember, if you play along, you just might win a free clear or digital stamp set of choice from the Power Poppy Shop! You have until September 30th to enter!


ON TO MY CREATION!

For my little bit of show and tell today, I decided to share one of my favorite gifts of all time -- my favorite Lavender Coconut Oil Lotion. This stuff smells absolutely delish and I love the fact that it has three ingredients in it -- all of which I can pronounce! I use it every day and in addition to making my skin soft and glossy, it brings a dose of aromatherapy as well! Who doesn't love the smell of coconut and lavender? ;-)

So, here's a peek at the gift set -- a cute little 4-1/4" square card to serve as a little gift note! And then, the mason jar can be dressed up by stamping the lavender onto a 2" punched circle that fits -- oh so perfectly -- on the top of your mason jar!


For the stamps, I used Power Poppy's Lavender stamp set -- perfect! After stamping in Memento Tuxedo Black ink, I grabbed my Copic markers and used BV00, BV02 and BV04, G20, G21, G24, BG0000, BG000, BG01, and G0000. For the jar topper, I used the same marker colors but added the little background lavender stamp with Vivid Violet Mist and then stamped the word Lavender in Lavender Vivid ink.  

Here's a peek at the card...

Here's a look at the jar topper -- sweet and simple with a little bit of glitter glue sparkle and a little bit of gingham ruffle! 


And, since I know you'll love this recipe, I thought I'd share! It's super dooper easy! 

LAVENDER COCONUT LOTION 

INGREDIENTS
  • 1 cup of extra virgin cold pressed coconut oil. I bought Nutiva Coconut Oil at Costco and it will likely last me forver!
  • 1 teaspoon of Vitaminn E Oil
  • 6 to 10 drops of lavender essential oil 

DIRECTIONS
Because coconut oil is a hard oil, you need to heat the oil to get it more fluid to mix the vitamin E and essential oils with it. I soften by sticking in the microwave for 30 seconds to a minute. Mix in additional ingredients. Stick in fridge until it solidifies to a soft butter feel. Using a hand mixer, mix until lotion is whipped. Store in a cool, dark place in a jar of choice. Keep in mind, coconut oil has a very low melting point, so on hot days, this lotion may return to liquid form It's okay! Just let it harden and rewhip if desired. I usually just let it set back up and use as normal. 

And that, my friends is it! I hope you whip some up and know that you can always turn to Power Poppy to make your gift extra special with our Lavender stamp set! 

Now it's time to hand the baton to my fellow Bloomies so that they can run off with all their creative ideas and inspire you ALL! So, stop by, say hi, and let that inspiration fly!


Julie Koerber >>> you are here!


Thanks for sharing a bit of your day with me! I hope you have a wonderful weekend ahead and for those of you in the States -- Happy Labor Day! Enjoy some rest and creative relaxation! ;-) See you back here soon!

~Julie


Pin It

Friday, August 21, 2015

Let's Repurpose!

Hi folks! Hope your week is ending on a high note! I have just a short lil post today because, I'll be honest, I'm not feeling so hot this week. I am not sure if you follow the news but the entire northwest seems to be on fire these days and this was our sky Thursday night. Cloudless sky with sun and nothing but smoke getting in the way of it shining.....


So sad...... if you're the praying type, let's pray this ends and soon. I can't imagine being a firefighter fighting on the front lines or the property owner who's land is scorched or in jeopardy. :-(

Moving on! Way back in January, I posted THIS tutorial showcasing how you can use digital stamps to create custom calendars that are one of a kind month in and month out! This was a peek at my January calendar featuring Power Poppy's digital stamp Winter Pick-Me-Up....


After I was done using these calendars for the month, I wondered what I could do to repurpose them? I didn't want to just throw each page away! So, I grabbed my paper cutter and decided to trim up the outer portion, like so!


Before I knew it I had matted it up, added some decorative paper, a sentiment from the Good Thinking: Renewal Set, which I thought was perfect for this image. I added some cotton lace and.. ta da! A colored up image that got double duty!

Here's a close up of the image to show off the little sparkle that I had added on the pussy willows....


I was glad that I thought to re-use these colored up blossoms. No use putting this in the "circular file" when you can find joy in an image all over again! And that, my friends is it! 

Speaking of joy, it's time to hand things over to my Bloom Brigade sisters! They've got some craftiness to share and I know they would love it if you stopped by to say hi! 


Thanks for spending a little of your day with me! I hope your day is blessed!

~Julie


Pin It

Friday, August 14, 2015

T.G.I.F!

Hey folks! T.G.I.F! I have a little Power Poppy fun to share! And, guess what? There's some fun that YOU can get in on too! So, stay tuned!

First up, I am not sure if you caught the latest Inspire Me Monday tutorial from Ally Cope over on the Power Poppy blog, but it was a fun one! Click HERE if you missed it! Here's her lesson in a nutshell -- you can create a background behind your digital stamps with the blackboard effect using just a few clicks and some photo editing software!

On to my "take" on it! I found this chalky circle on the net and then followed Ally's step by step to remove the background on Power Poppy's  Ranunculus Digital Stamp and layer it on my circle background.... see?


After printing, I colored up my image using these Copic markers: G20, G40, G43, YG000, RV00, R81, R83 and R01. And since I wanted to play along in this month's Power and Spark Challenge hosted by the lovely Cindy Lawrence to create a card with a shabby chic flair, I added a little antiqued doily, some crinkled ribbon, a fun vintage brad and some sponged distress ink accents! 

Here's a close up!


And that, my friends, is it! I should mention, the sentiment is part of the new digital stamp set that will be released TOMORROW over at Power Poppy! So, you'll have to hop on over then to learn more about this beautiful addition! And, while you're hopping, the blog  HERE will have details on how you can join us in a coloring contest for a shot at winning a $25 gift certificate to the Power Poppy Shop! There will also be a special on one of Power Poppy's newest digital stamps! So, hit up the Power Poppy Blog tomorrow for all the deets!  So much going on! And, so much fun that YOU can share in!

Speaking of fun, I love when I get to share the link list of some of my stamping sisters on the Bloom Brigade! Since you're hopping around the blogosphere, be sure to pay these fine ladies a visit to see what fun they've whipped up this week!

Christine Okken
Julie Koerber
Leslie Miller
Stacy Morgan
Tosha Leyendekker

Thanks for stopping by! I hope you have a fabulous weekend and I'll see you back here soon!

~Julie


Pin It

Wednesday, August 5, 2015

Sending a bit of Sunshine!

Well Hi-De-Ho there stamping friends! Guess what? It's the 5th, which means it's time for a little Power Poppy Digi on the 5s release! If the date has a "5" in it, Marcella has a little digi fun to deliver that day! Today's "catch" is one that is sure to deliver sunshine both near and far! Here's a look!


Here's a peek at my creation!


I absolutely adore sunflowers and so this image -- Sunflower Power -- is going to be one that I print off and color with reckless abandon -- I just know it! I should mention, before I printed this image, I did do a wee bit of digital editing. If you look above, you'll see the full image. I only wanted the main flower, not the little flower that just is about to open up. So, using my eraser tool, I erased that one and then closed the stem with the help of a Copic Multi-liner. Easy peasy! That's why I LOVE digital images! You can truly use them to make all kinds of variations -- perfect for card sets or just to get some diversity with each card!

Moving on! I printed on Cougar Opaque card stock (I use the 65 pound), and then let my fingers do the coloring with these Copic Markers!


From there, it was just matting it all up! I did cut out my image and then fussy cut only along the left side. I added some paper piercing and some fun sequins and... almost done! The sentiment was printed, punched with a 1-3/4" circle punch (I reduced the size of the sentie just a bit from the original file) and then, I mixed and matched some green and yellow decorative paper!

Here's a close up! I almost forgot, I did add some dots of white paint pen to the center of my flower too.....


And that, my friends, is it! Like I mentioned, Sunflower Power, is ready and waiting for you to buy, download, print and color it up to share a little sunshine with anyone who needs it! I will say we have a mix of Bloomies and Instant Gardeners on hand to show off some of the other beautiful things you can do with this digi! Hop on over and see.....

Debbie Olson
Cheryl Scrivens
Julie Koerber
Stacy Morgan
Tosha Leyendekker

Thanks for stopping by! I'll see you all back here real soon! ;-)

~Julie


Pin It

Saturday, August 1, 2015

Time for a Power Poppy Hop!

Well, nothing like joining the party at the tail end, eh? My family and I took a wee bit of a trip and are just getting back to the land of the living - that's why I missed the start of Power Poppy's big reveal for August! Aren't there some fabulous images to work with in the aptly called Color Me Grateful Collection? Me thinks so!

Since this was my first go at using these stamps, I HAD TO use a few of the images from the new Well Played set! Afterall, this was my daughter just days ago after she used ALL of her birthday money to pick out a new set of Skull Candy Crushers! LOVE!


So, here's my DD-inspired creation! She helped pick the colors for this one! ;-) 


What's fun about this card is the fact that it is actually a fusion of four images from the set. The cord, the headphones, the heart and music bubble and the "soul sister" sentiment! I stamped and then colored it all up with my Copic markers! 

And, here's a peek at the inside with the fun little 45 adapters! Isn't that cute and don't you remember those? I do! I would lose a gazillion of them and then my mom would have to go buy me more. When I was 8, she bought me a little turn table for my birthday along with all the top 45s on the hit list. I look back and think -- man -- what a cool mom. I got David Bowie, Paul Simon even a little ABBA!

Anyway, I digress.....  the inside! I have to say that I thought the sentiment from the set Marcella's Mixtape was a perfect fit to use this set for a birthday! 


And that, my friends, is it! Why not let the good times roll on over to the rest of the Bloom Brigade to see what they cooked up for this Color Me Grateful Power Poppy Hop? Remember, the sets are LIVE and ready to be added to YOUR stamp room now! Squeel!!!!

Allison Cope
Christine Okken
Cindy Lawrence
Julie Koerber >>> you are here!
Kathy Jones
Katie Sims
Leslie Miller
Stacy Morgan
Tosha Leyendekker

Thanks for stopping by! I'll see y'all back here real soon!

~Julie


Pin It

Monday, July 27, 2015

Christmas? In July? Why YES!


Hello folks and Happy Monday! Just a little heads up. Yours truly is the hostess today over on the Power Poppy Blog with a fun and festive creation that's perfect for..... Christmas in JULY! Not only do I share not one, not two, but FOUR different card ideas, I have a step-by-step tutorial for a card caddy that's perfect for gift giving all year long! Here's a peek at one of the cards and the fun card holder!


If you want to see more, just hop on over HERE and check out the Inspire Me Monday fun!

Happy Monday!
~Julie


Pin It

Friday, July 17, 2015

Ranunculus Among Us! ;-)

Hello there folks!  Hope you're having an ever-so-happy Friday and are looking forward to a little R & R this weekend! If you have some creative endeavors planned for your downtime, Power Poppy has got a little show and tell for you that just might spark some fun in your stamping space! If you missed the post HERE on the 15th, set your sights on this beauty that just so happens to be the latest addition to Power Poppy's Instant Garden......


Ahhhhh..... look at those options for color! This beauty called Ranunculus is also paired with a gentle sentiment aimed at "Sending Peace" to those friends in need. Best yet? It's available right now HERE to download, print and color. How's that for instant gratification?

So, let's get to my creation!


One thing you'll learn if you snag this digital beauty is that it is a large image. It's original size is about 3" by 5".  I decided that for my card today, I would downsize it a wee bit and I chose to make it more like 2" by 4".  I really love it at this size. That's the thing about digital stamps,-- you can enlarge or decrease to your heart's content!

After I was done printing onto Cougar Opaque white card stock, I grabbed my Copic markers and here's a peek at the markers that I used....


And, here's a close up of the finished creation! I had a lot of fun shading around my image with light shades of yellow plus the G20! You can kind of see the little stippled bits I added too....


The rest is just matting it all up! I used some scraps from my paper bin and these are all a mix from a whole bunch of different companies -- wish I could tell you from which collections! Sorry folks! I do know that the button is one of my oldies but goodies from BasicGrey that has a bit of pink twine threaded through! And that, my friends, is it!

Now it's time to turn things over to my fellow Bloomies, who are on standby to show off their latest creative pursuits using this brand new digital stamp!


And, if you need a wee bit more inspiration, it's always just a click away on Power Poppy's Pinterest Boards HERE. That's where you'll find EVERY stamp set released -- including Ranunculus --  and samples to go along with each. So, grab a cuppa joe and spend some time pinning some of your faves!

Before I go, don't forget about the monthly challenge Power Poppy hosts -- you could win a free stamp set of your choice!

All you need to do, according to challenge hostess Leslie Miller, is put three different patterned papers in to play on your card or creation! So, mix it up with pattern and pizazz! Click HERE for the details and to link up your creation when you're done!

Thanks for stopping by folks! Hope you have a fun and fabulous weekend in store! 

~Julie


Pin It

Sunday, July 12, 2015

MORE CARDS FOR SALE!


Hello all! I found more cards over the weekend and since I am in need of some space, I am putting these up for sale. Each card listed is a hand made creation by... ME!

PRICING & SHIPPING: Cards are $3 each and shipping is $2 for the first card and .50 for each additional card. If you want to purchase large quantities, I can ship in a flat rate box. I can fit 8 standard size cards in a small flat rate box for $5.95 or $12.65 for a medium flat rate box, which can hold upwards of 50 cards. Anything less than 8 cards, I will ship in a padded envelope. All cards include an envelope and will be wrapped in a plastic envelope as well for protection. I SHIP ONLY WITHIN THE UNITED STATES. Unless otherwise noted, the insides of the cards are blank. Cards are not signed by me on the back so, feel free to say you made them yourself! It can be our little secret! Standard size card is an A2 or 4-1/4" by 5-1/2". Square cards are 5-1/2" square.

PAYMENT: I accept Paypal for payment. Please allow up to 72 hours for shipment.

LOST PACKAGES: I am so sorry but I cannot be responsible for lost packages. In all of  my shipping, this has only happened once but since these are handmade cards, I will not be able to replace or refund lost packages.

TO PURCHASE: Simply email me at juliekoerber@gmail.com and I can send a PayPal invoice to you. You do not need a PayPal account in order to order cards. You simply pay the invoice using a credit card and, voila! Done! To let me know which cards you would like to purchase, just reference the letter/number above and to the left of each card i.e. C02, C43 etc. 

PLEASE NOTE: Order more than five cards and I will throw in one extra of my choosing! 

C01 -SOLD


CO2-SOLD

CO3- SOLD


C04-SOLD

C05-SOLD


C06-SOLD


C07-SOLD

C08-SOLD


C09-SOLD


C10


C11-SOLD


C12-SOLD


C13-SOLD


C14-SOLD


C15

C16-SOLD


C17-SOLD


C18-SOLD


C19-SOLD


C20-SOLD


C21


C22-SOLD


C23-SOLD

C24-SOLD


C25-SOLD


C26-SOLD


C27-SOLD


C28-SOLD


C29-SOLD


C30-SOLD


C31


C32


C33-SOLD


C34-SOLD

C35-SOLD


C36-SOLD


C37


C38


C39


C40-SOLD


C41-SOLD


C42


C43


C44


C45


C46


C47-SOLD


C48-SOLD


C49


C50


C51-SOLD


C52-SOLD


C53


C54-pending


Thanks for looking! ;-)


~Julie


Pin It