Friday, July 26, 2019

Take my color cues!

Hello all and happy FRIDAY! Hope your week is ending on an absolute high note! If you didn't tune into the Power Poppy blog earlier this week, you might have missed the challenge I ushered in! It was all about color! I thought I'd share the latest in Creative Confetti challenge here on my blog too! So... the challenge asked you to be inspired by my photo, use the colors in a card and... post it! Just that simple folks!

Here's a peek at the color combo! 


My family and I were out at our minor league baseball field catching the Billings Mustangs in action when this sunset played across the sky. It was breathtaking yet fleeting but thankfully, I had my phone and grabbed a snap!

And here's a look at my creation! 


You can see the base color scheme above! I used Power Poppy's Go Wild clear stamp set and then colored it all up with a mix of Copic Markers. I used RV32 and RV34 for the pink flower. The greens were YG03, YG24 and G20. And, the water was a mix of BG0000, BG0000, BV0000, and BV00. The window panes were brought to life with B60 and B63. You can't see in the photo above but I added some R0000 and V0000 along with BV00 around the edge of my image for some depth. 

You can see it a little better below! 


And, here's a peek inside. I used Ranger Cool Peri ink to add a little floral bit at the top and the bottom. The sentiment is also from the Go Wild stamp set! 


And that, my friends, is it! Want to join me this week? Simply create, post HERE ON THIS BLOG POST! As I always say, if you get those fingers inky and play along, each and every link is an opportunity to win a $25 gift code to the Power Poppy Shop! Woo Hoo!

And, just a side note! If you head on over to the Power Poppy Blog HERE today, you might have a shot at a $10 discount code to the Power Poppy Shop! So, click on over and see what the excitement is all about!


Make sure you check out this fine lady below! I know she's serving up some Power Poppy Goodness on her blog today!


Well, my sweet stamping friends, I hope you play along with me this week! Thanks for stopping by!

Until next time!
~Julie 
Linkz code -->

Friday, July 12, 2019

It's Christmas in July!

Hi all and happy Friday! If you are wondering what on earth I am doing showcasing a Christmas card in the dog days of summer, it's because it's Christmas in July! Earlier this week, I ushered in a Creative Confetti Challenge, urging you to get a little bit of a jump start -- way ahead of schedule -- on your holiday card making. You can check out all the details HERE! And, as luck would have it, Power Poppy is having a sale to help enable all those holiday creations! Stay tuned, and I'll fill you all in! ;-) 

On to my creation! 

As you can see above, I chose to create a little flip card! I had a Stampin' Up card template die and -- get this -- I had NEVER used it! Yep. Never. So, I thought now was as good of a time as any! The problem I had was finding a smaller image to fit in that 2-3/4" circle. So, I opted for a Power Poppy digital stamp set --  Snowglobe Greetings! I sized it down just a wee bit to fit into a 2-1/2" circle space and then used a punch to cut it out. But, before I did that, I opened up the image in my Photoshop Elements software and essentially "erased" the snowglobe portion of the image!

If you aren't quite sure how to get that job done, never fear! I put together a digital stamp tutorial a few years back to show you how to get the most out of your digital stamps. All you need to do is click HERE to check it out if you need a little "how-to!"

Here's a close up to show you just how that image was colored up! I used so many Copics -- too many to mention! But, as I was coloring, I did have a feeling that I wanted my Santa to appear in the night sky! After all, you don't see Santa climbing down chimneys in broad daylight, do you? :-) So, I used B63 and B66 to color that up and then went back over the background with a white gel pen to add a little bit of snow! See?


I also added a little bit of glitter glue on the fuzzy parts of the hat and jacket as well as on the snow. You just have to have a little bit of sparkle on Christmas cards, don't you think?

And here's a peek at the card once you flip it! I used the sentiment from the Power Poppy clear set -- Bough Wow Wow. The word "merry" was used on the front on the little sentiment tag that I adorned with a punched out heart accented with white gel pen.


If you've never seen one of these "flippy" cards, here's a little video to show you the mechanics! 


Like I mentioned, I used a Stampin' Up card template die to create this card, but there are a ton of tutorials that mimic this look. While Stampin' Up doesn't make this die any longer, I see the Sizzix has one that is very close and even has layering elements with it, which is great! You can check it out HERE. 

And here is a link to a Flip Card Tutorial done years ago by Beate on Splitcoaststampers.com. Just click HERE to check it out! If you search "flip card" on Youtube, there are also tons of video tutorials. If you google "flip card," you'll even find templates.

So, there you have it folks -- a fun little holiday card with a twist! As I mentioned earlier, if you need a few images to help you get into the Christmas in July spirit, Power Poppy has a little extra incentive!


Check it out peeps! Just use the code JOLLYJULY and you'll get 30% off all holiday stamps, digis and dies! What a deal! And, even though the graphic above says that the sale ended last night, it is being extended through next Tuesday! So, even more time to save on some spirited designs!


There are a few Bloomies joining me this week to share a few of the goodies that they've been working on this week! So, stop by and say "hi" to these fine ladies, will you?


And that, my friends, is it! Thank you so much for stopping by and spending a little time with me! I hope you have a fabulously creative weekend and I'll see you back here real soon!

~Julie 

Friday, July 5, 2019

Inspired by the Enchanted Garden!

Hello folks and happy Friday! If you live here in the States, I sure hope you are having a festive and fun holiday weekend! I have something fun to share with you all today! It's a new month, which means a whole new crop of Creative Confetti Challenges  and the one Power Poppy just kicked off last Tuesday is about as fun and easy as it gets! Seen as Power Poppy had six days of sneaky peeks for Power Poppy's new Enchanted Garden release, the challenge was to take a hop through release week, visit the designers and use one of their cards or techniques to inspire you! And so, that's just what I did!


For my creation, I was really WOWed by Kelly Griglione's clean and classy design HERE. While she inked up her creation in one color and then masked, leaving a space for a sentiment, I chose to be inspired differently by her card. I loved the void she used for the sentiment and so I decided to let that be my starting point. I used painters tape to mask off a section before stamping my Stong and Beautiful stamp over top in black ink. I should say, before I stamped, I took a super fine Copic black multi-liner pen and traced the edges of the painter's tape to create that fine line. I love the look! Also, I originally stamped the floral on top too but after coloring one side, I thought it might get overwhelming since I wanted to add that cute little hummingbird from Power Poppy's new Floribunda set. So, I cut off the top and then added a bit of decorative paper behind instead! I really like the results. I used Copics to color and honestly used too many to list -- just grabbing them as I went along!

Here's a closeup for you!


And that, my friends is it! I just matted it all up, fussy cut the hummingbird and lifted the little guy up with foam tape and... ta da! Done! I hope you get your fingers inky and join me! Just take a trip through release week, be inspired when creating and then link up your creation HERE! Each entry is a chance at winning a $25 gift code to the Power Poppy Shop! Woo Hoo!

Thanks so much for stopping by! 

Monday, July 1, 2019

It's a Release Day Blog Hop!


Well folks, it's the moment you have all been waiting for! After a week of sneaky peeks of Power Poppy's brand new release The Enchanted Garden, we have good news to share! All the stamp sets we've been giving you a glimpse of are available NOW in the Power Poppy Shop! 

And to celebrate, we have even more fun to share! The Power Poppy gals have teamed up with the absolutely fabulous designers over at Ellen Hutson Papercraft Essentials & More!  Yep, that's right! And, on top of seeing all kinds of fun eye candy featuring Power Poppy's brand new release, Marcy and Ellen have teamed up to share the chance at some goodies for YOU!

WE'VE GOT FUN PRIZES! 

As a part of this fun-filled blog hop, we're giving away a chance at $25 to the Ellen Hutson shop and $25 to the Power Poppy shop! To enter for a chance to win, make sure to leave comments at each stop along the hop. Two random & lucky commenters will win! Comment before Sunday, July 7th at 11:59pm PST! 

Okay, on to my creation! 


I absolutely adore Power Poppy's new Floribunda set. All those beautiful blossoms! Because you can definitely get lost in all those petals coloring with reckless abandon, I wanted to create a card that showed you could use this mondo image without coloring it up! So, I grabbed some Versamark ink, a soft brush and some Pearl Ex. I have just about every color made of the mica powder and it's been years since I have pulled it out from the drawer. So, I thought, now was a good time! 

 I started by stamping and then brushing Spring Green Pearl Ex over top. After you brush on the color, you need to burnish it and "set" it by rubbing it with a cloth. I used a paper shop cloth but you can use a dry Swiffer pad or something along those lines.

You can see below that I also tried the Duo Blue-Green, which took on a more turquoise shade. I liked it but it wasn't as bold and I knew I really wanted those flowers to stand out!. :-)


 From there, I stamped the little hummingbird in the set on white card stock and colored him up with Copic Markers. I used B24, B26, BG11, BG13, BG15, and YG05.


I fussy cut the little guy and set him aside. I used a 2-1/2" punched circle and stamped the sentiment using Versamark and embossed using gold detail in. I mat it up on a stitched circle (cut out of really light turquoise paper) I added some green accents with my YG05 Copic marker just to add a little something more 

Here's a closeup to show you the mica shine and the sentiment.... 


And that, my friends, is it! So, be sure to hop on over to see what both teams did with some of the sets in Power Poppy's Enchanted Garden release! Remember to comment on each blog for a chance to win either a $25 gift code to the Power Poppy Shop or $25 to the Ellen Hutson store!

Let's Get Hopping! 


Julie Koerber  >>> you are here! 


Thanks so much for joining us this week and seeing all the new goodies! Good luck in the giveaway and I'll see you back here soon! 

Happy Stamping!
~Julie 

Saturday, June 29, 2019

Power Poppy Day 4 Enchanted Garden Sneaky Peeks!


Hello all! It's day 4 of the fabulous week of sneaky peeks featuring Power Poppy's new Enchanted Garden release!  Today the Bloom Brigade and Instant Gardeners are serving up a fresh dose of summer with delish and delightful images that I'm sure you'll adore!


This summer-centric set -- Summer Berries -- offers stampers a tumbling vine of ripe raspberries providing the juiciest of focal points! A sweet bird among strawberry stems creates a gentle and whimsical image that you can color up in minutes. Add in a strawberry cluster that can be a focal point or fun accent to create a repeat border or even add a bit of pizzazz to an envelope and you've got a set that is sure to please all year round! 

On to my creation! 


I have to say, of this release, this card was the quickest of the bunch. Marcella was right when she said you can color up that little birdie vignette in minutes! I even took time to "Google" birds and knew I wanted one with a little pop of yellow on him. So, off I went and I found this guy below. Isn't he so cute!????


After I stamped him and colored him up with Copics (I used the range of W markers W1, W3, W5 and W7 and then paired with Y11, Y13 and Y15), I added some accents with a white gel pen and then got to coloring up the strawberries. I added the raspberries from the set as a background on the red strip using Brick colored Vivid Ink. Add a little yellow ribbon, a doily and a little red gem and... Voila! Done!

Here's a closeup for you!


This one is just about as simple as you can get and I think it's just as sweet! Speaking of sweet, I know some of the Bloomies and Instant Gardeners whipped up creations using this summer loving set! So, pop on over and say "hi" to.....


Tomorrow the fun continues with our last set to sneak. This one offers not only a bevy of blossoms but a fun little creature flitting about the scene. You'll love it. Trust me! Thanks so much for stopping by. Hopefully, I will see you all back here tomorrow! 

So, until then!
~Julie 

Friday, June 28, 2019

Power Poppy Day 3 Enchanted Garden Release!

Hello all! Are you enjoying our little trip through Power Poppy's Enchanted Garden so far? We sure hope so! Today's offering features an illustration you might have seen before but now, clear stamp lovers will be able to have this beauty in their stash as well!


Whether colored to the nines or stamped in a single ink, Power Poppy's new set - Strong and Beautiful - makes a gorgeous statement. An unfurling peony bloom is offset with ferns, lenten roses, and bluebells in a combination you won't find anywhere but Power Poppy! No matter how you rotate or crop this exuberant floral, you’ll come out on top! Five sentiments have clear letters so that you can color them in to coordinate with your palette, and, in true Power Poppy style, each one carries an empowering or uplifting message! 💗

On to my creation! 

If you checked out the Power Poppy Creative Confetti Challenge this week, you got a little sneaky peek to my card! The challenge was to .... JUST COLOR! And I grabbed some watercolor paints and inks and got down to business! 

Here's a peek at the supplies I started with -- a watercolor palette that had never been used. It was actually from one of my daughter's old art classes. Guess she didn't dabble with it either! ;-) For a more subdued color range, I chose a few Distress Inks too! 


And, after a couple hours just getting lost in the process, here's how my floral display turned out! I added a little purple and green watercolor wash behind it to help the color pop just a wee bit more. I am really playing around with adding colors that are a part of my main image to the background. It's been a fun experiment!


And here's a peek at my card! You can see I didn't do a complicated layout because this image doesn't need one -- just a simple matting, a little twine and a sentiment from the set, colored up to match. 


Here's a little closeup for you!


And that, my friends, is it! Now, you'll have to make the rounds to see what these fine ladies below did with this new Strong and Beautiful set! 


Julie Koerber >> you are here! 


Coming up tomorrow, Marcella offers up the juiciest of focal points in a charming new set that really celebrates a little of summer's best! So.... swing on back and see what it's all about! 

Until then!
~Julie 


Thursday, June 27, 2019

Power Poppy: Day 2 Enchanted Garden Release!


Hello folks, and welcome to DAY TWO of Power Poppy's Enchanted Garden release! This little sneaky peek of five new sets this week is sure to have you "ooooo"ing and "ahhhhhh"ing. There is so much to this release, Marcella's pen definitely drew something for everyone!

Today's set delivers that feeling of walking through a woodland area, just waiting to find natural treasures!


Power Poppy's new set Woodland Carpet features flora, fauna and ... fungi! Treasures of the forest floor are celebrated in this unique new 4" by 8" clear stamp set. Five images and five sentiments provide you with so many opportunities for both masculine AND feminine cards. The vignettes are just large enough to be a beautiful focal image. Each image reminds us to look down on your next outing, you just might miss a miraculous, mossy mound bursting with life!

On to my creation!


While I love the vignettes in this set, there was something about that Luna Moth that had me wanting to create a card with it as the focal point! After thinking about it for a bit, I realized I wanted to have that little guy lifted from the page. So, I drew a circle and started to stamp one of the leafy images in the set around the circle to form a kind of wreath. I stamped the sentiment in the middle and then stamped the moth where I wanted him to "land" on my card. I did this so that I wouldn't have to fussy cut those antennae!

From there, I colored my scene up with Copic Markers and while I doubt you can see it, I added a little Wink of Stella to the wings to help them shimmer.

Here's a closeup for you!


I matted it all up, added a button and some twine and created layers using circle dies to bring a little extra color and a "frame" to my scene.

Here's a peek at the inside where I added a sentiment, a colored version of that fabulous Luna Moth and then I drew in some little dots to let my moth take flight! :-) 


Want to see how some of the Bloomies and Instant Gardeners chose to delve into a little woodland wonder with this set? You will have to stop by these fine ladies below and see their creations. My jaw dropped more than a few times looking at them!


Coming up tomorrow for day three of the Enchanted Garden release, Marcella releases an image that can make more than cards. It can make a gorgeous statement! Can you say another exuberant floral? You'll just have to swing back to see for yourself tomorrow!

Until then!
~Julie


Wednesday, June 26, 2019

Power Poppy: Day 1 Enchanted Garden Release!


Well folks, I am so excited that I can hardly contain myself! Why? Well, it's been a bit since Power Poppy released a fresh crop of polymer stamp offerings and this week, Marcella is unveiling not one, not two, but FIVE brand new stamp sets to tickle your creative taste buds! Today's stamp set is the first in the Enchanted Garden release and it's big and bold -- a perfect way to make a statement with just one stamp! Check it out!


Create a garden of Gerberas in seconds with Power Poppy's very first flower-filled background stamp -- Big Sexy Blooms! Hand-drawn details indicate where to place your shadows, mid-tones, and highlights — so you can make a masterpiece with every impression! Did I mention that this stamp is nearly 5" x 6"? So big and lush, one stamp covers an entire card front! 

On to my creation! 


I started by stamping this big and bold background on some white card stock and then picked out a section to fussy cut, so that the petals just hung on the page. What's fun is, my black Copic marker was the same color as the paper so in the white voids in the other part of the stamped image, I colored so that it would look like it was all just on a black piece of card stock with that big pop of white from the petals! I accented with some BG0000, BG11, BV01 and BV0000. The centers of the flowers were done with a mix of deep yellow and light orange. Then, I stamped the sentiment using Versamark ink and embossed with white detail embossing powder. The stamp is actually from the stamp set Hellebore and Hyacinth.  Add a few rhinestones and some fun stitched yellow ribbon and.. BAM! Done!

Here's a little closeup for you!


Before I let you go, you should take a little trip around blogland to see what some of the other Bloomies and Instant Gardeners did with this lush and bodacious stamp!


Julie Koerber>> you are here! 


Be sure to stop back by tomorrow for day two! That's when flora, fauna and... fungi take center stage in a set that really celebrates the treasures of the forest floor! Doesn't that just sound delightful? I think so!

See you then!
~Julie

Friday, June 14, 2019

It's Flag Day!


Hello sweet stampers! Here in the States, it's Flag Day! And that's why earlier this week, I ushered in a fun-filled, flag inspired challenge to help you get that creativity rolling a bit. If you want to see what I mean, just clickety-clack on over HERE to check out this week's Creative Confetti Challenge! 

So the basic gist of the challenge was to pick the flag of any country as your launching pad for creativity! And, here's the clincher! Don't use your home country as inspiration! Use the flag of someplace you want to visit! Use the flag of one of your ancestors! Use the flag that just... "speaks to you!" Have fun with it and don't forget to share which flag inspired your creation.

ON TO MY INSPIRATION!

Being that Ms. Marce took a little Norwegian adventure, I decided to use Norway as my focus. I was inspired simply by the energy in the photos she posted. I mean, come on! Doesn't she look like she is having an absolute blast?


So, in honor of sweet Marce, here's a peek at the flag of Norway!


Knowing red and blue would be my focal colors, I went a flipping through all my clear and digital stamp sets! I stopped when I found this one --- Flower Bomb  --- a digital stamp set by Power Poppy. It was perfect! Roses are red, Violets are blue. I like the Norway flag, how about you? ;-) 


After printing, I used a stitched circle die to cut out my image and then went hunting for just the right colors of Copic markers! Here's a peek at what I used:

Roses: RV00, R00, R30. R32 R35, R39
Violets: V01, B60, B63, B66
Greenery: YG63, YG67 for Rose Leaves & YG00, YG06, YG17 for Violets

Here's a closeup! You can see that I did add some shading/color around my image and the edge of the die, for that I used R0000, R00 and R01 just for a soft glow. 


Add some fun blue and red decorative paper, a little bit of bling and a fun sentiment from the Power Poppy stamp set Juicy Strawberries (also a digital stamp set)

And that, my friends, is it! So, why don't you join me this week for a little world travel! Get to "Googling" and find that fun flag to inspire your next creation! After you finish up your card, don't forget to link it up HERE ON THIS POST! Every entry is one more shot at a $25 gift code to the Power Poppy Shop!   

Since you are hippity hopping around today, Make sure to pay this fine lady a visit -- Christine Okken -- to see the absolutely amazing card she did using one of Power Poppy's Peony illustrations. It's WOW!!!


Happy Stamping!
~Julie


Friday, May 17, 2019

Friday Fun Day!


Hello folks & Happy Friday! I have a little bit of fun to share today and it just so happens to involve the challenge I hosted earlier this week on the Power Poppy blog. With a roll of the dice, those wanting to play along got to see just which challenge they would partake in for the week! If you are confused, don't worry, all the details can be found HERE! 

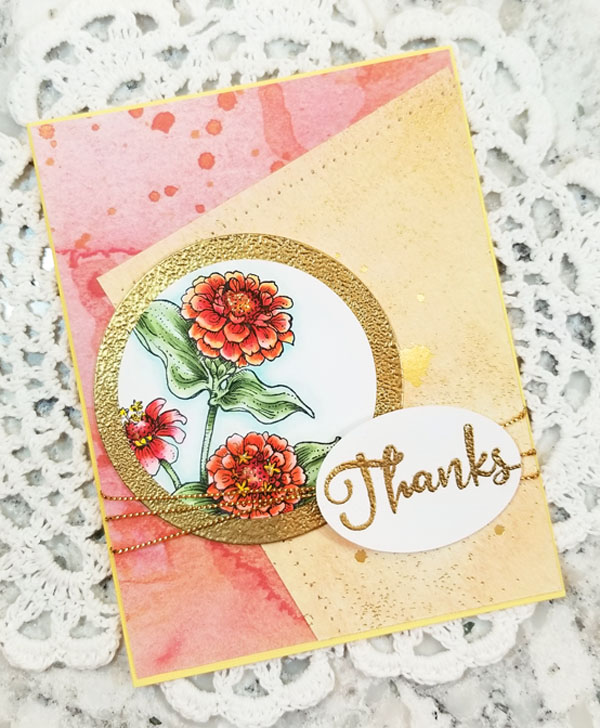
Since my challenge was to CASE one of my old creations, I spent some time scrolling through the Power Poppy blog and decided that THIS card would be a fun one to copy. And so.... off I went! Here's a peek at the finished card....


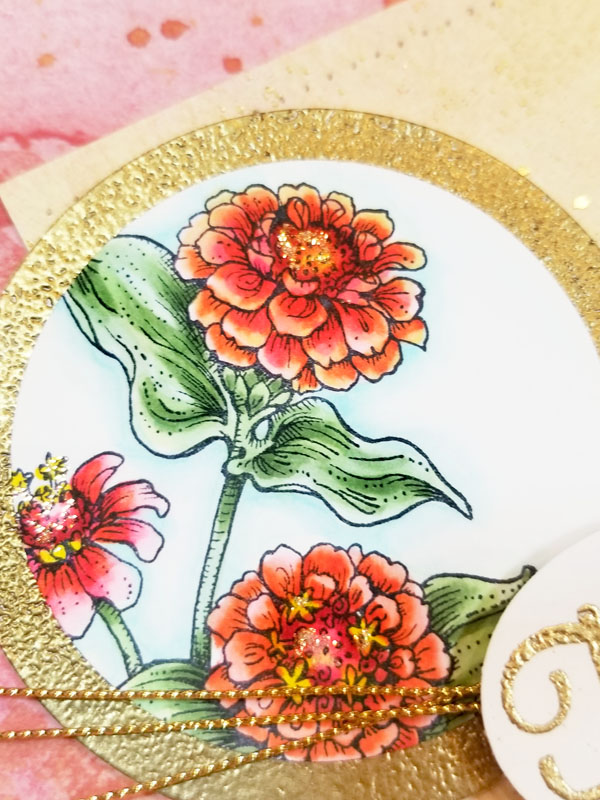
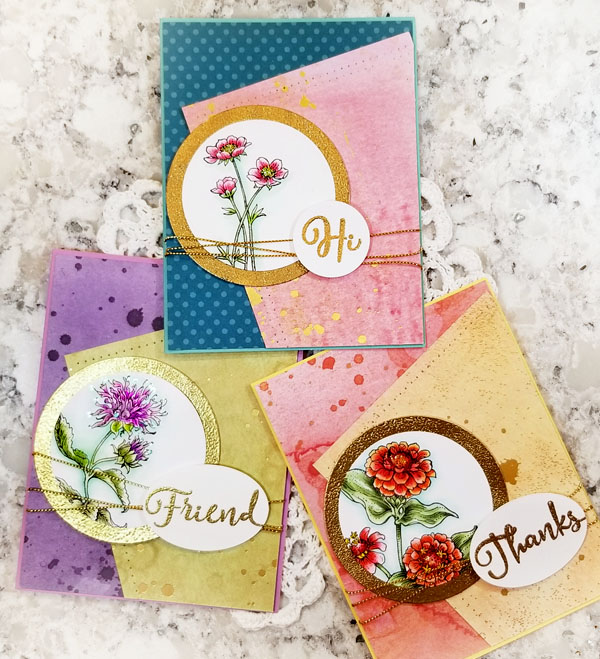
You can see I kept the composition and the colors pretty much the same. I used Power Poppy's Vibrant Thanks stamp set too! The only real difference is one of the papers and the shape of the punched sentiment accent. I also colored this all up with Copic Markers. In my first card, I used waterbased markers and a Wink of Stella glitter pen to color it all up. Here's a little closeup for you!


And here's another fun fact for you! I might have mentioned a few weeks ago that right now most of my craft room is boxed up while I get situated in a new room. Well, that's still the case folks! We have some painting to do and counters to install so, I am still in limbo! So, as I was searching for some gold paper and not finding it, I decided to make my own! I punched a circle, covered it with Versamark ink and then covered it in gold embossing powder! Just that simple!  


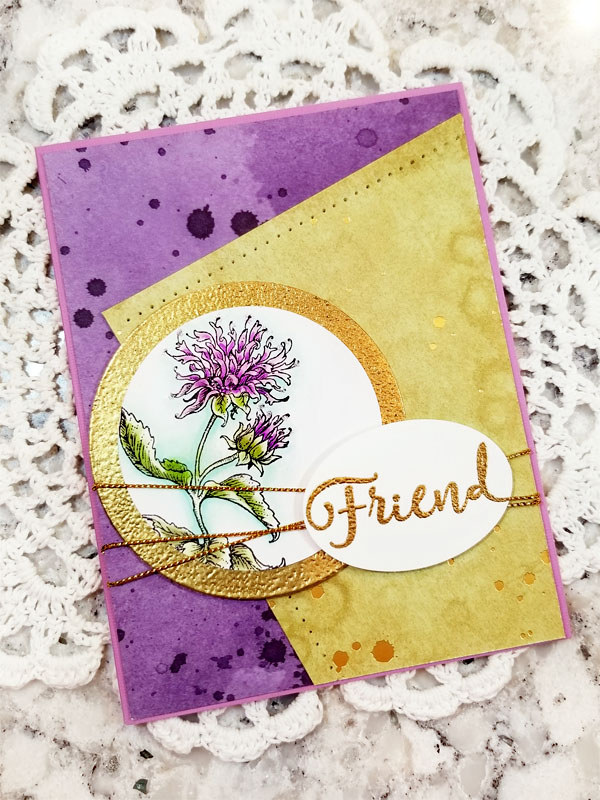
And GUESS WHAT? This isn't the only card I created! I actually created a trio using Power Poppy's Vibrant Thanks stamp set. Want to see?

Here's the second card....


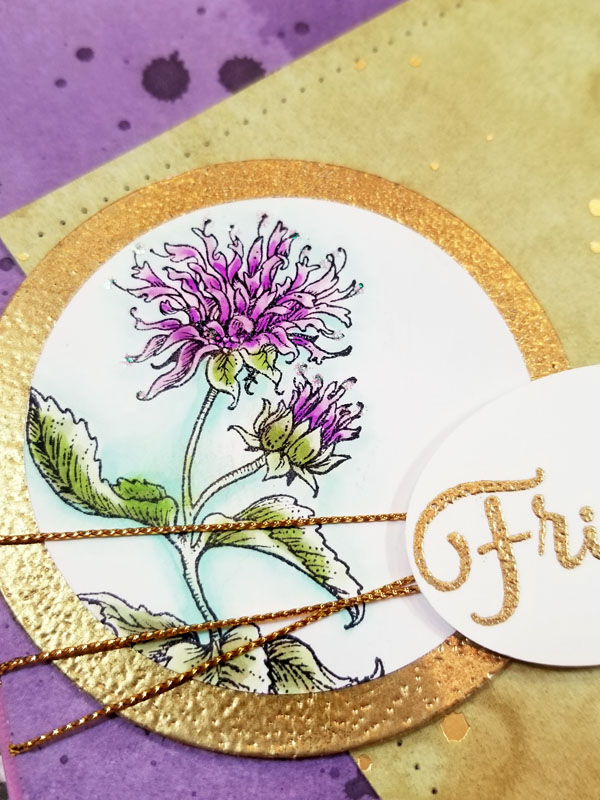
Here's the third. This one might just be my favorite since I love purple. ;-)


And, here's a peek at all three together! 


Hope you join me by playing along with me this week! Just click HERE to find out all about this week's challenge and remember, every time you play along during the month, it's one more chance to win a $25 trip to the Power Poppy Shop! Who wouldn't want that?


Since it's Friday, some of my fellow Bloomies are on standby ready and waiting to show you what they've been working on this week. So, without further ado, please pay these fine ladies a visit!


Be sure to stop by the Power Poppy Blog for a fun little Weekend Stamp Steal announcement featuring a beautiful array of... ORCHIDS! You'll want to check out that post for sure! ;-) 

Thanks for stopping by everyone & happy creating!

~Julie