Tuesday, October 11, 2022

A Power Poppy Halloween!


Hello all! Since we are three weeks away from 'The Night of Fright', I thought I'd share a little something I came up with on how to transform Marcella's super fun Halloween illustrations into home decor! 

I was at Michaels the other day and they have two rows full of wood pieces that you can use to create your own signs. That's where my idea was ignited! When I saw the options along with some of the fun wooden Halloween messages, I knew I had the start of something fun! 

Want to see what we are creating today? Here's a peek. 


Isn't that super fun? And, while I thought this might take me quite a bit of time to put together, I was done in a little less than 3 hours. I started by printing the digital stamp "Boo Cat & Pumpkins" at 81/2 by 11 inches. Basically, I opened it and printed it so that it would cover an entire sheet of card stock. My wooden base was 91/2 by 14 inches, so I thought this would work perfectly. Then, I continued with some loosey-goosey coloring. No need for super intricate coloring here! I used super large strokes and just colored with strokes instead of constant color. 

So this.....


Grew into this....


And, ultimately, this...


Now it was time to turn my attention to my sign! This is what I started with: a few bottles of acrylic paint, some foam brushes, the natural wooden sign, a natural Halloween sentiment and some decoupage glue. 


You can see I started painting the base of my sign black. I started wanting to cover only those cracks but quickly decided it would be better to give the entire sign a coat of black. You can see, I wasn't too careful to provide an even coat. I already knew I was going to cover this up a bit! 


From there, I took and dry brushed some purple paint over top to create a kind of weathered look. I also painted my Happy Halloween words --- although please ignore this color. After I painted this black I decided I needed a pop of color here and painted over top with a lime green shade of acrylic paint! 


And now, it's time to add my boo cat to this backdrop! I just fussy cut around my image cutting a jagged edge around the kitty so that I didn't have to cut all the little pieces of fur! After it was cut out, I attached it to the wooden base by putting some decoupage glue on the back side with one of the foam brushes. Make sure the edges of your paper don't curl. The key is to apply a super light coat, press down and then weigh the image down by covering it with a book or a few magazines to hold it all in place. 

From there, I added some layered ribbon at the top, securing with a little hot glue. I adhered the Happy Halloween wooden piece with some foam tape so that it would have some dimension. After everything was dry, it was time to add it to the hearth for a little home Halloween flair! What do you think?


And that, my friends, is it! A fun little way to use a digital stamp to create some home decor that's both frightful and fun! Until next time, 


Monday, July 11, 2022

A Little Word Play!

Hey all! I'm hosting Inspire Me Monday over on the Power Poppy Blog where I'm showing you step b step how to create this little number below! 


Just click HERE to join in the fun! Hope you have a wonderful and creative week! 


Monday, June 13, 2022

Inspire Me Monday!

Hello all! I'm hosting Inspire Me Monday over on the Power Poppy Blog and creating this fun window card with some tips & tricks! 


So click HERE and pop on over! Hope you have a wonderful and creative week!


Friday, March 11, 2022

Peace Offering

At the present time, the number of refugees fleeing the war-torn country of Ukraine has exceeded two million people. The images are heartbreaking. Due to the Russian invasion, food and supplies inside the country are becoming increasingly scarce. Organizations are on the ground in Ukraine and neighboring countries to help with these material and medical needs. And now, Power Poppy is lending its creative hand to the effort. 

In light of the events, Marcella has refreshed a drawing she did in 2016 when she created the stamp set, Folk Heart.  The set -- Peace Offering -- is based on European folk art flower designs. Added to the set are the words "PEACE" and "MIR," which translates to the word peace in Russian and Ukrainian. 

All profits from this digital image will go to the charity Sunflower of Peace to help support Ukraine with medical and humanitarian aid. Right now, the money is used by paramedics and doctors in the areas that are affected by the violence in Ukraine -- helping to dole out first-aid backpacks, medicine, medical instruments, and other means of survival that are saving hundreds of lives.

Let's take a look at my creation...


For my card, I ended up using the clear stamp set (my printer was out of ink -- oops!). The good news is, the image is exactly the same and, with a digital stamp, you can increase or decrease the size to suit your needs! I loved coloring up this whimsical image with Copic Markers and chose the colors of the Ukraine flag for my palette. 


After I was done coloring, I did go over bits of the image with a Wink of Stella glitter brush pen as well as some dots of white gel pen. 


And above, just one more close-up of the card and the vibrant shades of blue and yellow. 

Again, you can find this new digital stamp set HERE! 

Won't you please help us? Not only will you get this whimsical image and some beautifully hand-lettered sentiments, but you'll also be helping care for the Ukrainian people in ways they need most. 

Some of the other Power Poppy Designers are sharing their creative talents with this new digi. Be sure to visit....


Blessings to you! 


Wednesday, March 9, 2022

Still So Many Stamps!


Hello all!  I few weeks ago, I posted some goodies that my mom is selling to clear out some of her craft space! There's still so much left! Do you see something you like? Make an offer! Simply share the item number and email me at juliekoerber@gmail.com.

All prices are listed with the shipping cost as well. Pay Pal is the preferred form of payment. Thanks for looking! NOTE: If you buy multiple items, I will work to combine and lessen the shipping by using a flat rate box. 

ALL ORDERS WILL INCLUDE A SPECIAL SURPRISE 
GIFT FOR AS LONG AS SUPPLIES LAST! 


CHECK OUT THE OFFERINGS HERE!

Wednesday, February 23, 2022

Stamps for Sale!


Hello folks! I am helping my mom clean out her stamping space. She's acquired a lot of stuff over the years and it's time to pare down! If you like something on the list, please email me at juliekoerber@gmail.com and let me know the item numbers you would like to purchase. 

All prices are listed with the shipping cost as well. Keep in mind, I will only hold items for 24 hours. After that point, I will seek out the second person in line for that item. Pay Pal is the preferred form of payment. Thanks for looking! NOTE: If you buy multiple items, I will work to combine and lessen the shipping by using a flat rate box. 


ALL ORDERS WILL INCLUDE A SPECIAL SURPRISE 
GIFT FOR AS LONG AS SUPPLIES LAST! 

What does this mean? It might mean you get an embossing folder or a stamp that isn't a part of what we have listed here! Since my mom wants to pare down -- her loss is your gain! ;-) 


CHECK OUT THE OFFERINGS HERE!

Friday, October 22, 2021

Folklore Flora - The Fig!

Hello all! How has life been treating you this week? Wonderful, I hope! I have really enjoyed breaking out my markers and taking some time to color. Confession, I always put on some jams and many times sing at the top of my lungs when I color. It alarms my husband, who also works at home but heck, I call it entertainment. He's lucky I don't charge cover. HA! 

Moving on! Did you see Power Poppy's new digital release that pays homage to some beautiful plants with equally beautiful meanings? Check it out! These beauties were released last week. There are four images in all. You can see each one of them HERE!  


Today, I wanted to bring you part two of my escapade into this digital set. If you missed my first offering, just click HERE! Last week, I colored up Folklore Flora Apple! 

Moving on to today's creation!


Marcella illustrated a gorgeous fig plant and ... who knew the meaning behind a fig was "enlightenment?" Not me! 

I colored this image up with Copic markers and had fun just reaching for different combinations of green and violet. I stuck more to the YG greens to add a little hint of yellow to my figs. They really are so interesting in their coloring and go from a vibrant green to a deep almost grey purple. I even added a few shades of deep red here so that my figs didn't end up too grey. I real life they are but I was worried mine would look like a muddy blob! LOL! 

I used V01, V06, V12, R35, R39, V09, and a bit of BV00. The leaves were G20, G40, G21, YG63, and a little bit of YG21. I had a few other colors I reached for but they were minor players. 

Here's a closeup for you! 


When it came to layering up my card, it was super simple because this illustration is so large. It fills an entire card front. So, I added a little punched corner, some cording and a button and ... ta da! Done! 

So, again, if you want to check out this collection, all you need to do is click HERE! There are two other images in this set and... if all goes as planned, I plan to bring you my versions of them in the next two Fridays! 

Hope you have an amazing weekend and I'll see you back here soon! 


Sunday, October 17, 2021

Introducing.... Folklore Flora!

Wow... it's been a hot minute since I have posted but thankfully, Marcella over at Power Poppy gave me a reason to dust off my Copic markers and take a little time just coloring with glee. It had been so long I felt I almost forgot how to do it. But, as my breathing slowed and I studied her gorgeous illustration, I realized just how badly I missed this sensation - slowing down and getting lost in the craft. 

Today Marcella is releasing four new digital images that are oh so beautiful and have a sweet meaning behind each drawing. So, it's time to take a peek at.... 


Folklore Flora is a four-piece set that not only comes in black line but greyscale for no-line coloring. Marcy is actually doing something brand new as well! She is offering her painted artwork for download so if you want to create an instant notecard that is all beautifully colored and ready to go -- you can! She's taken the work out of it for you. While I love the coloring journey, I think that this option is so nice for those times when you need a gorgeous card in a jiffy. 

On to my creation! 


I grabbed my Copic markers and really just reached for colors as I went. The apples are mostly R30, R35, R39, R59 and a little BV00 to accent the shaded areas. I grabbed a whole host of greens, too many to list and then added a little Y32 to spots to add a little golden glow. 

The beautiful thing about this illustration is that because it is so large, you don't need a ton of extras to make it into a card. I decided to put my illustration on a slant, add a button and twine and... ta da! Done!

I will say that I knew I wanted to add the button and so I created a space for it by erasing the name "Thoreau" from the quote. So sorry Thoreau. I love your quote and I didn't mean to "dis" you by not acknowledging it! But, a gal needed space for a button! Ha! 

Here's a little closeup for you!


Want to see what the other gals did with these beautiful illustrations? A few of the designers took on the mission. Stop by to see what they have in store! 


And, don't forget to stop by the Power Poppy Shop to see what Marcy has to say about this new collection! 

Just a little FYI -- I am hoping to color all of these and will be sharing a post hopefully each Friday until all four are colored! So, stay tuned! I promise it won't be so long until my next post. 


Monday, November 16, 2020

Power Poppy Quiet Christmas: Joy to the World!


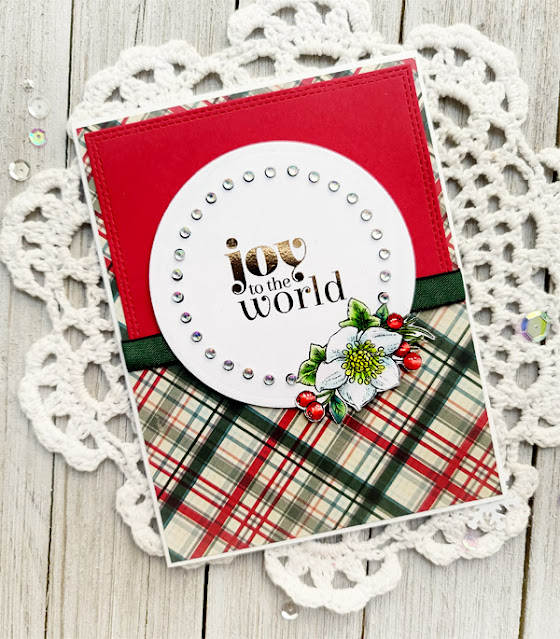
Hi all! Happy Monday everyone! Today, Power Poppy's Quiet Christmas Release offers a little something for everyone and today's final post of our release offers a big and bodacious bouquet that might make you swoon! Check out Joy to the World Bouquet -- a set filled with Christmas botanicals and some beautiful sentiments to accompany them! 


When I looked at this big and beautiful set of blossoms, while I LOVED the enormous cluster of flowers, I wanted to show a sweet and delicate card using just the smaller image in this set along with one of the sentiments. So, here's what I did! 


I loved the sentiment and chose to make it the focal point. I downloaded a dotted circle frame that I found on the net to serve as my guide for my rhinestones, then, I used the digital version of this sentiment, dragged and dropped it into the middle of my circle frame, printed on my laser printer and then, using my foil system (a laminator and some rose gold foil), I placed a piece of foil only on the sentiment and ran in through my laminator. I love this! I have to say, I did remove a portion of the circle frame by erasing it digitally so that I could stamp my flower at the edge of the frame. I did fussy cut this before I ran it through my die, making sure to lift this portion over the top of the die so that it wouldn't be cut in the process. I love the effect!

From there, I just colored up my flowers with Copic markers, using a few shades of red and green for the berries and leaves. And then YG000 and YG00 for the center portion of my lenten rose along with some B0000 to highlight some of the petals. And... ta-da! Done!

Here's a little close up for you!


And that, my friends, is it! 


Now, I have to tell you, I saw some of the samples from my fellow Bloomies, so you are going to want to pay these fine ladies a visit to see their Joy to the World Bouquet creations. So stunning!


Thanks for stopping by! We hope you love the sets the Bloomies have been showing off this week! Did you know that you can buy either this leg of the release or the one we unveiled in October as bundles for a discount? YES! You can! Just click HERE to take a trip to the Power Poppy Shop if you love and have to have them all! Have a wonderful rest of your week and I'll see you back here soon!


Saturday, November 14, 2020

Power Poppy Quiet Christmas: Seasons Greenings!


Hi all! Happy Saturday everyone! Today, Power Poppy's Quiet Christmas Release offers a little something fun for those green thumbs! Check out Seasons Greenings -- a set with garden-inspired Christmas images and more than a half dozen sentiments and sayings to send off some snail mail cheer! Check it out! 


Earlier this week on Creative Confetti, I showed off this colored up image below. The challenge was to just color and that's all I had time for as the Bloomies prepped for this fun-filled release!


And, below is what my card looked like all put together! I decided with an illustration this detailed, a simple layout was in store -- a little plaid paper, a little floral red decorative paper, stitched edge dies and a few rhinestones and that's it! 


I think this set is so darling and there are three main images that are oh-so-unique! Speaking of unique....


You'll have to stop by these ladies to see their spin on this new and whimsical set!

Barbara W
Jenn Dove 
SathyaKala 
Leslie  
Gloria  
Barbara C 
Allison
Jenny 


Thanks for stopping by! Remember, the Power Poppy fun continues through Monday so, be sure to swing back and see what else is in store!


Friday, November 13, 2020

Power Poppy Quiet Christmas: Enchanted Branches Woodland


Hi all and welcome to day two of Power Poppy's November Quiet Christmas release! We hope you loved the kickoff yesterday! If you missed it, make sure you swing over to the Power Poppy Blog for a peek! The new Forest Fellas set is too darling to pass up!

Today's set also has a woodland theme! Enchanted Branches Woodland is a charming and woodsy way to deliver a little Christmas cheer! 

 
With a branch to set the scene, you have a whole host of goodies you can use to deck it out - from moss and lichen to pine cones and mushrooms galore! There's even a darling little squirrel standing at the ready!

On to my creation!


With so many "scenes" to create, this set really let's the imagination flow! I had a blast adding ornaments and moss to bring this branch to life! I love clear stamps for this reason! It is just so easy to align images and put them exactly where you want them!

After all my images were stamped, I loved reaching for all these earthy colors of Copic markers to bring my branch to life! I adore the little mushroom!


Once I was done coloring the images, I did add Y0000 and YR0000 around the branch to give it a warm glow and take some of the starkness of the white paper away. From there, it is just matting it all up! I added some plaid paper, a kraft base and a wooden button for a little rustic charm! Tada!

Now be sure to hop on over to see what these fine ladies did with this one of a kind set!


Christine
Gloria
Barbara
Lisa
Allison
Broni
Power Poppy Blog


Thanks so much for stopping by and spending a little time with me! Tomorrow, the fun continues and the set the Bloomies will be sharing has a little something for everyone all illustrated with Marcella's trademark whimsical flair! So, swing on back and see what she has in store!


Thursday, November 12, 2020

Power Poppy Quiet Christmas: Forest Fellas!


Hi all and welcome to PART TWO of Power Poppy's Quiet Christmas release! Back at the end of October, the Bloomies showcased five new holiday and winter-themed sets that won so many of you over. Well, get ready for the second installment with more illustrations bound to knock your creative socks off! Today's set is for the lover of those creatures that dwell in the forest and this set comes with a whole host of sentiments that will have you reaching for this set all year long! 


Take a peek at the new set Forest Fellas! Isn't it absolutely adorable? I love each and every one of the "fellas" in this set and know I will have fun creating. Because I have an affinity for owls, I had to reach for that image first! 

On to my creation! 


When I was "Googling" owls, I realized this one bore a resemblance to the Barred Owl. Oh my gosh, click the link and you'll see -- so cute! I know, many of you might say, an owl? Cute? Yep. That's my story and I'm sticking to it! 

I colored this fella using the photos of the owl as my guide and literally scribbled shades of brown all over the feathers and then with the tip of my Copic, flicked color on the body to give the impression of texture. Not sure it worked! I am not the best at feathers, fur or hair. :-) After I was done coloring him up, I added BV0000 and BV00 to the background to give a kind of wintery feel and added some white gel pen to give the effect of snow. I really think it turned out cute and I will have fun sending this bit of snail mail off to a friend! 


Want to see what the rest of the Bloomies did with this darling set? Just hop on over to see these fine ladies and don't forget to pay the Power Poppy blog a visit to see the back story on this set from Marcella herself! 


Tomorrow's set is one with another woodland theme. It's creative and over the top fun, so swing on back and see for yourself! 


Until then!